Click Purchase Button =>> View License =>> Click Key Icon and Copy your Licence Key.
After Download Premium Theme Kindly Install and Activate
How to Activate License Key?
Login to your WordPress site and go to Appearance =>> Theme License Enter the license Key then click the save Changes Button.
2. Storely Theme Installation
How to install Storely Woo commerce Theme ?
You can install Storely in two very easy ways.
Option:- 1
Login Site, Go to Dashboard =>> Appearance =>> Themes =>> Add New and search for Storely. Install and activate it.
Option:- 2
Login Site, Go to Dashboard =>> Appearance =>> Themes =>> Add New =>> Upload Theme Your pc Location and Install and activate it.
Now your Storely Woo commerce theme is installed.
Thanks Reading this Article
3. Homepage Setup as a Frontpage
You can Set as Homepage as a Frontpage Following in two very easy Steps.
Step 1:- Login Site, Go to Dashboard =>> Pages =>> Add New Page=>> Enter Page Title, Select Page Template " Homepage" Then Click Publish Button.
For more help see the attachment given below:-
Homepage Setting
Here you can choose what’s displayed on the homepage of your site. The options are:
Go to Setting =>>Reading =>>Select a Static page Check Box> Select Home> And Click save change Button.
For more help see the attachment given below:-
Thanks Reading this Article
4. Demo Import
You need to install required plugins before importing premade demos
=>> How Install Requred Plugins?
Login Your Wordpress Dashboard, Go to Appearance =>> Install Plugins =>> Install & Activate it.
=>> One Click Demo Import?
Before Import Demo, Confirm that the One Click Demo Import plugin has been installed and activated
Go to Appearance=>> Premade Demos=>> Click Import Demo Data Button
Not:- Demo Importing process will take some time. Kindly be patience.
Please sit tight while we import your content. Do not refresh the page or hit the back button.
5. Header Section Setup For Storely and Child Themes
Site Identity
=>> How To Upload Logo?
Login Site, go to Dashboard, Appearance=>> Customizer=>> Header=>> Site Identity Upload Logo Then Click Publish Button
For more help see the attachment given below:-
=>> How to Manage Site Title & Tagline?
Login Site, go to Dashboard, Appearance=>> Customizer=>> Header=>> Site Identity =>> Site Title and Tagline> Add Your Site Title and Tagline Then Click Publish Button.
For more help see the attachment given below:-
=>> How Manage Your Logo Width?
Login Site, go to Dashboard, Appearance=>> Customizer =>>Header=>> Site Identity=>> Logo Width, Drag and manage Logo Width Then Click Publish Button
=>> How Manage Hide/Show Site Title and Tagline?
Login Site, go to Dashboard, Appearance=>> Customizer=>> Header=>> Site Identity=>> Click Check Box and Hide/Show Then Click Publish Button
=>> How To Upload Site Icon?
Login Site, go to Dashboard, Appearance=>> Customizer=>> Header=>> Site Identity=>> Select Site Icon =>> Upload image Then Click Publish Button
3 Step Given Screenshot For more help see the attachment given below:-
=>>How Manage Site Title & Tagline Font Size?
Login Site, go to Dashboard, Appearance=>> Customizer=>> Header=>> Site Identity=>> Typography=>> Add title & Description Font Size =>>Then Click Publish Button
For more help see the attachment given below:-
Header Type
=>> How Select Type of Header?
Login Site, go to Dashboard, Appearance=>> Customizer=>> Header=>> Type Header=>> Select Header and Click Publish Button
For more help see the attachment given below:-
Above Header
=>> How to Manage Header Layout?
Login Site, go to Dashboard, Appearance=>> Customizer=>> Header=>> Above Header=>> Select Header Layout Click Publish Button
For more help see the attachment given below:-
=>> Can i Add Text/Custom Html in Above Header Left Side(Section1) Area?
Yes, Login Site, go to Dashboard, Appearance=>> Customizer=>> Header=>> Above Header=>> Click Section1 and Select Text and Custom Html Widget and Add Your Text/Html Here then Click Publish Button
For more help see the attachment given below:-
=>> Can i Change i Add more Social Icon Section2?
Yes of course, Login Site, go to Dashboard, Appearance=>> Customizer=>> Header=>> Above Header=>> Click Section2 and Select Social Icon Widget and Add Social Link and Icon Here then Click Publish Button
=>> Can i Manage Navigation Right side Area icon Hide/Show?
Yes of course, Login Site, go to Dashboard, Appearance=>> Customizer=>> Header=>> Header Navigation=>> Click Checkbox and Manage Hide/Show Click Publish Button
For more help see the attachment given below:-
=>> Can i Change Navigation Right side Area Cart Docker Style, Cart Title, Cart Close Title, Button Label and Link?
Yes of course, Login Site, go to Dashboard, Appearance=>> Customizer=>> Header=>> Header Navigation=>> Select Cart Docker Style, Enter Cart Title, Cart Close and Button Label Then Click Publish Button
For more help see the attachment given below:-
=>> Can i Change Navigation Right side Area Button Label and Link?
Yes of course, Login Site, go to Dashboard, Appearance=>> Customizer=>> Header=>> Header Navigation=>> Enter Button Label Then Click Publish Button
For more help see the attachment given below:-
Browse Section
=>> Can i Manage Browse Category Hide/Show and Change Title?
Yes of course, Login Site, go to Dashboard, Appearance=>> Customizer=>> Header=>> Browse Category Section=>> Click Check Box and Manage Hide/Show and Enter Title Then Click Publish Button
For more help see the attachment given below:-
=>> Can i Manage Product Hide/Show?
Yes of course, Login Site, go to Dashboard, Appearance=>> Customizer=>> Header=>> Browse Category Section=>> Product Search=>> Click Check Box and Manage Hide/Show Then Click Publish Button
For more help see the attachment given below:-
Sticky Header
can i turn sticky header on and off:-
Yes Why not, Login Site, Go to Dashboard, Appearance>Customizer>Header>Sticky Header > Click Checkbox Hide/show Sticky Header Then Click Publish Button
For more help see the attachment given below:-
6. Slider Setup
How to setup slider?
We have given a very easy Customizer setting, using which you can easily setup the slider.
Front Page Section
Slider Setup
=>>How to Manage Slider Content?
You will login to your site and follow the location
Go to Dashboard Appearance =>> Frontpage Section =>> Slider Section =>> Content =>> Slide, After Click Slide menu Fill Title, Subtitles, Description, Buttons Label and Links & Choose Background Image Upload 1st Box, Upload Second Box Sub Image, Click you Can Delete Slide and Click Add New Button Add New Slides Then Click Publish Button
For more help see the attachment given below:-
Add Images on Slider
=>>How to Manage Slider Animation and Typography Color?
You will login to your site and follow the location
Go to Dashboard Appearance =>> Frontpage Section =>> Slider Section =>> Content=>> Add Slides In and Out Animation, Select Slide Color and Manage Change Slider Text Color Then Click Publish Button
For more help see the attachment given below:-
7. Sales Info Section Setup?
You can add sales info section very easily
Login Your Site, Go to Dashboard, Appearance =>>Customize =>> Frontpage Section =>>Sales Info Section =>> First, Add Title, Subtitle, Enter Your Offer Text and Coupon Code Then Click Publish Button.
For more help see the attachment given below:-
8. Popular Product Section Setup?
=>> Can I Change Product Title?
You absolutely can follow this Article Login Your Site go to Appearance=>> Customizer=>> FrontPage=>> Popular Product Section=>> Header=>> Title=>> Now Change the Title.
. Then Click Publish Button.
For more help see the attachment given below:-
=>>Can I Manage Category Hide/Show and Select Category Filter?
You absolutely can follow this Article Login Your Site go to Appearance=>> Customizer=>> FrontPage=>> Popular Product Section=>> Content=>> Now Click Checkbox and manage Category Hide/show.
. Then Click Publish Button.
For more help see the attachment given below:-
=>>Can I set the product in 2 or 3 columns?
You absolutely can follow this Article Login Your Site go to Appearance=>> Customizer=>> FrontPage=>> Popular Product
Section=>> Content =>> Select Column=>> Now Select Column
Then Click Publish Button.
For more help see the attachment given below:-
=>>Can I show more than 1 product or less than that?
You absolutely can follow this Article Login Your Site go to Appearance>Customizer>FrontPage> Popular Product Section>Content >No of Products Display. You can manage with the range slider how many products you have to show
Then Click Publish Button.
For more help see the attachment given below:-
=>>Can I Manage product Animation Speed?
You absolutely can follow this Article Login Your Site go to Appearance>Customizer>FrontPage> Popular Product Section>Content >Animation Speed. You can manage with the range slider how many products you have to show
Then Click Publish Button.
For more help see the attachment given below:-
9. Post Banner Setup?
=>> Can I Change Post Banner Left Content?
You absolutely can follow this Article go to Appearance=>> Customizer=>> FrontPage=>> Post Banner Section=>> Left Content=>>Title, Description, Button Label and Link =>> Now Change the Title.
. Then Click Publish Button.
For more help see the attachment given below:-
=>>How to Manage Mockup Slide Images Hide/Show and Add New Slide?
You absolutely can follow this Article go to Appearance=>> Customizer=>> FrontPage=>> Post Banner Section=>> Right Content =>> Now Click Checkbox Manage Hide/Show Mockup And Upload Image and Publish Now.
For more help see the attachment given below:-
=>>How to Change Right Images?
You absolutely can follow this Article go to Appearance=>> Customizer=>> FrontPage=>> Post Banner Section=>> Right Content =>> Now Click Upload Image then Upload Image and Publish Now.
For more help see the attachment given below:-
=>>How to Change Background Image?
You absolutely can follow this Article go to Appearance=>> Customizer=>> FrontPage=>> Post Banner Section=>> Right Content =>> Now Click Upload Image then Upload Image and Publish Now.
For more help see the attachment given below:-
10. Service Section Setup?
=>> How to Add Service Title & Description and Link?
You absolutely can follow this Article go to Appearance=>> Customizer=>> FrontPage=>> Post Banner Section=>> Left Content=>>Title, Description, Button Label and Link =>> Now Change the Title.
. Then Click Publish Button.
For more help see the attachment given below:-
=>> Can I use an image instead of an icon?
Yes, You Can follow this Article
go to Appearance=>> Customizer=>> FrontPage=>> Service=>> Select Your icon and image
and add link then click publish Button.
For more help see the attachment given below:-
=>> Can I Manage Service Column?
Yes You Can follows this Article
go to Appearance=>> Customizer=>> FrontPage=>> Service=>> Select Column=>> Select Prebuild Column settings then click publish Button.
go to Appearance=>> Customizer=>> FrontPage=>> Deal of the Day=>> Header=>> Title=>> Enter your Title Here and Click Checkbox on Manage Hide/Show then click publish Button.
For more help see the attachment given below:-
=>> How Create Countdown Timer?
Yes You Can, follows this Article
go to Appearance=>> Customizer=>> FrontPage=>> Deal of the Day=>> Header=>> Countdown=>> Select Date and Time then click publish Button.
For more help see the attachment given below:-
=>> How to Assign Category in Deal of the Day Section?
Yes You Can, follows this Article
go to Appearance=>> Customizer=>> FrontPage=>> Deal of the Day=>> Header=>> Content=>> Select Category the product you want to show Category Select You can also assign multiple categories then click publish Button.
For more help see the attachment given below:-
=>> Can I Manage my product column?
Yes You Can, follows this Article go to Appearance=>> Customizer=>> FrontPage=>> Deal of the Day=>>Content=>> Select Columns =>> Select Predefine Column Dropdown and Select 2 column, 3column, 4column Product then click publish Button
=>> Can I have more or less product shows and Add Animation?
Yes You Can, follows this Article
go to Appearance=>> Customizer=>> FrontPage=>> Deal of the Day=>> Header=>> Content=>> No of Product Display =>> Enter the value of the number of products you want to show then click publish Button.
13. Blog Page Setup?
=>> How to Make Blog Page?
Yes You Can, follows this Article
Login Your Site Go to Dashboard, Pages=>> Add New=>> Enter Page Name=>> Click Now Publish Button
For more help see the attachment given below:-
=>> How to Assign Blog Page on Page Template?
Yes You Can, follows this Article
Login Your Site Go to Dashboard, Pages=>> Setting=>> Reading=>> Select Static Page=>> Select Post Page “Blog” Then Click Save Change Button.
For more help see the attachment given below:-
=>> How to Assign Blog Masonry Page Category?
Yes You Can, follows this Article
Login Your Site Go to Dashboard, Appearance=>> Customizer=>> Page Template=>> Blog Page=>> Blog Masonry=>> Select category for Blog Masonry Page=>> Then Click Publish Button.
For more help see the attachment given below:-
=>> How to Make Blog Sticky?
Yes You Can, follows this Article
Login Site, Go to Dashboard Appearance=>> Customizer=>> Page Template=>> Blog Page=>> Blog Sticky=>> 1. You Select Default Page Layout
2. Add Sticky Content
3. Select Background Color
Click Pubish Button.
For more help see the attachment given below:-
14. Trending Product Setup?
=>> How to Add Trending Product Section?
Yes You Can, follows this Article
Login Your Site and Go to Dashboard, Appearance =>>Customizer =>> Frontpage =>> Trending Product
01Step:- Enter Your Section Title
02 Step:- Click a 1st Checkbox on Manage Trending Filter Category Hide/Show
03 Step:- Click a 2nd Checkbox on Manage Trending Filter Category Images Hide/Show
04 Step:- Assign the category of the product you want to appear in this section
05 Step:- Select No of Products Display You Want
Then Click Publish Button Save Your Changes.
For more help see the attachment given below:-
15. Footer Setup?
=>> How to Setup above Footer?
Yes You Can, follows this Article
1. Left Content
Go to Appearance=>> Customizer=>> Footer=>> above footer=>> Left Content
1. Click Checkbox and Manage above footer hide/show
2. Enter Title
Then Click Publish Button.
2. Right Content
2. Add More Content Click add New Button
=>> How to Setup Footer Widget Area?
Go to Appearance=>> Customizer=>> Footer=>> footer widget=>> Left Content=>>
1. Left Content
1. Click Checkbox and Manage Content Hide/show
2. Click Change Upload Logo.
3. Enter Title
Then Click Publish Button.
2. Content
Go to Appearance>Customizer>Footer>footer widget Area>Left Content>
1. Enter Title
2. Enter Link
3. Upload Icon
3. Footer Layout
Go to Appearance>Customizer>Footer>footer widget Area>Footer Widget Layout > Select Layout and Click Publish Button Save your Changes.
=>> How to Setup Below Footer?
1. Layout
Go to Appearance>Customizer=>> Footer=>> Below Footer=>> Layout =>> Select Layout and Click Publish Button Save your Changes.
2. Section1
Go to Appearance>Customizer=>> Footer=>> Below Footer=>> Section1 =>> Text/Html And Footer Menu Widget and Click Publish Button Save your Changes.
Example:- If you have selected text/html widget then add custom HTML
Download Apps
Then Click Publish Button
3. Copyright Content
Go to Appearance>Customizer=>> Footer=>> Below Footer=>> Copyright Content =>> Enter Your Text Here and Click Publish Button Save your Changes.
Login Your Site and Go to Dashboard, Appearance =>>Customizer =>> Footer Widget Area =>> Click ADD Pluse Icon and add Widget then Click Publish Button.
For more help see the attachment given below:-
17. Manage Header Text Color and Background Color?
Yes You Can, follows this Article
Login Your Site and Go to Dashboard, Appearance =>>Customizer =>> Color =>> Header Text Color, Background Color Select Color then Click Publish Button.
For more help see the attachment given below:-
1. Header Text Color
2. Background Color
18. Upload Header Images?
Yes You Can, follows this Article
Login Your Site and Go to Dashboard, Appearance =>>Customizer =>> Header Image =>> Click ADD New Image Button Upload Image then Click Publish Button.
For more help see the attachment given below:-
19. General Setup
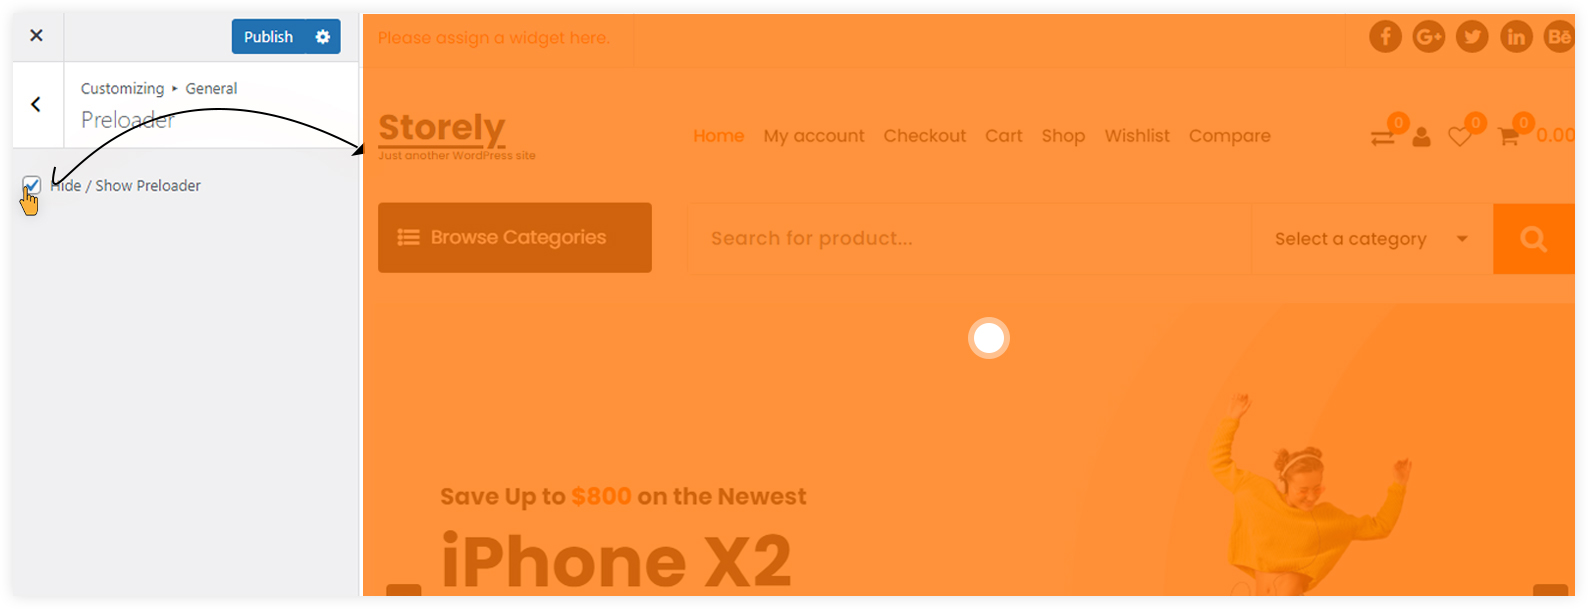
Preloader
=>>can i enable/disable the Preloader?
Yes, Of Course Login Site, go to Dashboard, Appearance=>> Customizer=>> General=>> Preloader=>> Click Check and Manage Hide/Show Preloader Then Click Publish Button
For more help see the attachment given below:-
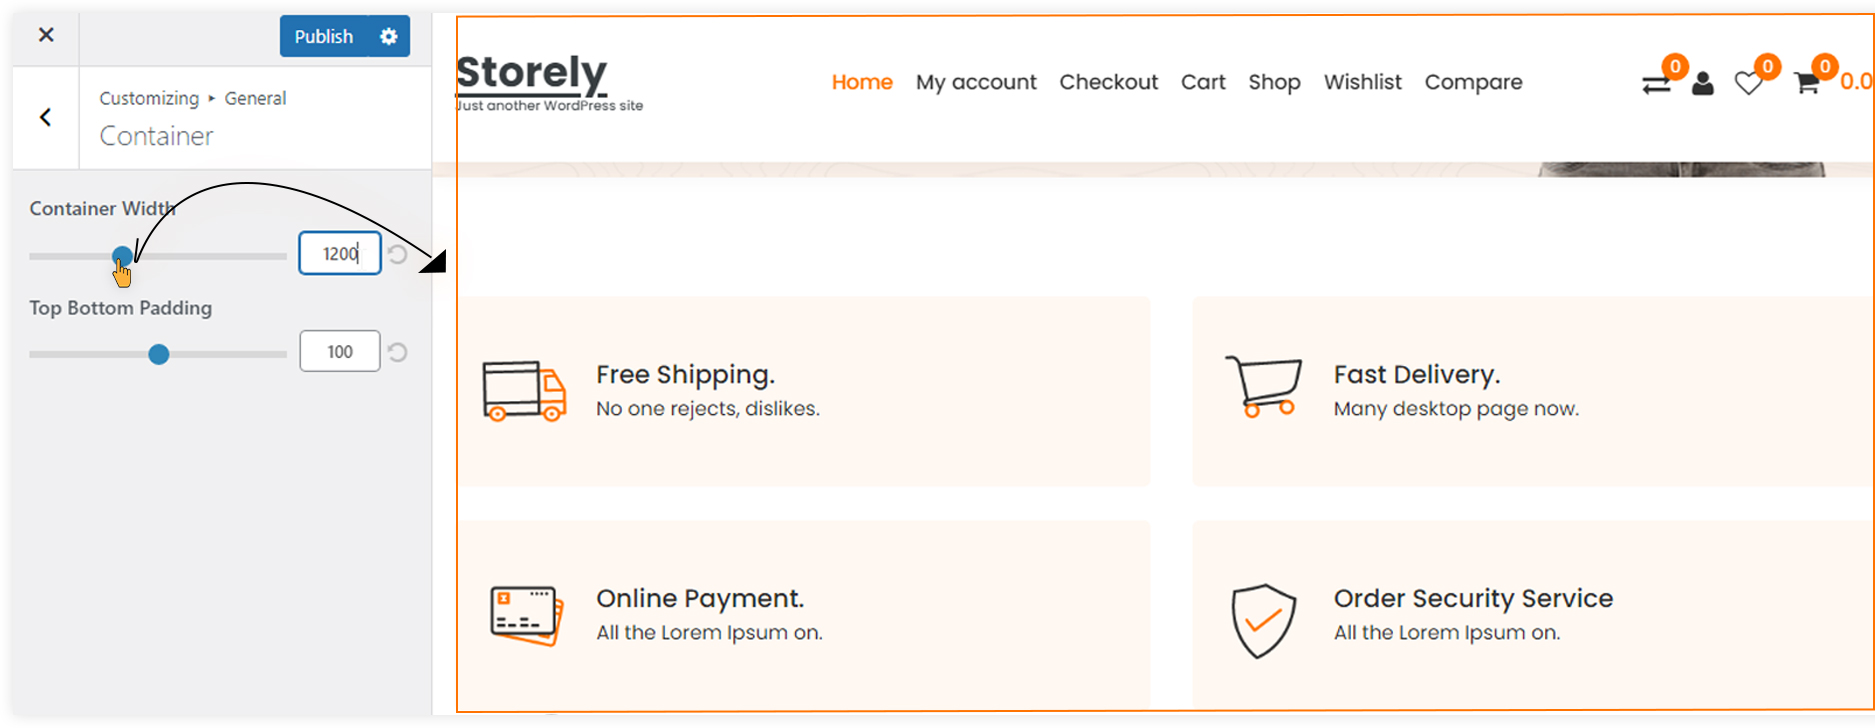
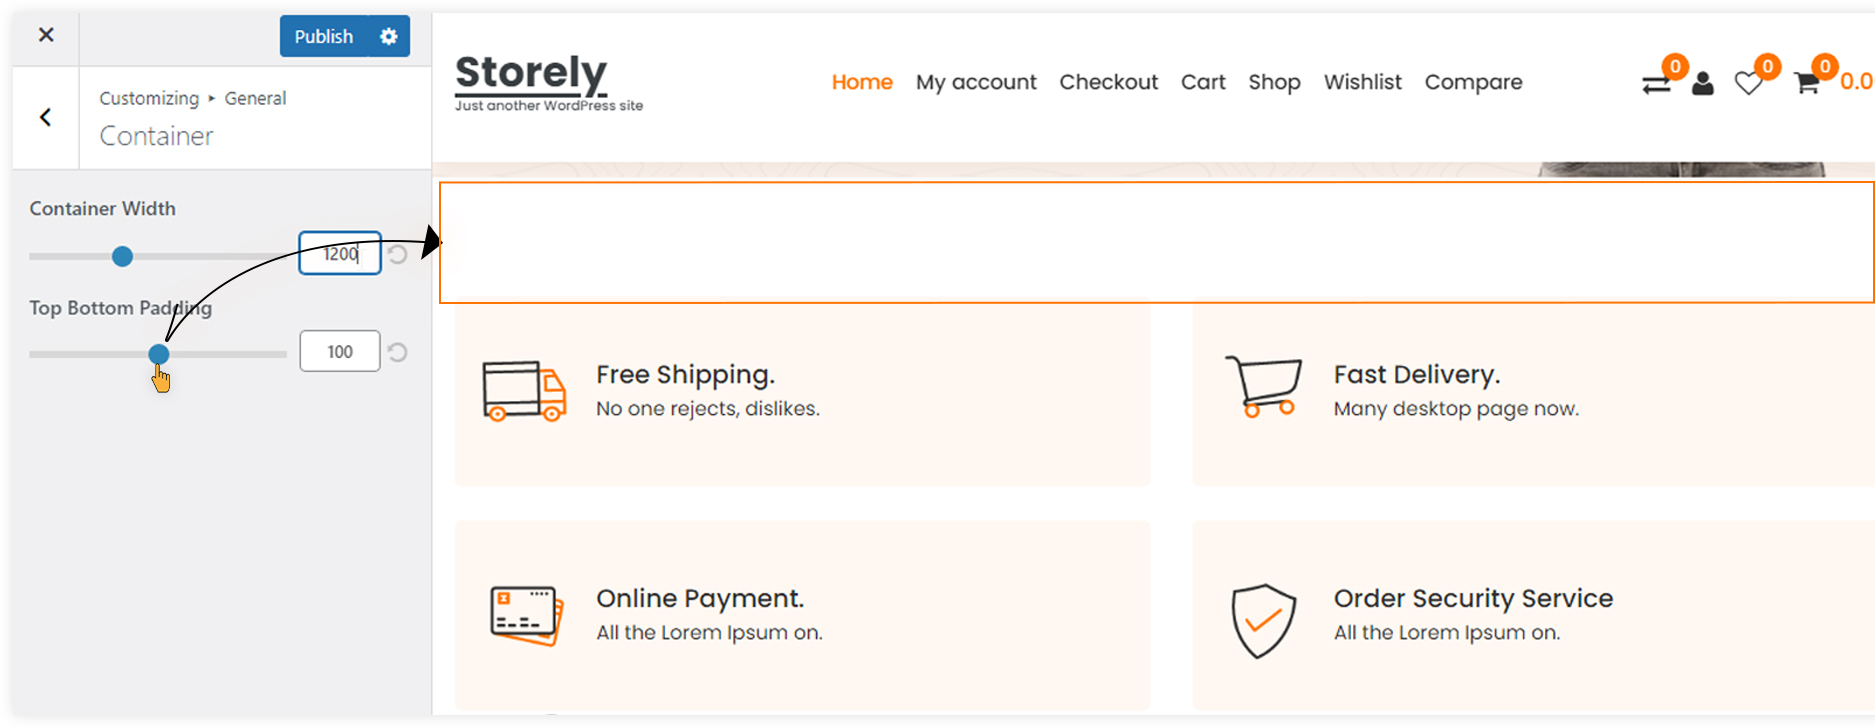
Container
=>> Can I increase or decrease the width of the container?
Yes, Of Course Login Site, go to Dashboard, Appearance=>> Customizer=>> General=>> Container =>>Container Width=>> Slide range slider or Fill Value Then Click Publish Button
For more help see the attachment given below:-
=>> Can I increase or decrease the Top Bottom Padding of the Sections?
Yes, Of Course Login Site, go to Dashboard, Appearance=>> Customizer=>> General=>> Container =>> Top Bottom Padding=>> Slide range slider or Fill Value Then Click Publish Button
For more help see the attachment given below:-
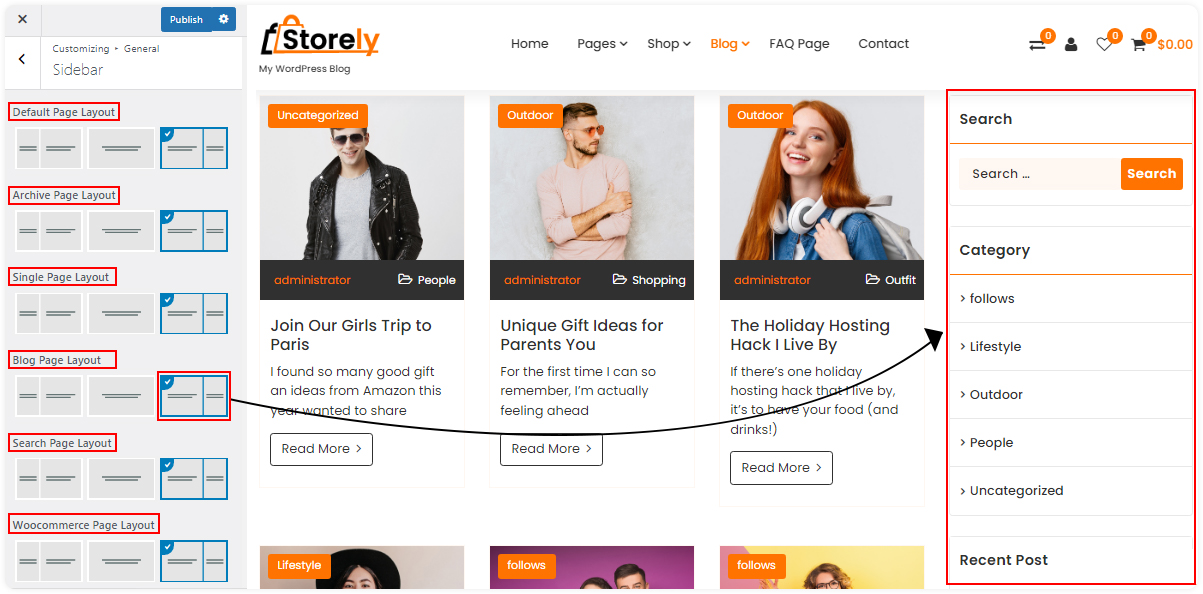
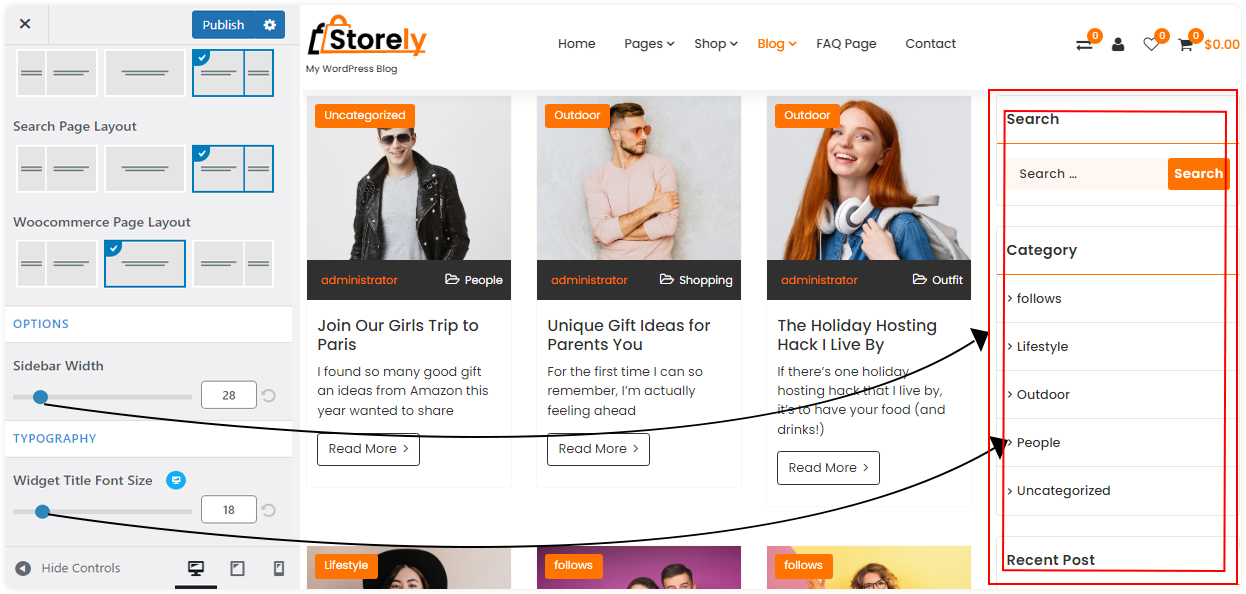
Sidebar
=>> Can I set the blog page's sidebar to the right, left, or center?
Yes, Of Course Login Site, go to Dashboard, Appearance=>> Customizer=>> General=>> Sidebar =>> default page Layout =>> Click Layout and add you want Then Click Publish Button
Login Site, go to Dashboard, Appearance=>> Customizer=>> General=>> Sidebar =>> Archive Page Layout Click Layout add you want Then Click Publish Button
Login Site, go to Dashboard, Appearance=>> Customizer=>> General=>> Sidebar =>> Single Page Layout Click Layout add you want Then Click Publish Button
Login Site, go to Dashboard, Appearance=>> Customizer=>> General=>> Sidebar =>> Blog Page Layout Click Layout add you want Then Click Publish Button
Login Site, go to Dashboard, Appearance=>> Customizer=>> General=>> Sidebar =>> Search Page Layout Click Layout add you want Then Click Publish Button
Login Site, go to Dashboard, Appearance=>> Customizer=>> General=>> Sidebar =>> Woocommerce Page Layout Click Layout add you want Then Click Publish Button
For more help see the attachment given below:-
=>> Can I set Sidebar Width and Typography?
Yes, Of Course Login Site, go to Dashboard, Appearance=>> Customizer=>> General=>> Sidebar =>> Options =>> Slide range slider or Fill Value Then Click Publish Button
For more help see the attachment given below:-
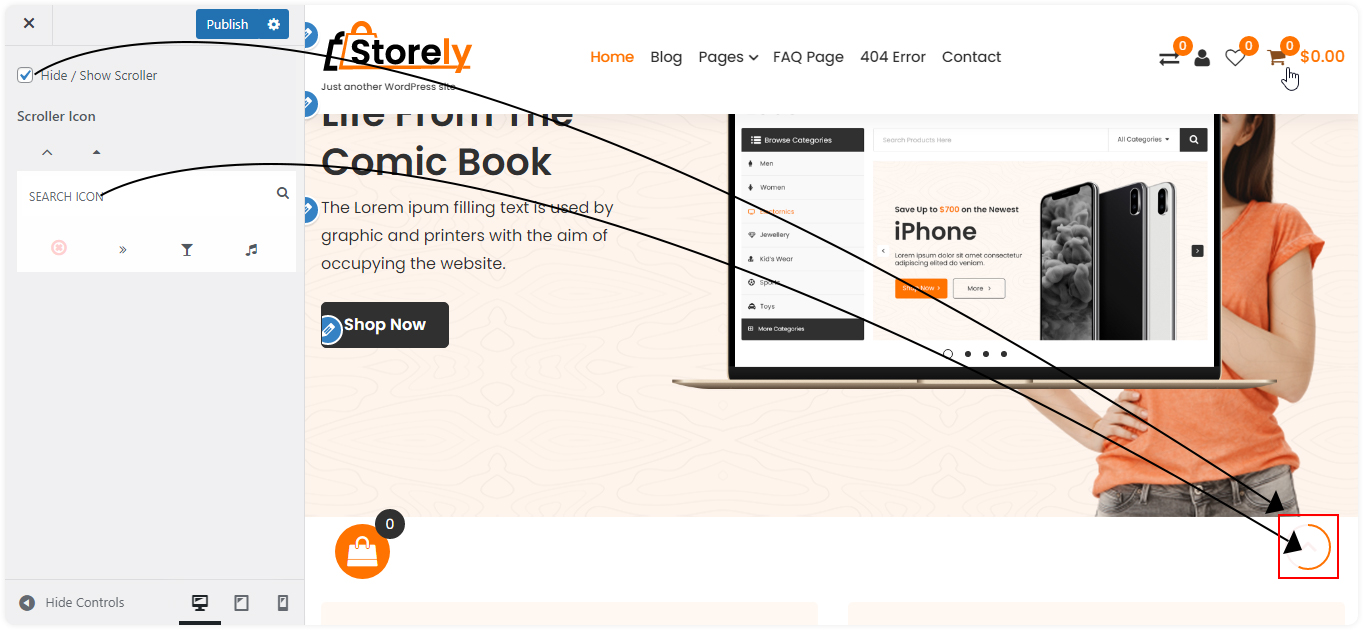
Top Scroller
=>> Can I Change Top Scroller Icon and Hide/Show?
Yes, Of Course Login Site, go to Dashboard, Appearance=>> Customizer=>> General=>> Top Scroller =>> Click Checkbox and Manage Hide/Show and Then Click Publish Button
For more help see the attachment given below:-
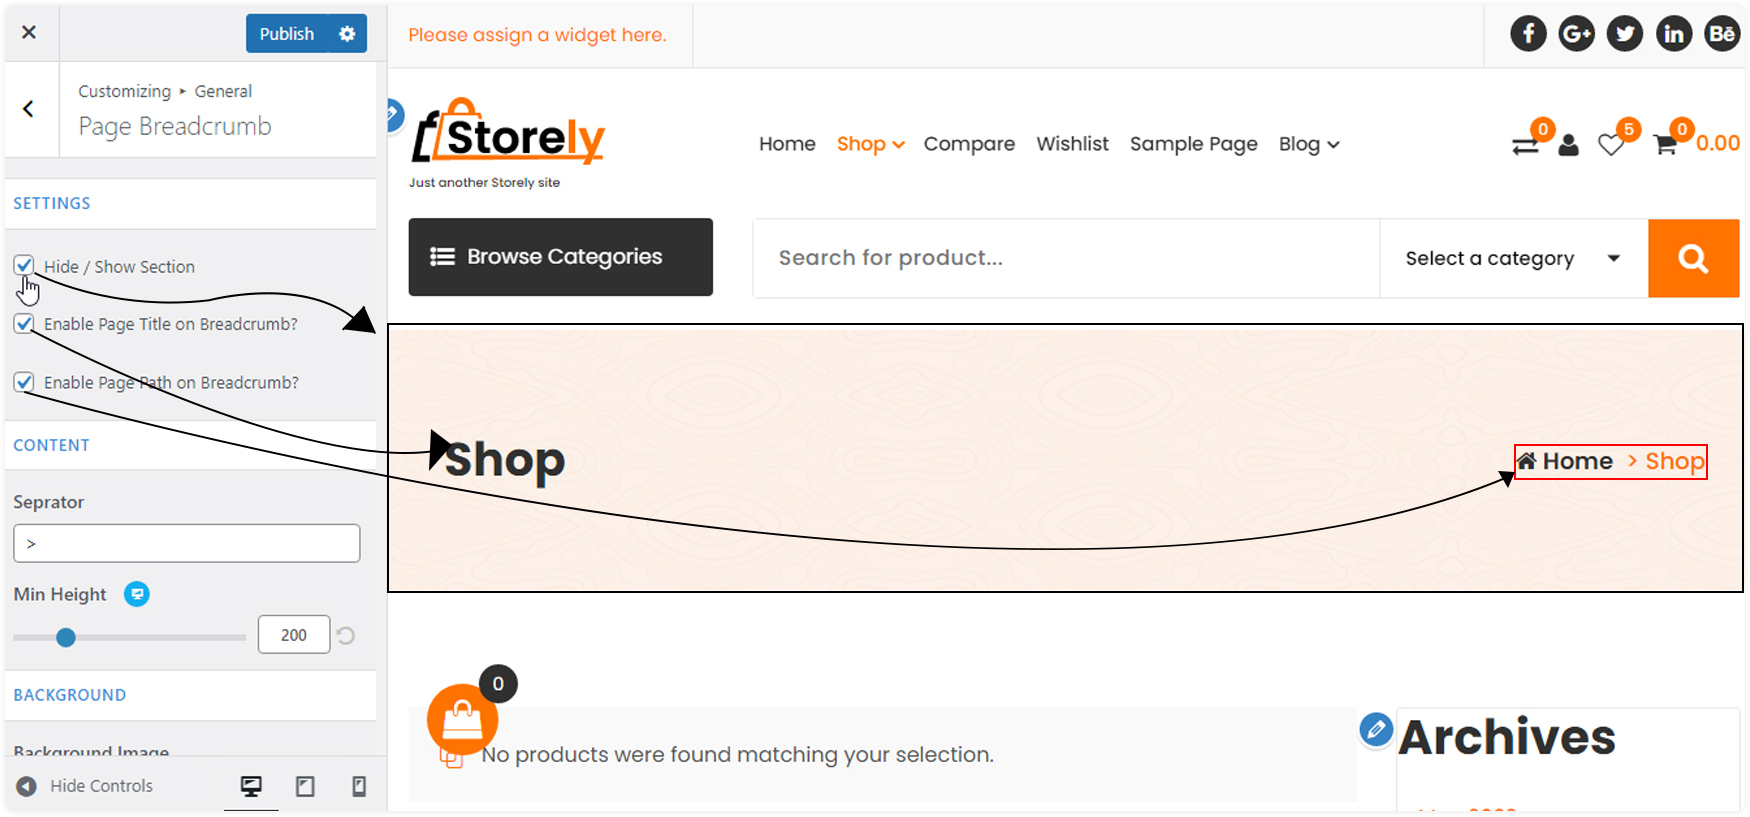
Page Breadcrumb
=>> Can I Manage Breadcrumb Hide/Show and Enable/Disable Page Title and Path?
Yes, Of Course Login Site, go to Dashboard, Appearance=>> Customizer=>> General=>> Page Breadcrumb =>> Click Checkbox and Manage Hide/Show and Then Click Publish Button
For more help see the attachment given below:-
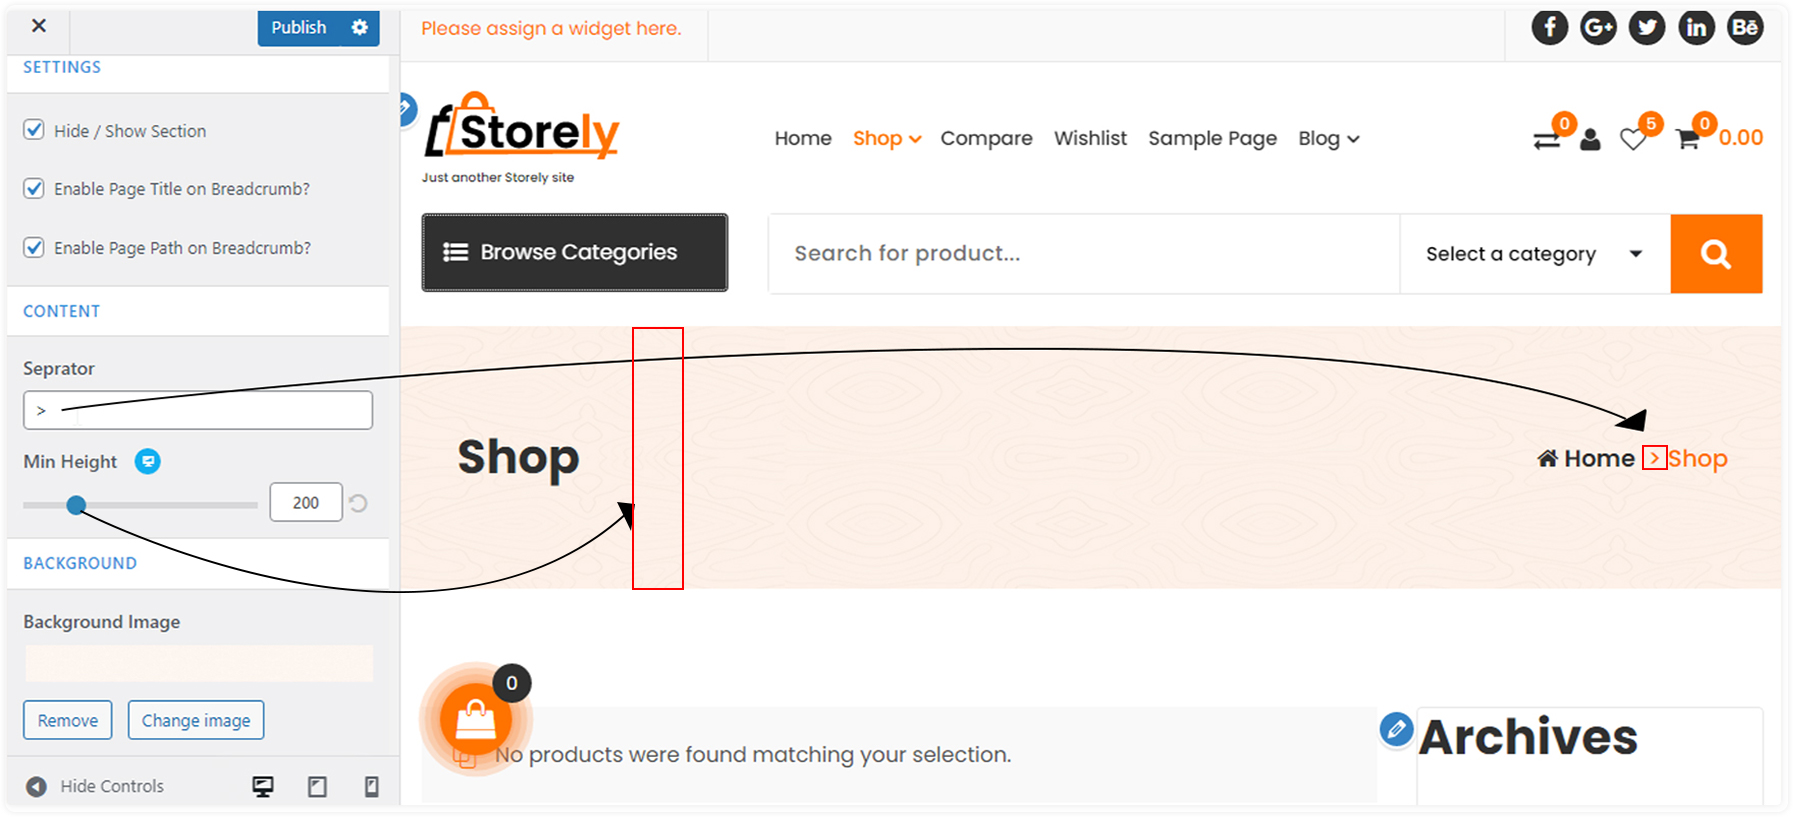
=>> Can I Manage Breadcrumb Height and Change Separator?
Yes, Of Course Login Site, go to Dashboard, Appearance=>> Customizer=>> General=>> Page Breadcrumb =>>Content=>> Add Separator and Slide range slider or Fill Value manage breadcrumb Height Then Click Publish Button
For more help see the attachment given below:-
=>> Can I Manage Breadcrumb Image Change and Image Attachment Fixed and Scroll ?
Yes, Of Course Login Site, go to Dashboard, Appearance=>> Customizer=>> General=>> Page Breadcrumb =>>Background=>> Click and Upload Image and Click the Background Attachment Dropdown You Want Attachment You Select Then Click Publish Button
For more help see the attachment given below:-
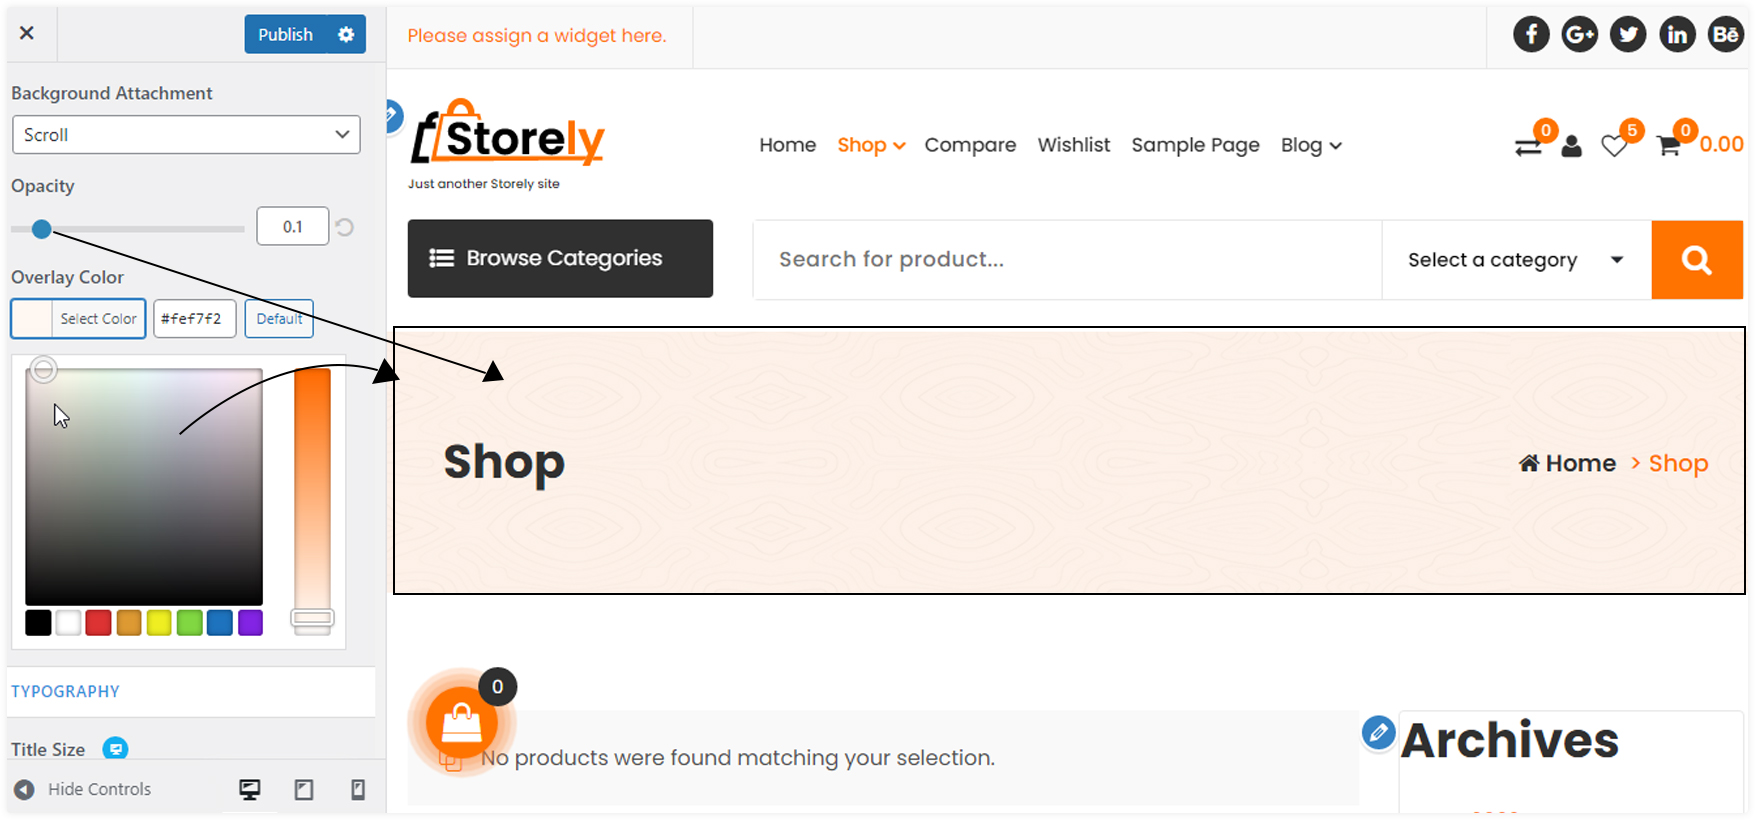
=>> Can I Change Breadcrumb Image Color Overlay and Opacity?
Yes, Of Course Login Site, go to Dashboard, Appearance=>> Customizer=>> General=>> Page Breadcrumb =>>Background=>> Slide range slider or Fill Value manage Image Opacity and Click the Color Palate and Select Overlay Color Then Click Publish Button
For more help see the attachment given below:-
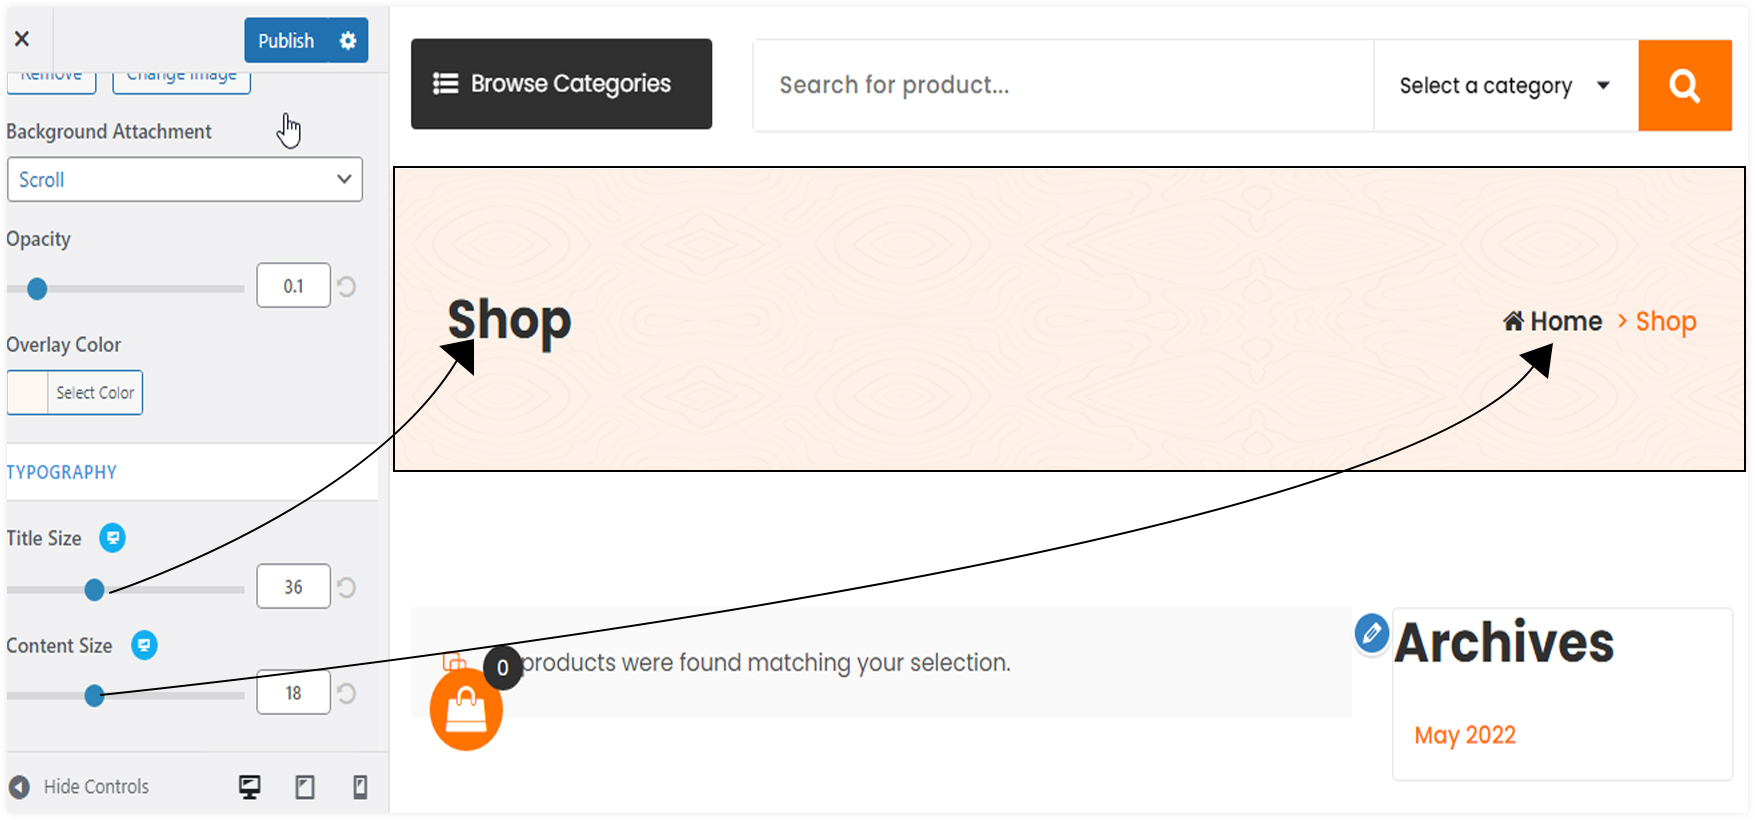
=>> Can I Change Breadcrumb Content Typography?
Yes, Of Course Login Site, go to Dashboard, Appearance=>> Customizer=>> General=>> Page Breadcrumb =>>Typography=>> Slide range slider or Fill Value manage Breadcrumb Title Font Size and Content Font Size Then Click Publish Button
For more help see the attachment given below:-
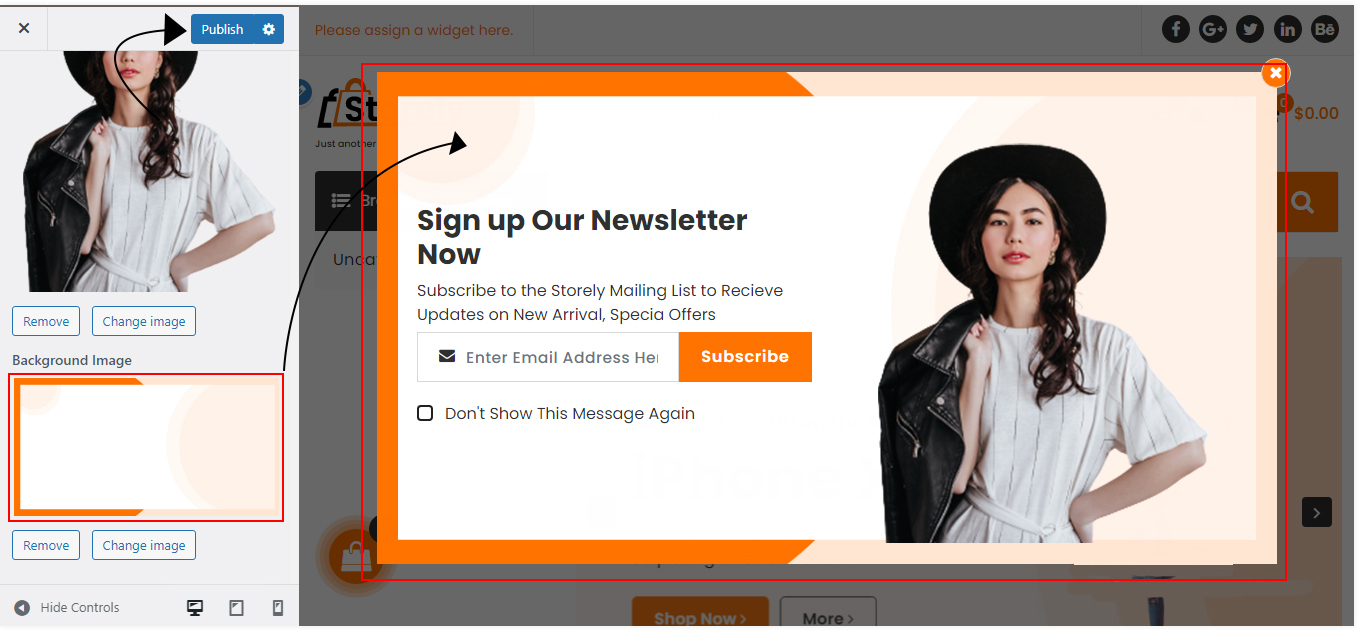
Newsletter
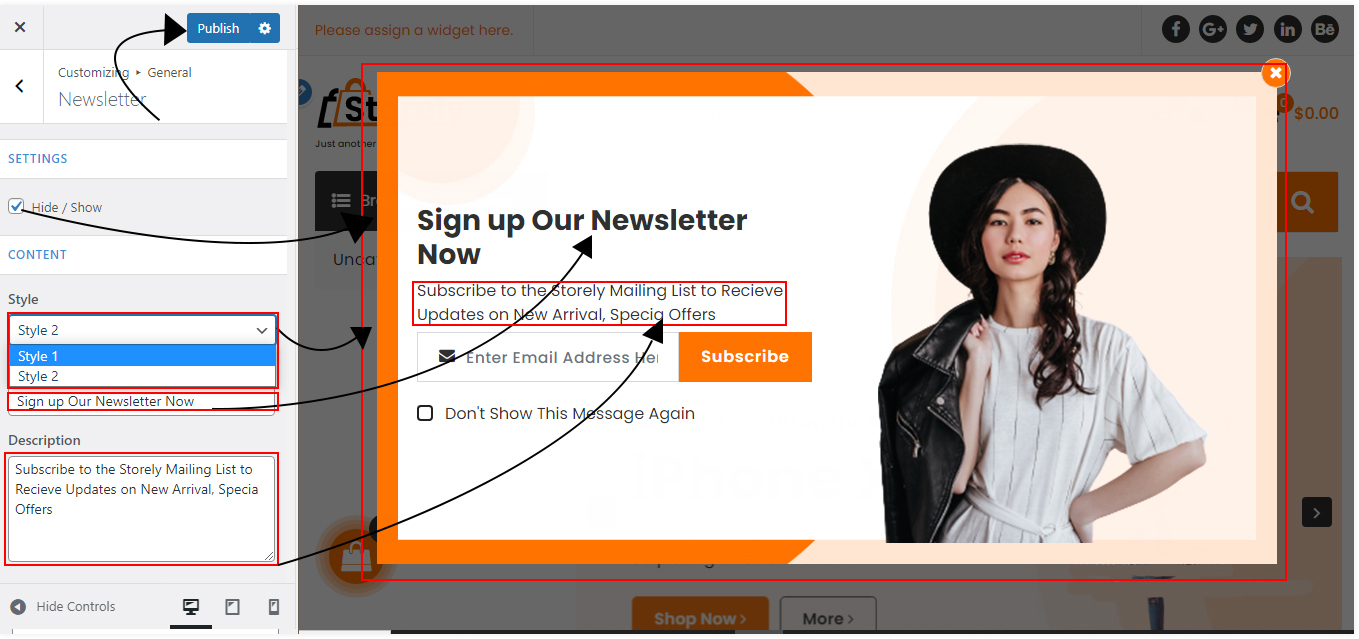
=>> Can I Manage Newsletter Popup Hide/Show and Change Title Description?
Yes, Of Course Login Site, go to Dashboard, Appearance=>> Customizer=>> General=>> Newsletter=>>Settings, Content=>> Click Checkbox and Manage Newsletter hide/show Then Select Newsletter Style and Change Title and Description Then Click Publish Button
For more help see the attachment given below:-
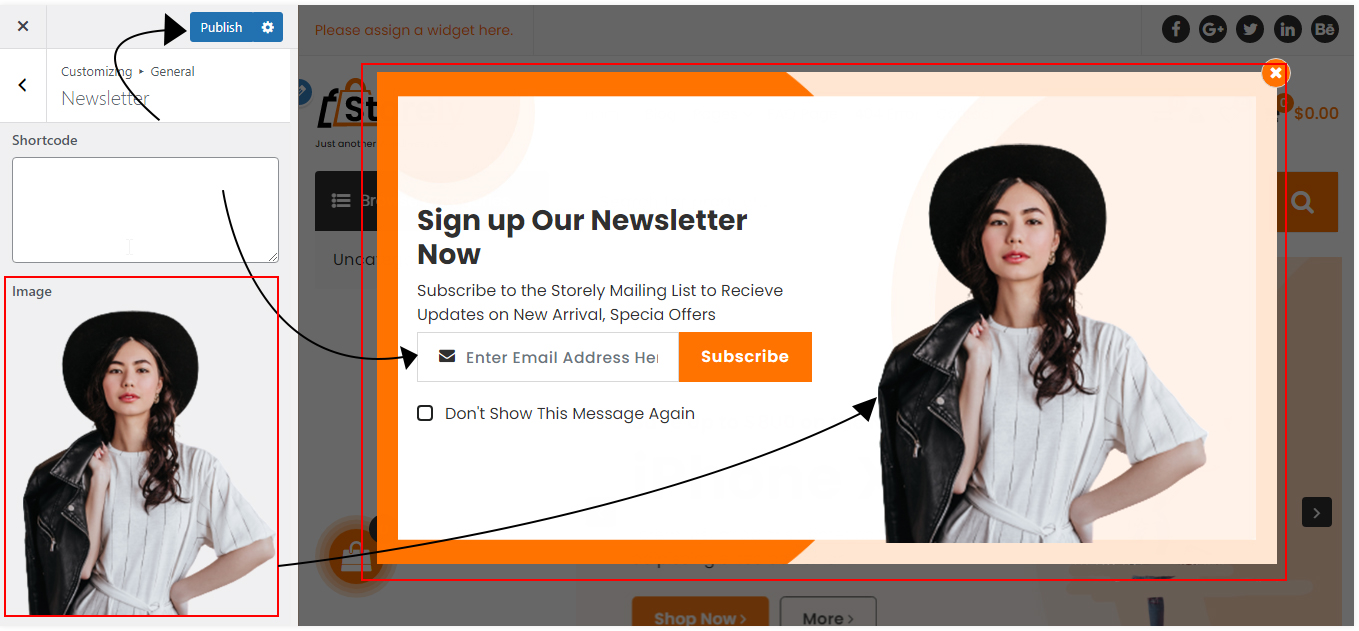
=>> Can i Add Short code and Change Image and Background Image?
Yes, Of Course Login Site, go to Dashboard, Appearance=>> Customizer=>> General=>> Newsletter=>> Enter Short Code Here And Click Change Image image Upload Image Then Click Publish Button
For more help see the attachment given below:-
Background Image
20. Custom Section Setup?
=>> How to Change Custom Section Title?
Yes You Can, follows this Article
go to Appearance=>> Customizer=>> FrontPage=>> Custom Section=>> Title=>> Enter your title then click publish Button.
=>> How to Customize Custom Section Content?
Yes You Can, follows this Article
go to Appearance=>> Customizer=>> FrontPage=>> Custom Section=>> Content=>> Click Edit Tab Enter Customize Text then click publish Button.
=>> How to Add Blog Section Title and Hide/Show Category Filter?
Yes You Can, follows this Article
go to Appearance=>> Pages=>> Add New =>> Enter Title "Blog" then click publish Button.
For more help see the attachment given below:-
=>> How to Manage Blog Column Setting?
Yes You Can, follows this Article
go to Appearance=>> Customizer=>> FrontPage=>> Blog Section=>> Content=>> Select Column=>> Select the Predefine Column Setting 2 column, 3 column, 4 column
then click publish Button.
For more help see the attachment given below:-
=>> Can I have more or less Blog shows?
Yes You Can, follows this Article
go to Appearance=>> Customizer=>> FrontPage=>> Blog Section=>> Content=>> No of Blog Display=>> Enter the value of the number of Blog you want to show then click publish Button.
For more help see the attachment given below:-
=>> Can I put read more buttons on all blogs at once?
Yes You Can, follows this Article
go to Appearance=>> Customizer=>> FrontPage=>> Blog Section=>> Content=>> Click The Checkbox Enable Excerpt then Excerpt Length, Excerpt More Enter 3 Dots ... Click Check Box Enable Read More Button and Enter Button Title Then Click Publish Button and Save Your Change.
Login Your Site Go to Dahboard, Pages =>> Add New =>> Select Page Template " FAQ "=>> Add FAQ Category Then Click Pubilsh Button.
For more help see the attachment given below:-
=>> How to Craete FAQ Questions?
Yes You Can, follows this Article
Login Your Site Go to Dahboard, FAQ =>> Add New =>> Select FAQ Category Then Click Pubilsh Button.
For more help see the attachment given below:-
=>> How to Craete FAQ Category?
Yes You Can, follows this Article
Login Your Site Go to Dahboard, FAQ =>> FAQ Category =>> Add New=>> Enter Category Title Here Then Click Pubilsh Button.
For more help see the attachment given below:-
=>> How to Customize FAQ Settins?
Yes You Can, follows this Article
Login Your Site Go to Appearance=>> Customizer=>> Page Template=>> FAQ Page=>>
1. How to Add Title?
Go to Appearance>Customizer>Page Template>FAQ Page>Enter Title and Click Publish Button.
2. How to Hide/show FAQs Category?
Go to Appearance>Customizer>Page Template>FAQ Page>Content>Click Checkbox and Manage Category Filter Hide/show and Click Publish Button.
3. No of FAQ Display in Category?
Go to Appearance>Customizer>Page Template>FAQ Page>Enter as many FAQs as you want and Click Publish Button.
For more help see the attachment given below:-
23. Contact Page in Page Template?
=>> How to Hide/Show Contact Page Info?
Yes You Can, follows this Article
go to Appearance=>> Customizer=>> Page Template=>> Contact info Section=>>Click Checkbox and Manage Hide/Show Then Click Now Publish Button
For more help see the attachment given below:-
=>> How to Add Contact Page Info?
Login Your Site and Follow This Article go to Appearance=>> Customizer=>> Page Template=>>Contact info Section=>> Enter The Title, Link, Social Icon Then Click Now Publish Button
For more help see the attachment given below:-
=>> How to Add Contact Page and Hide/Show Map Section on Contact Page?
Login Your Site and Follow this Article go to Appearance=>> Customizer=>> Page Template=>> Contact Map Section Then Click Now Publish Button.
For more help see the attachment given below:-
=>> How to Setup Form Section in Contact Page?
Login Your Site and go to Appearance>Customizer>Page Template >Contact Form Section>Click Checkbox and manage hide/show and Enter The Form Title, Description, Short code and Upload Image. Then Click Now Publish Button.
=>> How to Get Contact Form 7 Short code?
Login Your Site, Go to Dashboard=>> Plugins=>> add New Plugin=>> Add Contact Form 7 Plugin=>> Then Find Contact in CPT, Contact=>> Add New>Create Form
Make New Contact Form
Click Save Button
Copy Short code
Enter Short code
Upload Image
For best result use the size of the image 377px × 596 px
Then Click Publish Button.
24. Privacy Page Setup?
=>> How to Caate Privacy Policy Page in Page Template?
Yes You Can, follows this Article
Go to Dashboard, Pages=>> Add New=>> Enter Title=>> Select Page Template " Privacy Policy "
and Click Publish Button.
For more help see the attachment given below:-
=>> Privacy Policy Page Customizer Settings?
Yes You Can, follows this Article
Go to Appearance=>> Customizer=>> Page Template=>> Privacy Page
Follow This Article
1. How to Add Title?
Go to Appearance>Customizer>Page Template>Privacy Page>Enter Title and Click Publish Button.
2. How to Select FAQ category?
Go to Appearance=>> Customizer=>> Page Template=>> Privacy Page=>> Content=>> Select FAQ category and Click Publish Button.
3. How to Set Column?
Go to Appearance=>> Customizer=>> Page Template=>> Privacy Page=>> Column you want and Click Publish Button.
4. No of FAQ Display in Category?
Go to Appearance=>> Customizer=>> Page Template=>> Privacy Page=>> Enter as many FAQs as you want and Click Publish Button.
For more help see the attachment given below:-
Note:- You can easily createTerm & Conditionandrefund Policypage by following this article
25. Style Configurator Setup?
=>> Page Layout
Website Layout
Yes You Can, follows this Article
Login Your Site Go to Dahboard, Appearance =>> Costomizer =>> Style Configurator=>> Website Layout, Select Layout Boxed and Full Width Then Click Pubilsh Button.
For more help see the attachment given below:-
Preset Background Image
Yes You Can, follows this Article
Login Your Site Go to Dahboard, Appearance =>> Costomizer =>> Style Configurator=>> Preset Background Image, Select Background Image Then Click Pubilsh Button.
For more help see the attachment given below:-
Add Custom Background Image
Yes You Can, follows this Article
Login Your Site Go to Dahboard, Appearance =>> Costomizer =>> Style Configurator=>>Add Custom Background Image, Select Custom Background Image Then Click Pubilsh Button.
For more help see the attachment given below:-
Add Custom Background Color
Yes You Can, follows this Article
Login Your Site Go to Dahboard, Appearance =>> Costomizer =>> Style Configurator=>>Add Custom Background Color, Select Custom Background Color Then Click Pubilsh Button.
For more help see the attachment given below:-
Front Pallte
Yes You Can, follows this Article
Front Pallate Added for testing only
Login Your Site Go to Dahboard, Appearance =>> Costomizer =>> Style Configurator=>> Front Pallate Click Check Box and Manage Hide Show Then Click Pubilsh Button.
For more help see the attachment given below:-
26. Change Background Image?
Yes You Can, follows this Article
Login Your Site and Go to Dashboard, Appearance =>>Customizer =>> Background Image =>> Click ADD New Image Button Upload Image then Click Publish Button.
For more help see the attachment given below:-
27. How Add Custom Related Product?
Login Your Site Go to Dashboard, Product =>> Add New =>> Make a Product Page and Follow Some Steps:- 1. Enter Product Name, Upload Product Image, Category, and Tag.
2. Below the product description is the linked product tab, click on it Add
3. After Click Linked Product Tab, You Can Add Related products.
Then Click Publish Button.
For more help see the attachment given below:-
Custom Related Product Setting?
You will find the setting to the related product title, column, and section hide/show here
Login to Your Site to Dashboard, Storely options=>> Related Product =>> View More Then Click Save Change Button.
28. How to Add Product Sale Timer?
Login Your Site, go to Dashboard, Product=>> Add New=>> Enter Product Title, Description, Product Images, Click Countdown and Changes Setting According Screenshot Then Click Publish Button.
29. Can i Add Product Video?
Yes, Login Your Site go to Dashboard, Product=>> Add New=>> Enter Title, Description, Image and Click Video URL, Enter Video YouTube URL then Click Publish Button
30. How to Add Sale Popup on My Website?
You can easily add sale popups to your website through the settings provided by Sellerthemes.
Following Some Steps:-
Login Your Site, Dashboard, Storely Options=>> View More=>> After Clicking View More Button, Showing Sale Popup Settings Fill Like Given Screenshot and Click Save Setting Button.
31. How to Make Product Image 360 Degree View?
Login to Your Site Go to Dashboard,=>> Product =>> Add New =>> Create Product add Multiple Images and Click Checkbox Storely 360 Image Setting Then Click Publish Button.
For more help see the attachment given below:-
360 Setting
32. Theme Color Setup?
=>> Prebuild Theme Color
Yes You Can, follows this Article
Login Your Site Go to Dashboard, Appearance =>> Customizer =>> Style Configurator=>> Theme Color, Choose Predefine Color Then Click Publish Button.
For more help see the attachment given below:-
=>> Custom Theme Color
Login Your Site Go to Dashboard, Appearance =>> Customizer =>> Style Configurator=>> Theme Color=>> Select Predefine Color, Choose Predefine Color Then Click Publish Button.
For more help see the attachment given below:-
33. Additional CSS
Login Your Site, go to Dashboard, Appearance=>> Customizer=>> Additional Css =>> Add Css Here
then Click Publish Button.
34. Typography Management?
=>> How to Manage Body Typography?
Login Your Site, Go to Dashboard Appearance =>> Costomizer =>>Typography =>> Body Typography
Manage Body and Click Publish Button.
=>> How to Manage Hedings Typography?
Login Your Site, Go to Dashboard Appearance =>> Costomizer =>>Typography =>>Headings
Manage Body and Click Publish Button.
H1
H2
H3
H4
H5
H6
=>> Howto Manage Menu Typography?
Login Your Site, Go to Dashboard Appearance =>> Costomizer =>>Typography =>>Menus
Manage Body and Click Publish Button.
35. Section Reorder Managment?
Yes You Can, follows this Article
Login Your Site and Go to Dashboard, Appearance =>>Customizer =>> Section Reorder =>> Manage Drage and Drop and Manage Section Reorder then Click Publish Button.
For more help see the attachment given below:-
36. I bought Storess Pro theme but got Storely Pro theme, Why ?
nothing to worry about it, Storess Pro theme is Storely child theme, you can easily convert it to Storess with 2 steps:-
Step1:- Initial
Step2:- Demo Import
Step1:- Initial:-
Step1:- Change Header Type
Login Site, Go to Dashboard =>> Appearance =>>Customize =>>Header =>>Header Type =>> Select Header3 Then Click Publish Button
Step2:- Change Slider
Login Site, Go to Dashboard =>> Appearance =>>Customize =>>Frontpage Section =>>Slider Section =>> Select Slider3 Then Click Publish Button
Step3:- Change Theme Color
Login Site, Go to Dashboard =>> Appearance =>>Customize =>>Style Configurator =>>Theme Color =>> Color Type =>> Select Custom Color =>> Fill Your Primary & Secondary Color Storess Color Code #D51C28, Then Click Publish Button
Now your Storess Theme is Ready to use.
Thanks Reading this Article
Step2:- Demo Import
Login Site, Go to Dashboard =>> Appearance =>>Install Plugins>Select all Required Plugin and Install & Activate it.
Now Start Demo Import
Login Site, Go to Dashboard =>> Appearance =>>Premade Demos> Click Import Demo Data Button Not:- Demo Importing process will take some time. Kindly be patience. Please sit tight while we import your content. Do not refresh the page or hit the back button.
37. Can I change the label and link of the Need Help button?
Yes, Login Your Site, go to Dashboard, Product=>> Add New=>> Add Product Title, Description, Images
and Click Sale Badge=>> Help Button=>> Enter Button Label and Link
after Add Click Publish Button.
See screenshots
38. How Make Compare Page?
Login to Your Site Go to Dashboard,=>> Storely Options =>> Storely Compare List =>> View More Then Click Publish Button.
For more help see the attachment given below:-
39. Blog Single Page Author Box Hide/Show?
=>> How to Manage Author Box Hide/Show in Blog Single Page?
Yes You Can, follows this Article
Login Your Site Go to Appearance=>> Customizer=>> Page Template=>> Blog Single=>> Click Check box and Manage Hide/Show Then Click Publish Button.
For more help see the attachment given below:-
40. EMI Module Setup?
To create an EMI model, you first need to create an EMI category such as Credit Cart, Debit Card, No Cost EMI Etc..
=>> How to Create EMI Category?
Login Your Site Go to Dahboard, EMI=>> Category =>> Create New Category Then Click Pubilsh Button.
For more help see the attachment given below:-
=>> How to Create EMI ?
Yes, You Create Essily EMI Module for Your Website, follows this Article
Login Your Site Go to Dahboard, EMI=>> Add New =>> Then Click Pubilsh Button.
For more help see the attachment given below:-
=>> How to Manage EMI Basic Settings ?
Yes, We have given basic and popup settings of EMI module from which you can easily manage, follows this Article
Login Your Site Go to Dahboard, Storely Options=>> EMI Popup =>> Click View More Button =>> Basic Setting=>> Manage EMI Settings Then Pubilsh Button.
For more help see the attachment given below:-
=>> How to Manage EMI Popup Settings?
Yes, We have given basic and popup settings of EMI module from which you can easily manage, follows this Article
Login Your Site Go to Dahboard, Storely Options=>> EMI Popup =>> Click View More Button=>> Basic Setting, Manage EMI Settings Then Pubilsh Button.
For more help see the attachment given below:-
41. How Can Change Stock Badge Label?
Login Your Site, go to Dashboard, Product=>> Add New=>> Add Product Title, Description, Images
and Click Sale Badge, Enter Badge Label
after Add Click Publish Button.
See screenshots
42. How to Make Product Size Chart?
=>> How to Create Size Chart?
Login to Your Site Go to Dashboard, Size Chart=>> Add New =>> Make New Chart Following Screenshot Then Click Publish Button.
For more help see the attachment given below:-
=>> How to Manage Size Chart Settings?
Login to Your Site Go to Dashboard,=>> Storely Options=>> Size Chart =>> Click View More Button Then Click Publish Button.
For more help see the attachment given below:-
43. Image Zoom Magnifier Setting?
Login Your Site, go to Dashboard, Appearance=>> Customizer=>> Woo commerce=>> Zoom Magnifier
Check Setting Given Screenshot then Click Publish Button.
Note:- For best zoom magnifier result you need to keep the product image size800x800
44. How To Make Product Bundle?
Login Your Site, go to Dashboard, Product=>> Add New=>> Add Product Title, Description, Images
and Select Product Data Name " Product Bundle " and add Product make bundle.
after Make Bundle Click Publish Button.
See screenshots
Product Bundle Settings
Dashboard=>> Storely Options=>> Product Bundle=>> Click View More Button.
45. How to Add Free Shipping Bar?
Step1- Follow Gif:-
Login Your Site, go to Dashboard, Storely Options=>> Free Shipping Bar=>> View More and Manage Setting Acording to Screenshot
after Make Bundle Click Publish Button.
See screenshots
46. How to Add Free Shipping Bar?
Login Your Site, go to Dashboard, Storely Options=>> Free Shipping Bar=>> View More and Manage Setting Acording to Screenshot
after Make Bundle Click Publish Button.
See screenshots
47. How to Add Storely Wishlist?
Login to Your Site Go to Dashboard,=>> Storely Options =>> Storely Wishlist =>> View More Then Click Publish Button.
For more help see the attachment given below:-
48. After I changed the slider image, why the image is it appearing smaller?
There is nothing to worry about, you can use the size (840x450 Px) slider for good image quality, and your image quality will remain good.
Login Your wordpress Dashboard go appearance =>> Customizer =>> Frontpage Section =>> Slider Section =>> Slide, Upload jpg Image.
Image2
There is nothing to worry about, you can use the size (345x400 Px) slider for good image quality, and your image quality will remain good.
Login Your wordpress Dashboard go appearance =>> Customizer =>> Frontpage Section =>> Slider Section =>> Slide, Upload Png Image.
49. After I changed the Product image, why the image is it appearing smaller?
There is nothing to worry about, you can use the size (800x800 Px) Product for good image quality, and your image quality will remain good.
Login to Your WordPress Dashboard go Product =>> Add New =>> Enter Product title, Price, and Upload Image.
50. I bought shopient Pro theme but got Storely Pro theme, Why ?
nothing to worry about it, Shopient Pro theme is Storely child theme, you can easily convert it to Shopient with 2 steps:-
Step1:- Initial
Step2:- Demo Import
Step1:- Initial:-
Step1:- Change Header Type
Login Site, Go to Dashboard =>> Appearance =>>Customize =>>Header =>>Header Type =>> Select Header6 Then Click Publish Button
Step2:- Change Slider
Login Site, Go to Dashboard =>> Appearance =>>Customize =>>Frontpage Section =>>Slider Section =>> Select Slider6 Then Click Publish Button
Step3:- Change Theme Color
Login Site, Go to Dashboard =>> Appearance =>>Customize =>>Style Configurator =>>Theme Color =>> Color Type =>> Select Custom Color =>> Fill Your Primary & Secondary Color Storess Color Code #f37421 Then Click Publish Button
51. I bought Shoply Pro theme but got Storely Pro theme, Why ?
nothing to worry about it, Shoply Pro theme is Storely child theme, you can easily convert it to Shoply with 2 steps:-
1:- Initial
2:- Demo Import
Step1:- Initial:-
Step1:- Change Header Type
Login Site, Go to Dashboard =>> Appearance =>>Customize =>>Header =>>Header Type =>> Select Header2 Then Click Publish Button
Step2:- Change Slider
Login Site, Go to Dashboard =>> Appearance =>>Customize =>>Frontpage Section =>>Slider Section =>> Select Slider2 Then Click Publish Button
Login Site, Go to Dashboard =>> Appearance =>>Customize =>>Style Configurator =>>Theme Color =>> Color Type =>> Select Custom Color =>> Fill Your Primary & Secondary Color Storess Color Code #82b638, Then Click Publish Button
Now your Shoply Theme is Ready to use.
2:- Demo Import
Login Site, Go to Dashboard =>> Appearance =>>Install Plugins>Select all Required Plugin and Install & Activate it.
Now Start Demo Import
Login Site, Go to Dashboard =>> Appearance =>>Premade Demos> Click Import Demo Data Button Not:- Demo Importing process will take some time. Kindly be patience. Please sit tight while we import your content. Do not refresh the page or hit the back button.