Electromix Pro Footer Setup
In this article, you’ll learn how to set up and customize the Footer of the Flossy Pro theme, This guide will help you configure these settings to align with your site’s branding and functionality needs.
(1) How to Manage Footer Widgets in the Dashboard ?
Before setting up the footer in the Customizer, it's important to know how to manage footer widgets directly from the Dashboard.
To manage the Footer Widgets in the Dashboard, follow these steps:
- Ensure you're logged into your WordPress Dashboard.
- From the WordPress Dashboard, navigate to Appearance > Widgets.
- In the Widgets section, you can drag and drop various widgets from the Available Widgets to the Footer 1, Footer 2, and Footer 3 widget areas.
- Once you've made the necessary changes, click Save to apply them.
Tip: We recommend using the Classic Widgets plugin for a simpler and more familiar way to manage widgets. You can download it here: Classic Widgets Plugin.

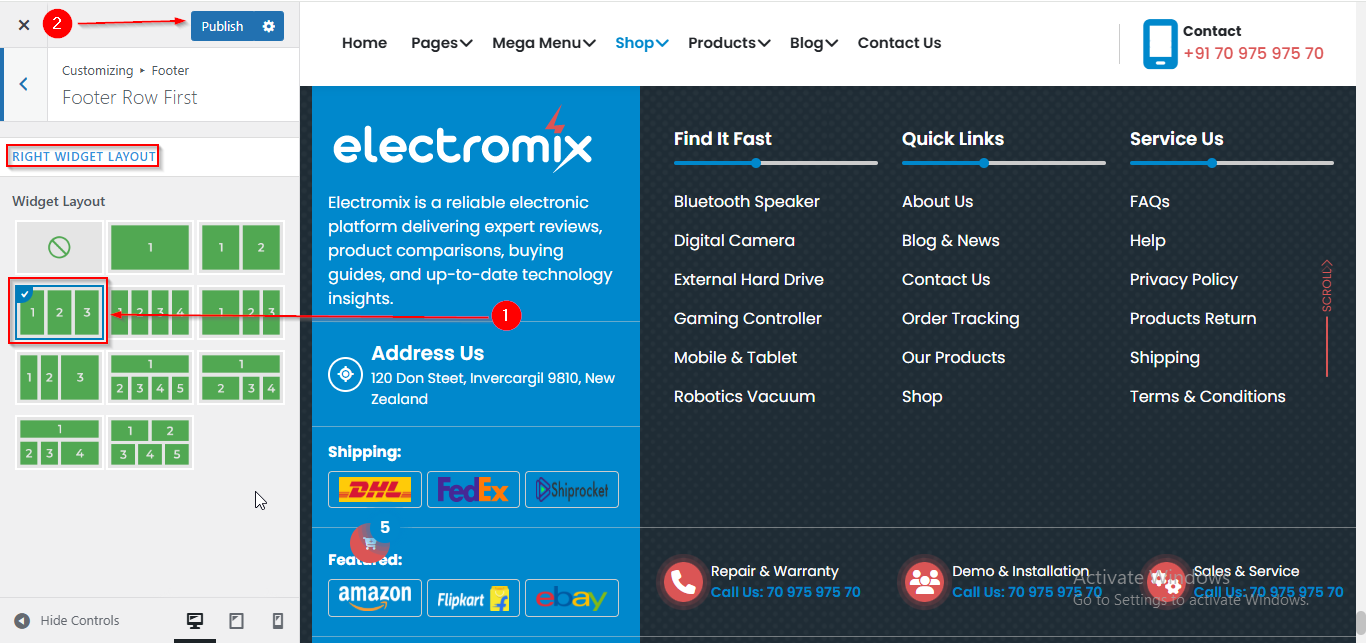
(2) How to manage the Widget Layout in Footer Row First ?
Before proceeding, ensure you're logged into your WordPress Dashboard.
To manage the Widget Layout in Footer Section, follow these steps:
- From the WordPress Dashboard, navigate to Appearance > Customize.
- On the Customizer page, go to Footer > Footer Row First.
- Here you can manage the Widget Layout.
- Click Publish when you're done.
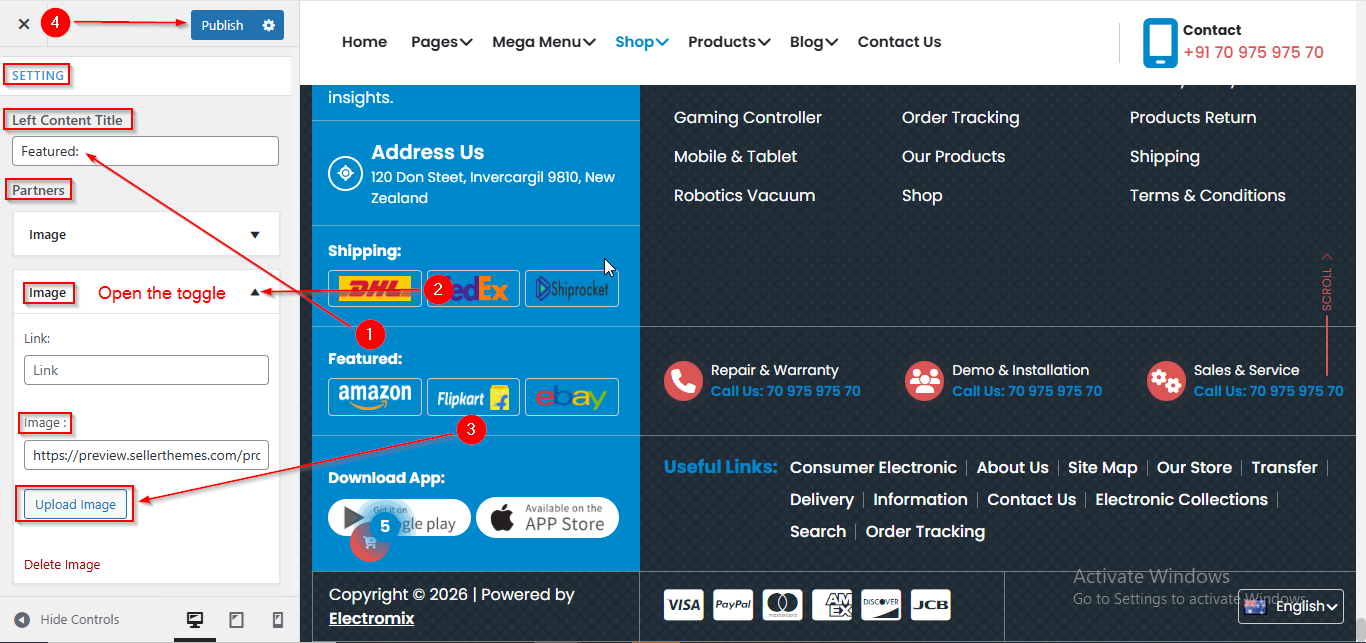
(3) How to manage the Left Content title and Partner Image in Footer Row Second ?
Before proceeding, ensure you're logged into your WordPress Dashboard.
To manage the Left Content title and Partner Image in Footer Row Second , follow these steps:
- From the WordPress Dashboard, navigate to Appearance > Customize.
- On the Customizer page, go to Footer > Footer Row Second.
- Here from the Left Content Title field you can manage the left content title.
- Open the Image toggle to manage the Partner Image.
- Click Publish when you're done.
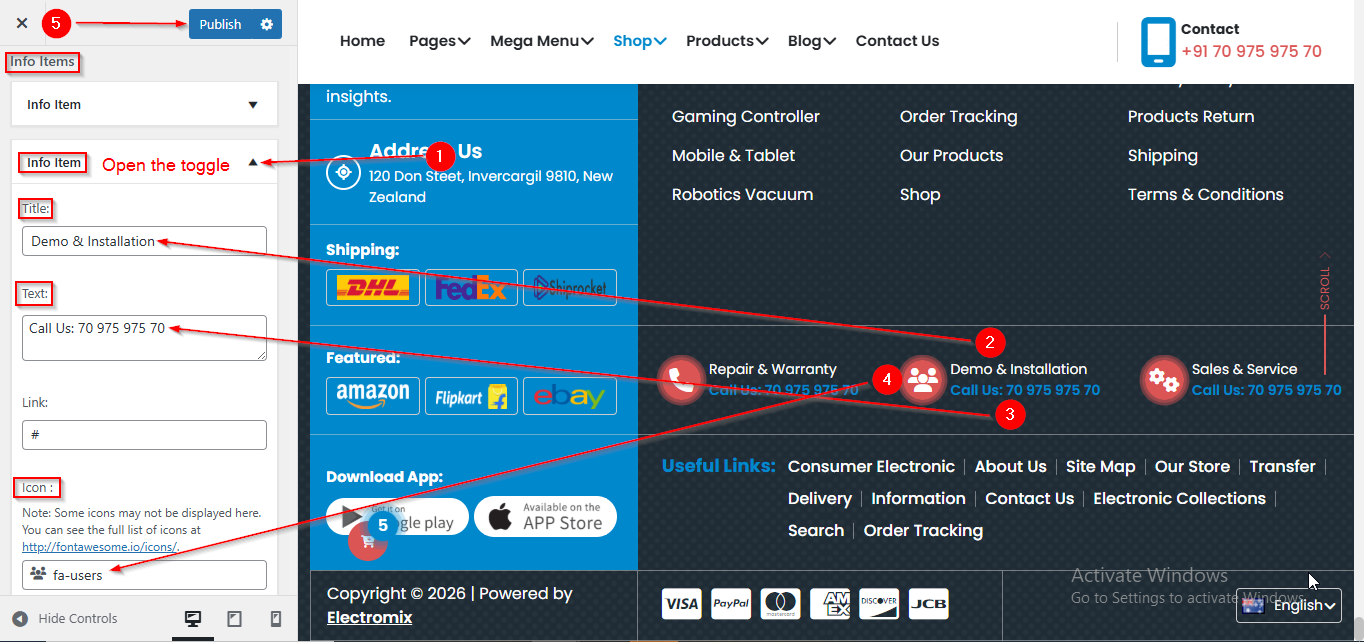
(4) How to manage the Info Items in Footer Row Second ?
Before proceeding, ensure you're logged into your WordPress Dashboard.
To manage the Info Items in Footer Row Second , follow these steps:
- From the WordPress Dashboard, navigate to Appearance > Customize.
- On the Customizer page, go to Footer > Footer Row Second.
- Scroll down until you see the Info Items.
- Open the Info Item toggle to manage the Info Title ,Text and Icon.
- Click Publish when you're done.
(5) How to manage the Left Content Title and Application Image in Footer Row Third ?
Before proceeding, ensure you're logged into your WordPress Dashboard.
To manage the Left Content in Footer Row Third , follow these steps:
- From the WordPress Dashboard, navigate to Appearance > Customize.
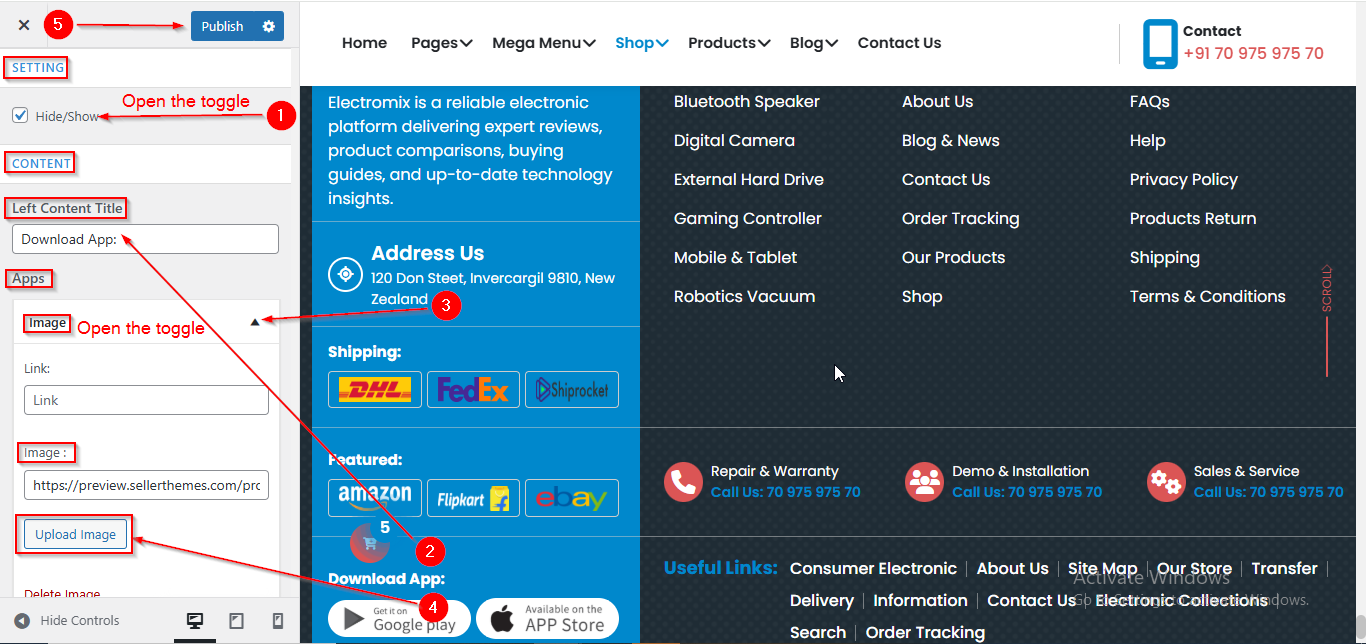
- On the Customizer page, go to Footer > Footer Row Third.
- Enable the Hide/Show checkbox to display the Content.
- From the Left Content Title field you can manage the Title.
- Open the Image toggle to manage the Application Image.
- Click Publish when you're done.
(6) How to manage the Right Content Title in Footer Row Third ?
Before proceeding, ensure you're logged into your WordPress Dashboard.
To manage the Right Content Title in Footer Row Third , follow these steps:
- From the WordPress Dashboard, navigate to Appearance > Customize.
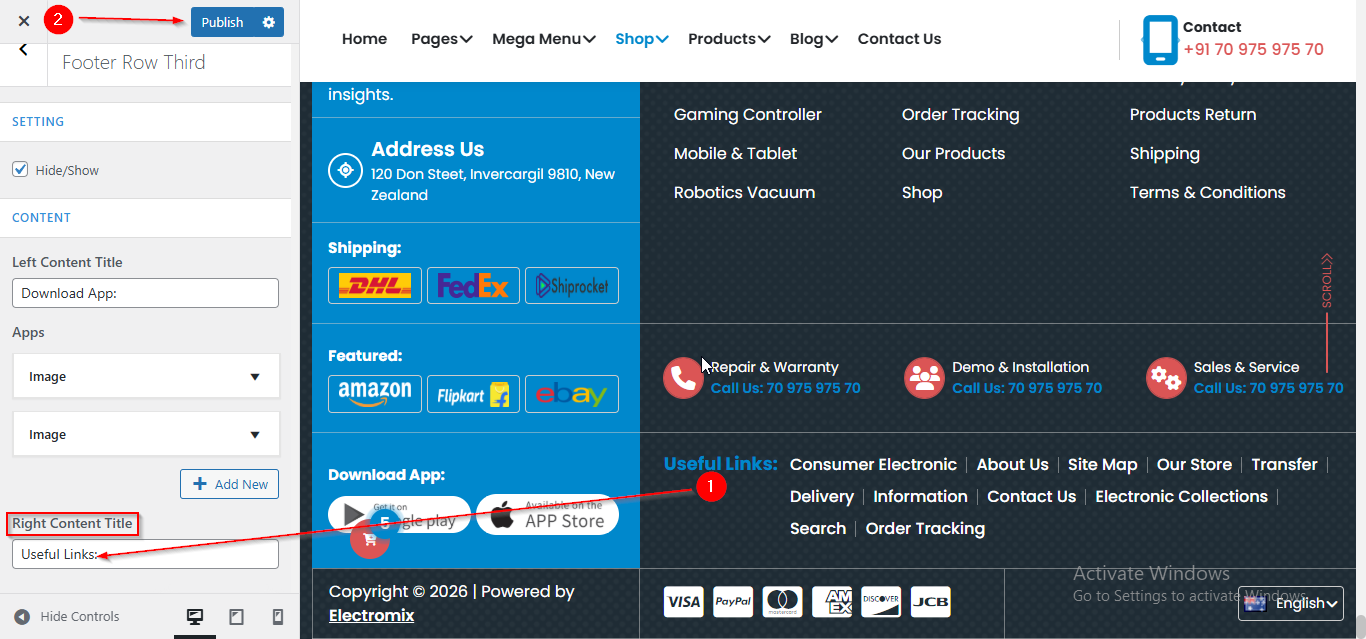
- On the Customizer page, go to Footer > Footer Row Third.
- From the Right Content Title field you can manage the Title.
- Click Publish when you're done.
(7) How to manage the Footer Copyright in Footer Section ?
Before proceeding, ensure you're logged into your WordPress Dashboard.
To manage the Footer Copyright in Footer Section, follow these steps:
- From the WordPress Dashboard, navigate to Appearance > Customize.
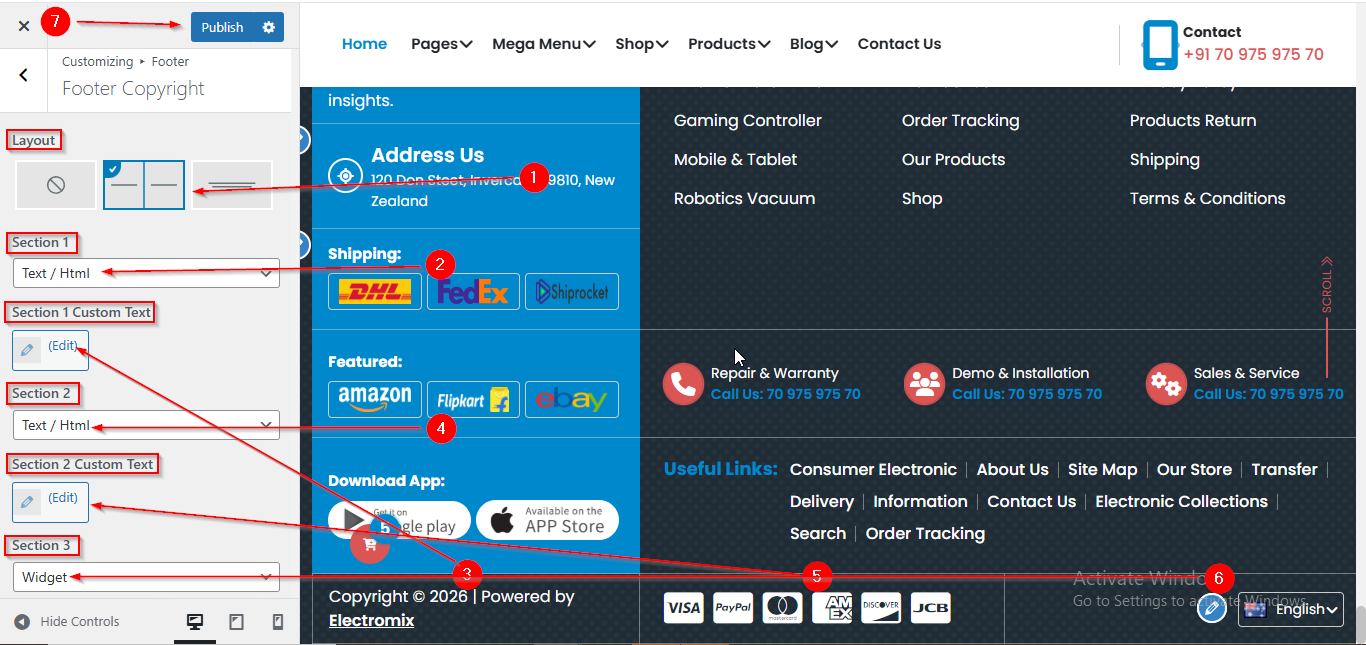
- On the Customizer page, go to Footer > Footer Copyright.
- Under the Layout Option, select your preferred footer layout.
- Then, in the Section 1 dropdown, choose Text/HTML as the content type
- Once selected, you’ll see a field labeled Section 1 Custom Text where you can enter any content of your choice.
- You can do the same process for other Section dropdown.
- Click Publish when you're done.
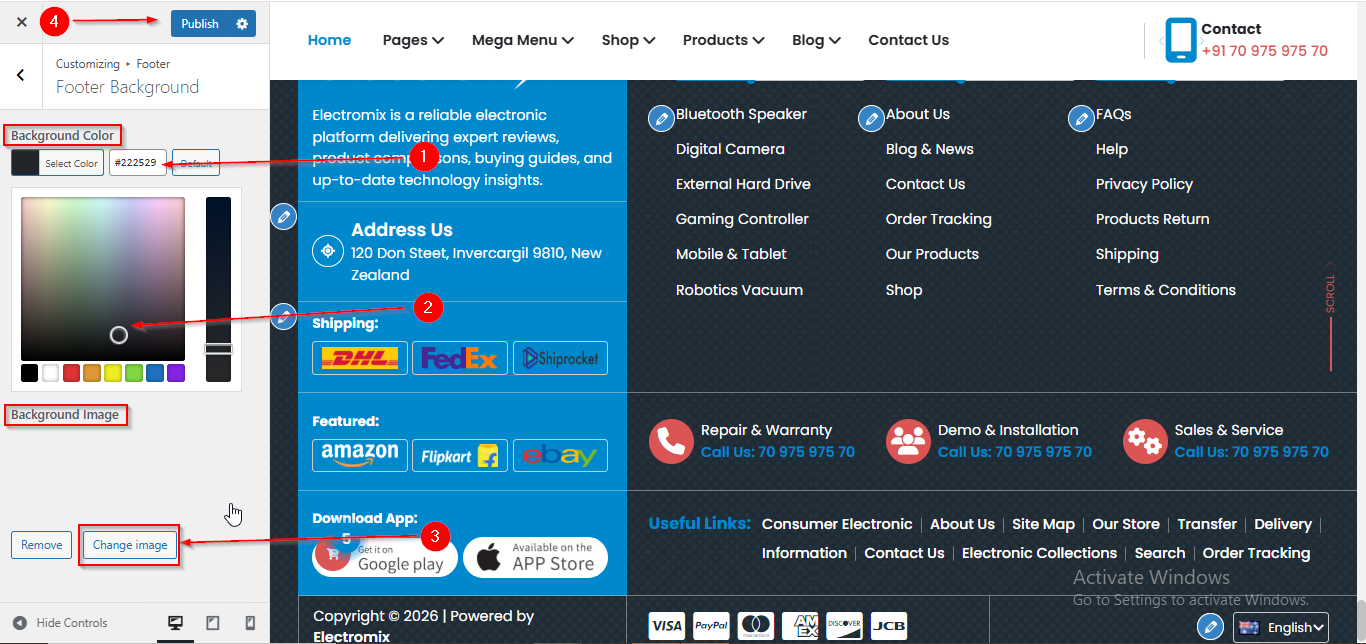
(8) How to manage the Footer Background in Footer Section ?
Before proceeding, ensure you’re logged into your WordPress Dashboard.
To manage the Background in Footer Section , follow these steps:
- From the WordPress Dashboard, navigate to Appearance > Customize.
- On the Customizer page, go to Footer > Footer Background.
- Use the Background Color option to set the Color of Background.
- From Background Image option you can set the Image of Background
- Click Publish when you’re done.