Electromix Pro Header Setup
In this article, you’ll learn how to set up and customize the Header Section of the Electromix Pro theme, This guide will help you configure these settings to align with your site’s branding and functionality needs.
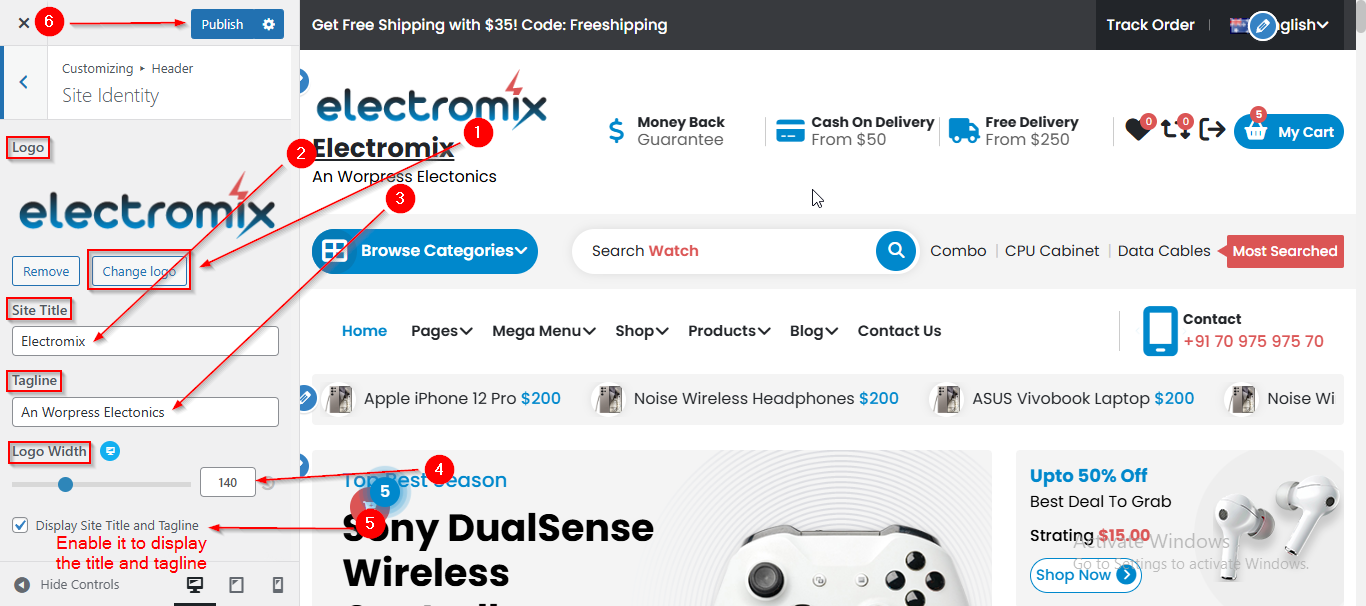
(1) How to manage the Logo, Site Title,Tagline and Logo width in the Header Section ?
Before proceeding, ensure you're logged into your WordPress Dashboard.
To manage the Logo, Site Title, Tagline and Logo Width in the Header Section, follow these steps:
- From the WordPress Dashboard, navigate to Appearance > Customize.
- On the Customizer page, go to Header > Site Identity.
- Here, you can manage the Logo, Site Title, Tagline and Logo Width in the Header Section.
- Click Publish when you’re done.
Note : Ensure the checkbox labeled Display Site Title and Tagline is checked if you want to display the Site Title and Tagline.
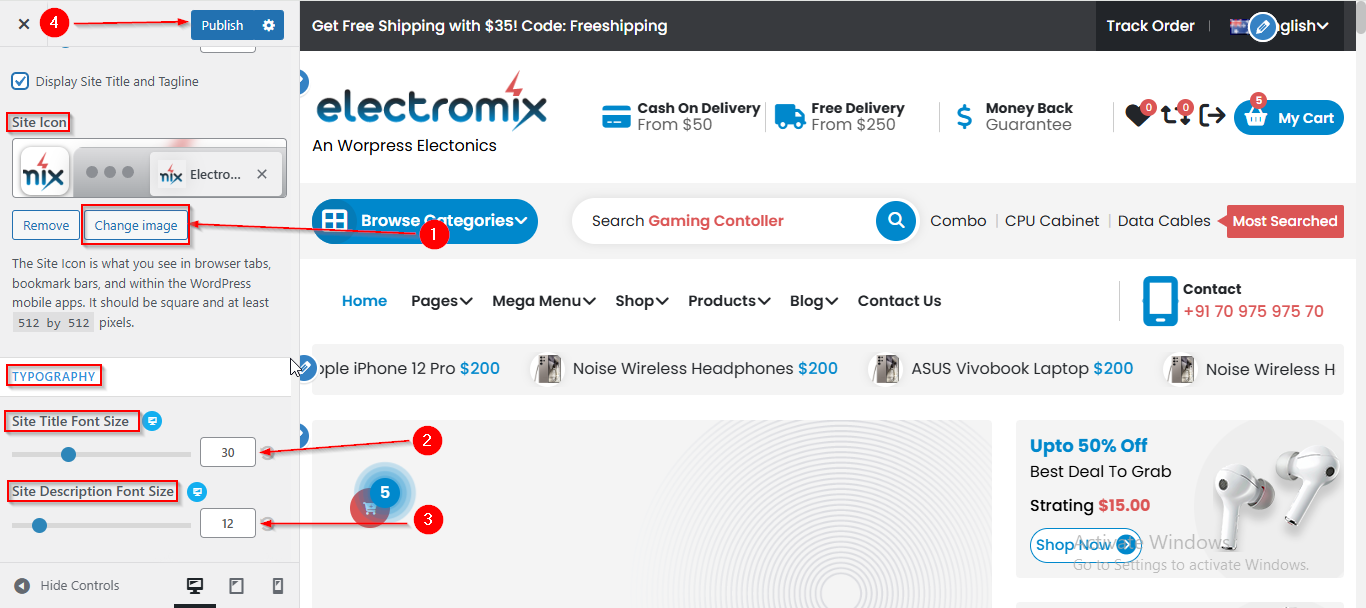
(2) How to Manage the Site Icon, Site Title, and Description Font Size in the Header Section ?
Before proceeding, ensure you're logged into your WordPress Dashboard.
To manage the Site Icon, Site Title, and Description font size in the Header Section, follow these steps:
- From the WordPress Dashboard, navigate to Appearance > Customize.
- On the Customizer page, go to Header > Site Identity.
- Scroll down to the Site Icon section to manage the Site Icon.
- For the Site Title and Description, scroll to the Typography section below the Site Icon, where you can adjust the Font Size.
- Click Publish when you're done.
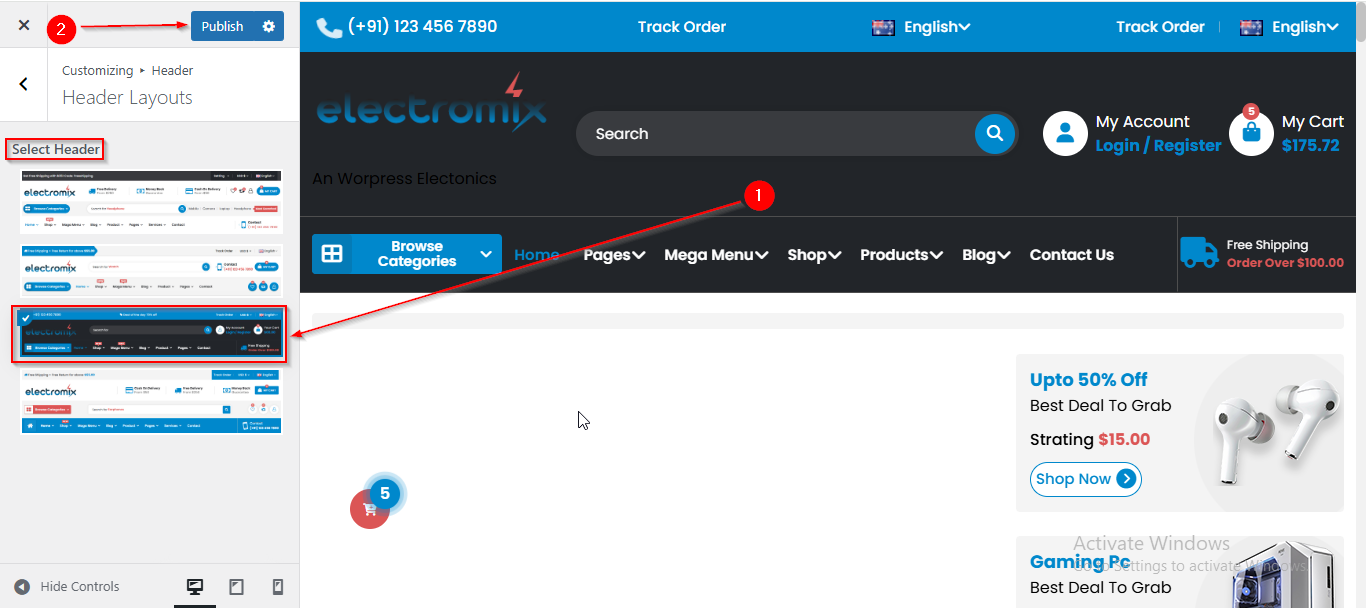
(3) How to Manage the Header Layout in the Header Section ?
Before proceeding, ensure you're logged into your WordPress Dashboard.
To manage the Header Layout in the Header Section, follow these steps:
- From the WordPress Dashboard, navigate to Appearance > Customize.
- On the Customizer page, go to Header > Header Layout.
- From here you can manage the Header Layout.
- Click Publish when you're done.
(4) How to manage the Above header in Header Section ?
Before proceeding, ensure you're logged into your WordPress Dashboard.
To manage the Above header in the Header Section, follow these steps:
- From the WordPress Dashboard, navigate to Appearance > Customize.
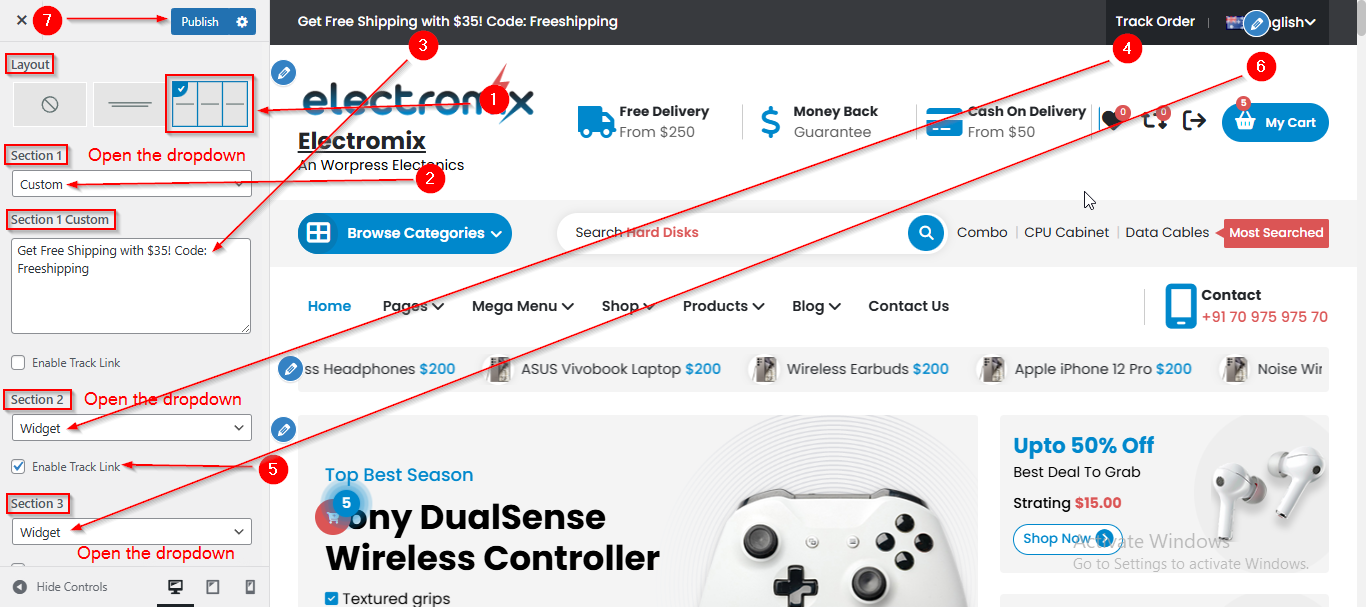
- On the Customizer page, go to Header > Above Header.
- Here, you can manage the Above Header content such as layout, sections, title, etc.
- Click Publish when you're done.
(5) How to manage the Header Navigation Icon and Cart title in Header Section ?
Before proceeding, ensure you're logged into your WordPress Dashboard.
To manage the Header Navigation Icon in the Header Section, follow these steps:
- From the WordPress Dashboard, navigate to Appearance > Customize.
- On the Customizer page, go to Header > Header Navigation.
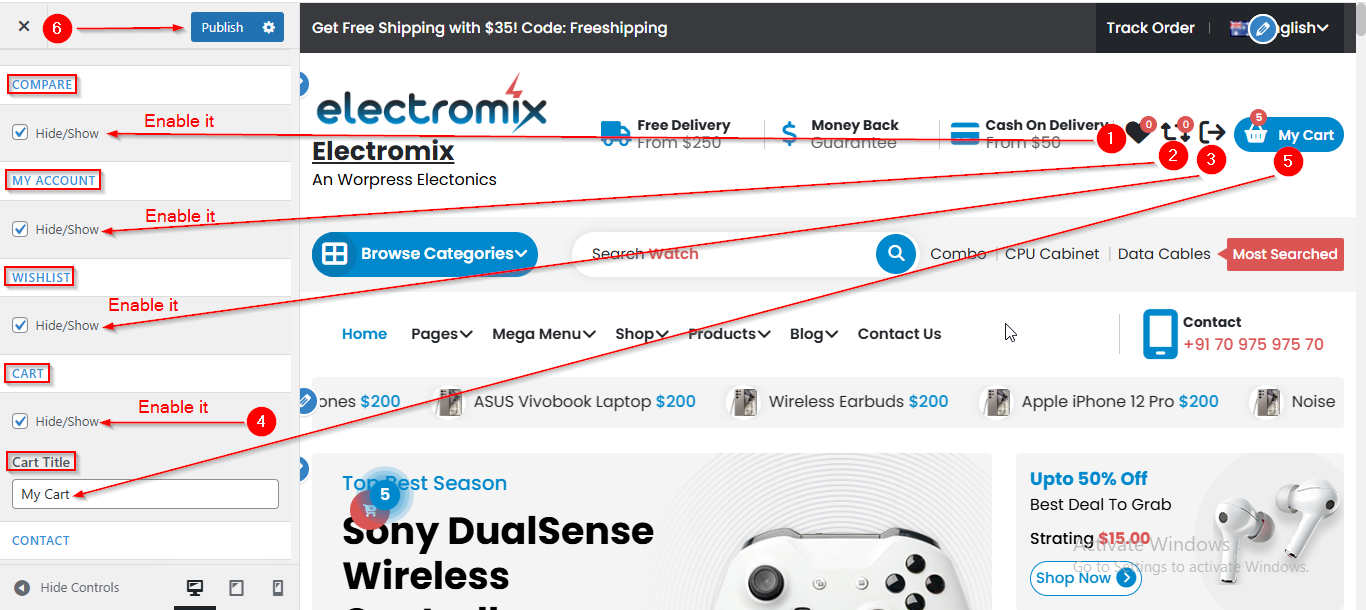
- Here, you will find the Hide/Show checkboxes for each navigation icon.
- You can manage whether to display specific navigation icons by enabling or disabling the Hide/Show checkbox.
- From the Cart title option you can also manage the Cart title
- Click Publish when you're done.
(6) How to manage the Contact Content in Header Section ?
Before proceeding, ensure you're logged into your WordPress Dashboard.
To manage the Contact Content in the Header Section, follow these steps:
- From the WordPress Dashboard, navigate to Appearance > Customize.
- On the Customizer page, go to Header > Header Navigation.
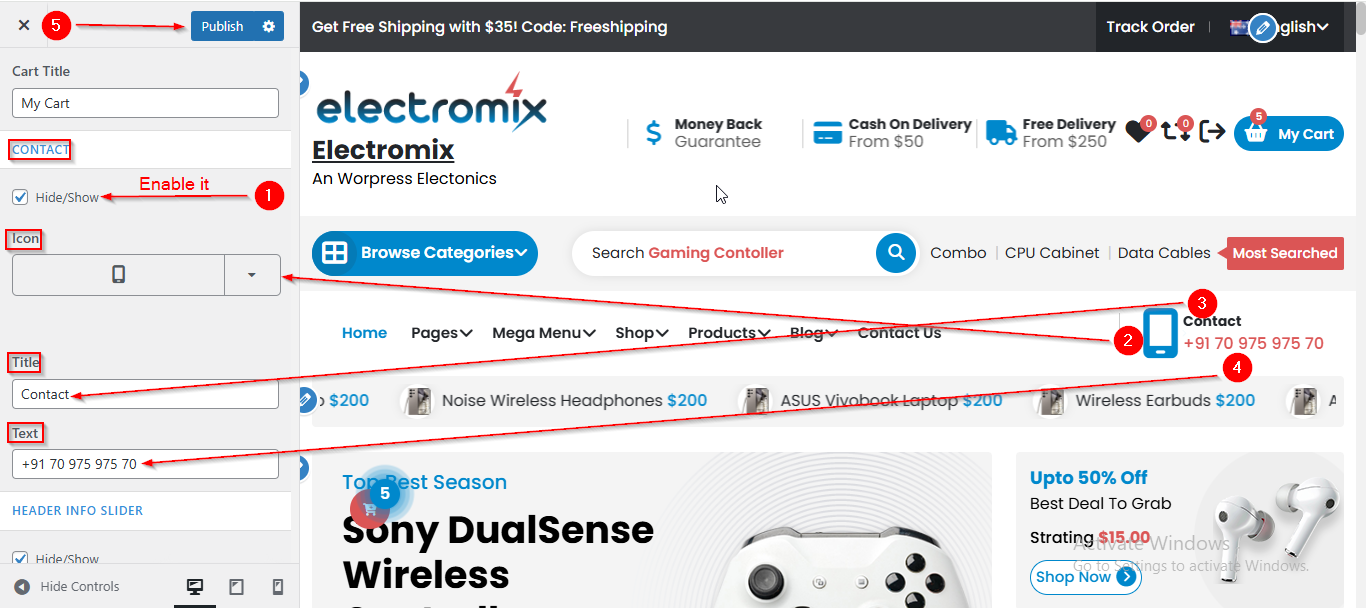
- Scroll down until you see the CONTACT Section.
- From here you can manage the Contact Content such as Icon , Title and Text.
- Click Publish when you're done.
(7) How to manage the Header Info Slider in Header Section ?
Before proceeding, ensure you're logged into your WordPress Dashboard.
To manage the Header Info Slider in the Header Section, follow these steps:
- From the WordPress Dashboard, navigate to Appearance > Customize.
- On the Customizer page, go to Header > Header Navigation.
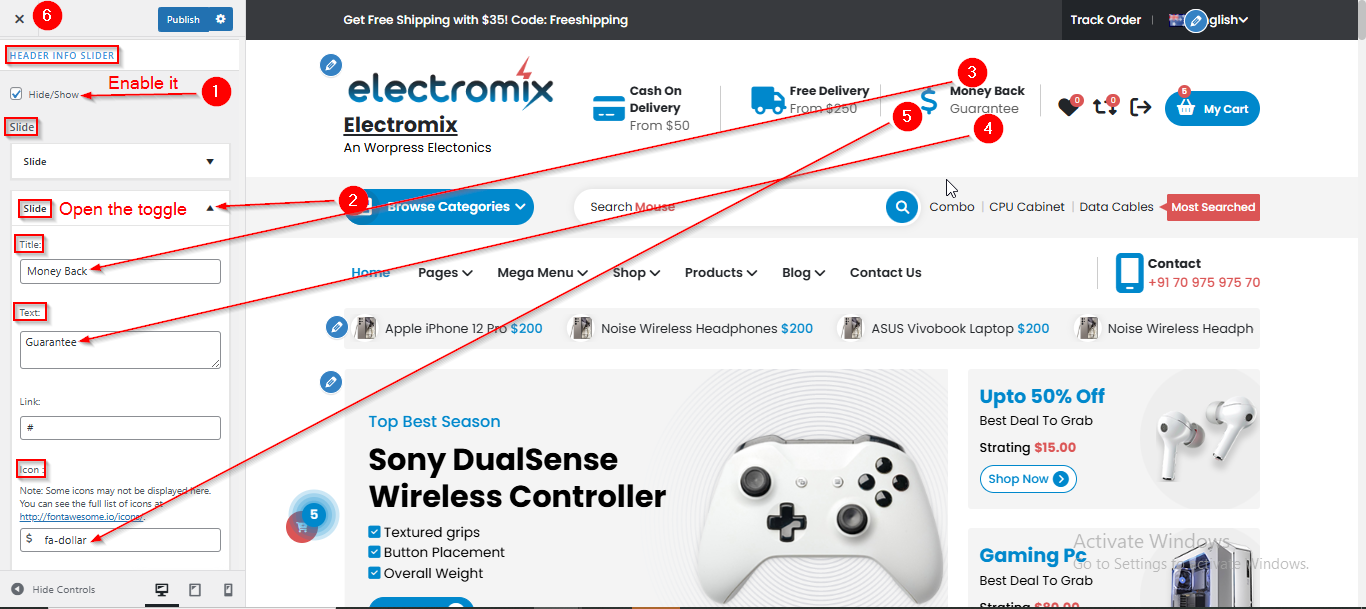
- Scroll down to the HEADER INFO SLIDER.
- Open the Slide Toggle to manage title , text and icon.
- Click Publish when you're done.
Note: Enable the Hide/Show checkbox to display the Slider
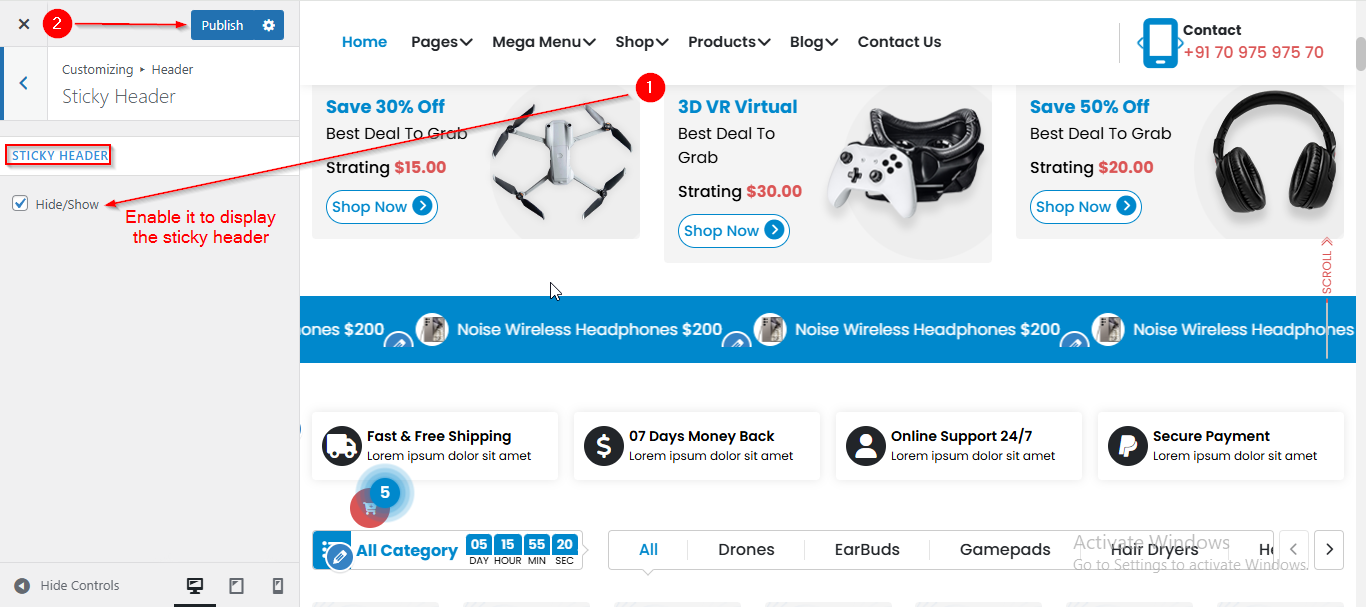
(8) How to manage the Sticky Header in Header Section ?
Before proceeding, ensure you're logged into your WordPress Dashboard.
To manage the Sticky Header in the Header Section, follow these steps:
- From the WordPress Dashboard, navigate to Appearance > Customize.
- On the Customizer page, go to Header > Sticky Header.
- Here, you can manage the Sticky Header by enabling or disabling the Hide/Show checkbox.
- Click Publish when you're done.