
Pet Bazaar Pro Frontpage 1 Setup
In this article, you’ll learn how to set up and customize the Frontpage 1 of the Pet Bazaar Pro theme, This guide will help you configure these settings to align with your site’s branding and functionality needs.
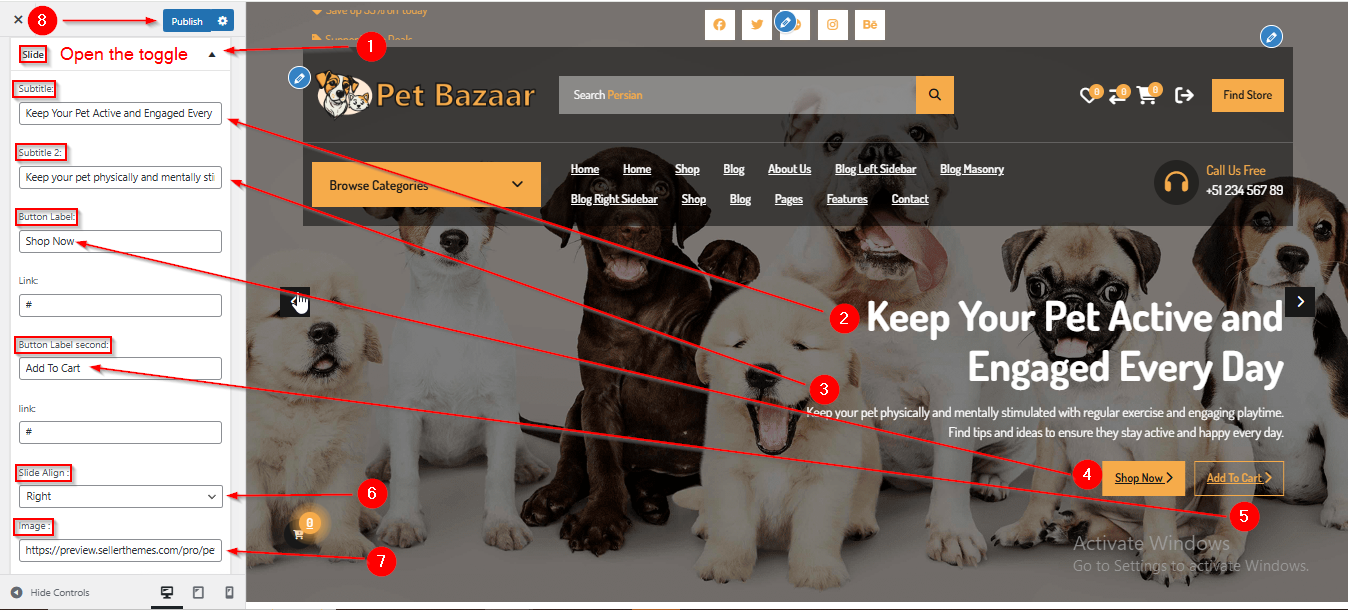
(1) How to manage the Slide Subtitle , Subtitle 2 , Button Label , Button Label second , Slide Align & Image in Slider Section ?
Before proceeding, ensure you're logged into your WordPress Dashboard.
To manage the Slide Subtitle, Subtitle 2 , Button Label , Button Label second , Slider Align & Image in Slider Section, follow these steps:
- From the WordPress Dashboard, navigate to Appearance > Customize.
- On the Customizer page, go to Frontpage 1 > Slider Section.
- Here, open the Slide toggle to manage the Slide Subtitle, Subtitle 2 , Button Label , Button Label second , Slider Align & Image.
- Click Publish when you're done.
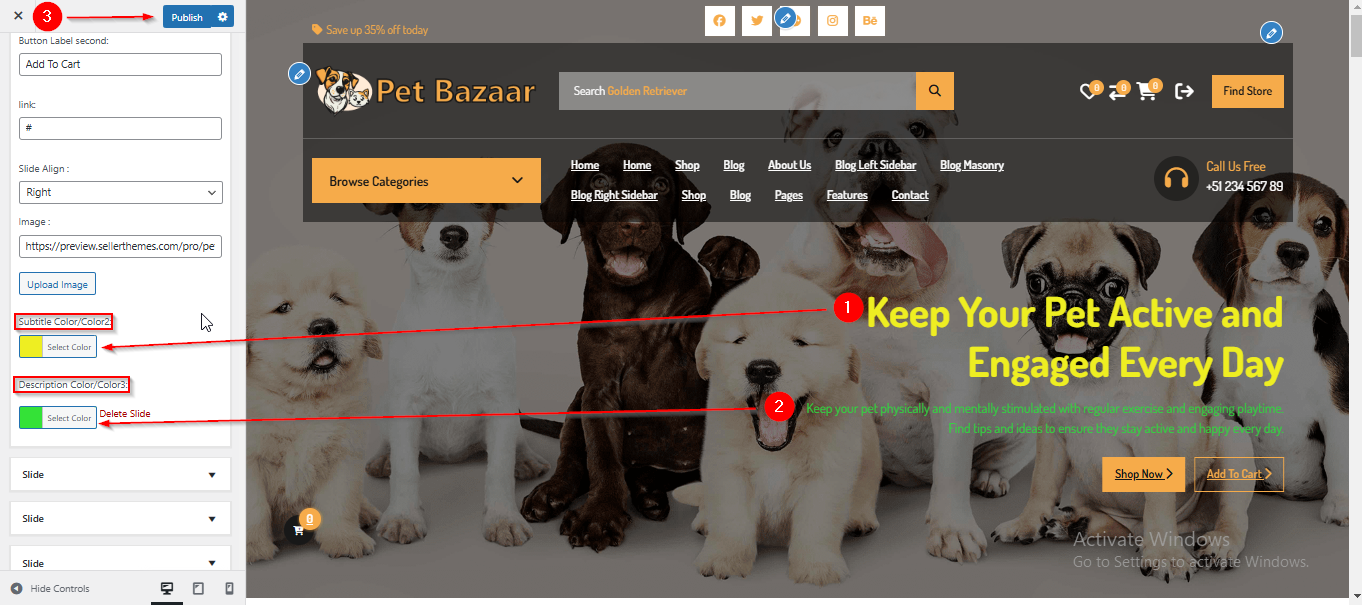
(2) How to manage the Slide Subtitle & Description Color in Slider Section ?
Before proceeding, ensure you're logged into your WordPress Dashboard.
To manage the Slide Subtitle & Description Color in Slider Section, follow these steps:
- From the WordPress Dashboard, navigate to Appearance > Customize.
- On the Customizer page, go to Frontpage 1 > Slider Section.
- Open the Slide toggle and scroll down until you see the Subtitle Color/Color2 and Description Color/Color3.
- Adjust the colors as needed.
- Click Publish when you're done.
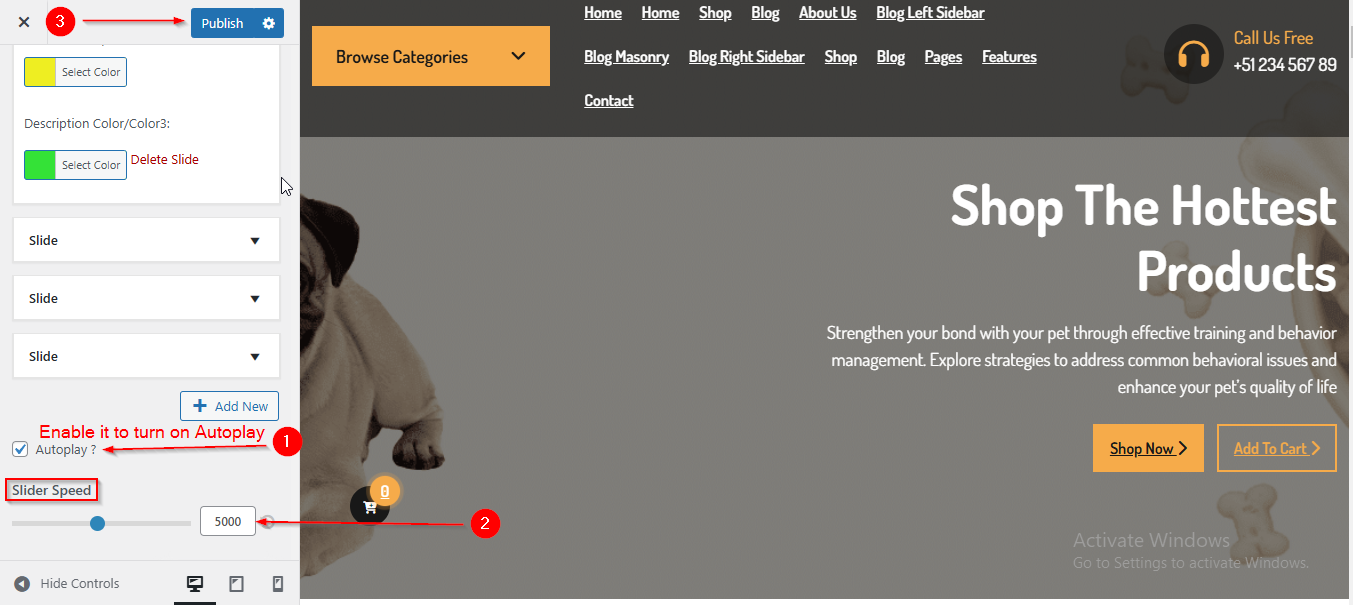
(3) How to manage the Slider Autoplay & Speed in Slider Section ?
Before proceeding, ensure you're logged into your WordPress Dashboard.
To manage the Slider Autoplay & Speed in Slider Section, follow these steps:
- From the WordPress Dashboard, navigate to Appearance > Customize.
- On the Customizer page, go to Frontpage 1 > Slider Section.
- Here, you have to scroll down till you see the Autoplay ? & Slider Speed option.
- Once you have reached here you can manage the Slider Autoplay & Speed.
- Click Publish when you're done.
Note : Ensure the checkbox labeled Autoplay ? is checked if you want to enable the Autoplay.
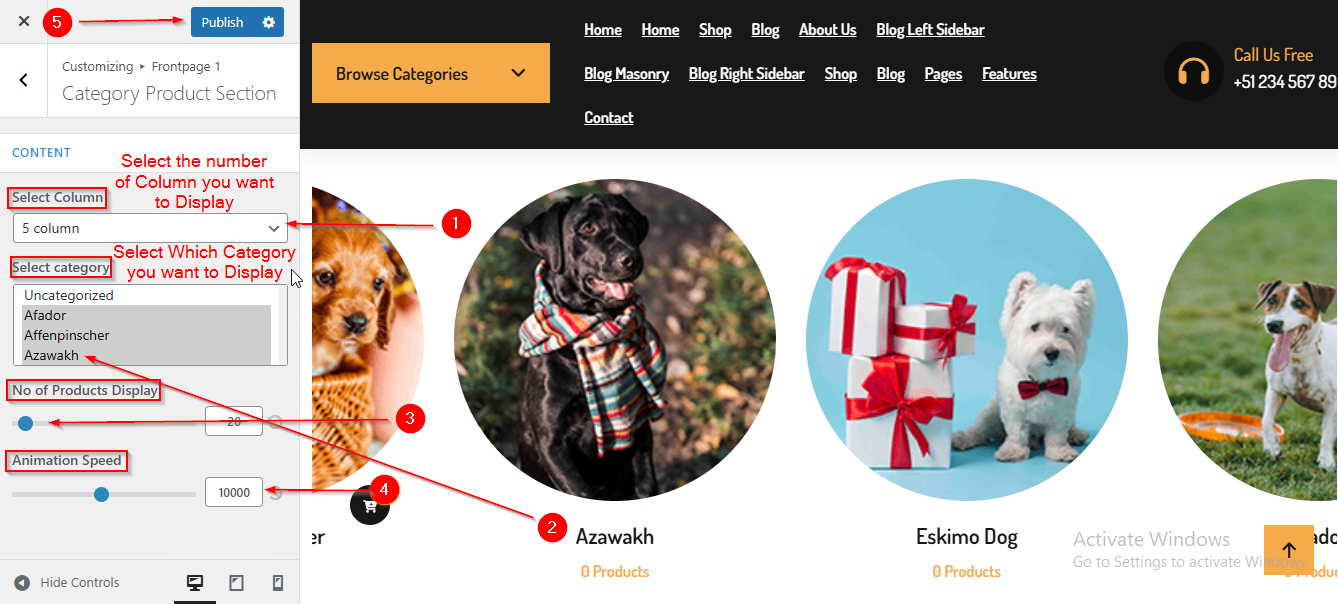
(4) How to manage the Select Column ,Select Category , No of Products Display & Animation Speed in Category Product Section ?
Before proceeding, ensure you're logged into your WordPress Dashboard.
To manage the Select Column , Select Category , No of Products Display & Animation Speed in Category Product Section, follow these steps:
- From the WordPress Dashboard, navigate to Appearance > Customize.
- On the Customizer page, go to Frontpage 1 > Category Product Section.
- Once you have reached here you can manage the Select Column , Select Category , No of Products Display & Animation Speed.
- Click Publish when you're done.
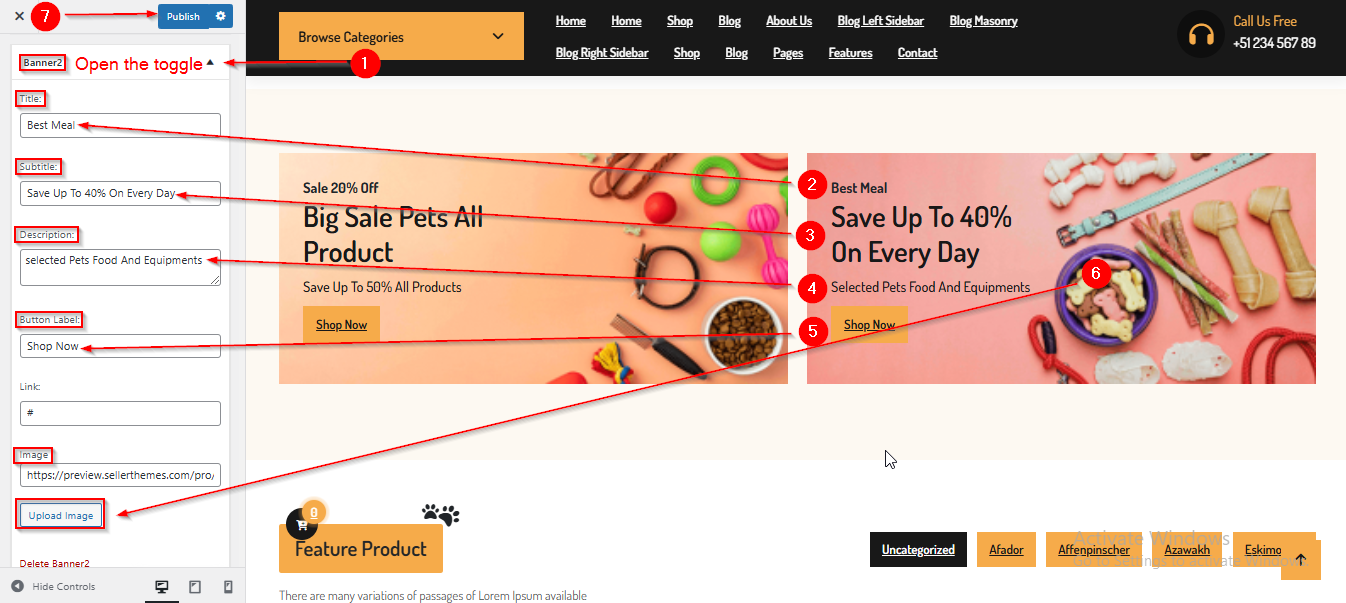
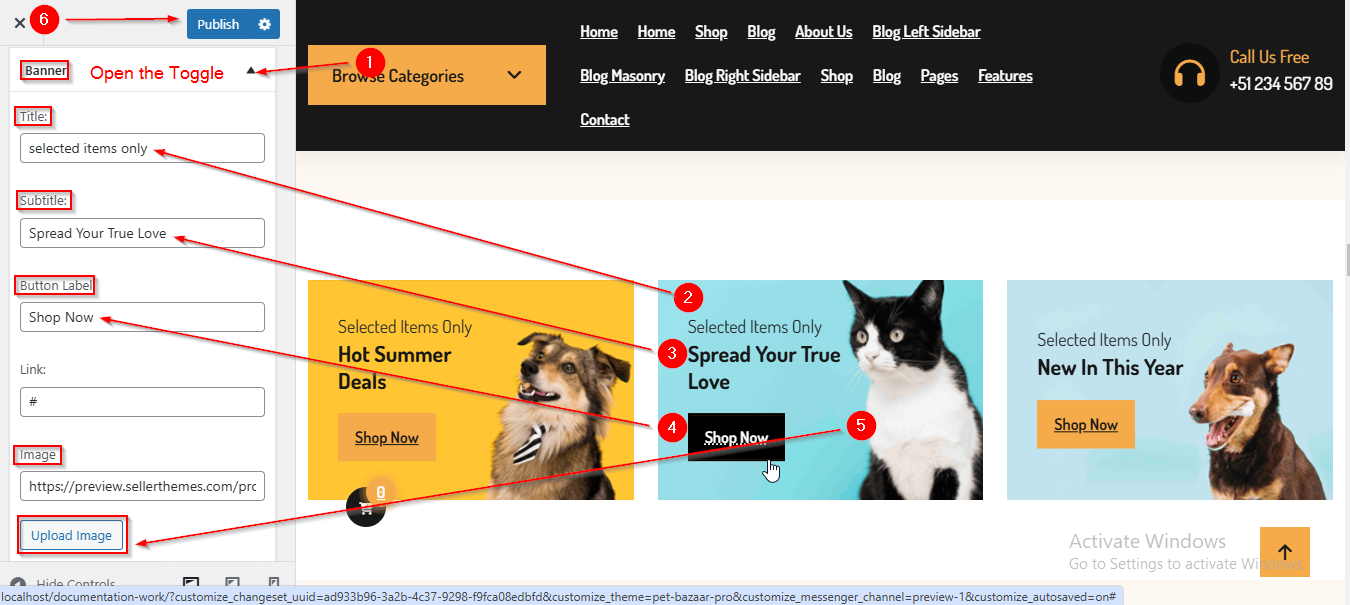
(5) How to manage the Banner Content in Banner 2 Section ?
Before proceeding, ensure you're logged into your WordPress Dashboard.
To manage the Banner Content in Banner 2 Section, follow these steps:
- From the WordPress Dashboard, navigate to Appearance > Customize.
- On the Customizer page, go to Frontpage 1 > Banner 2 Section.
- Open the Banner2 toggle to manage the Banner content such as Title , Subtitle , Description , Button Label & Image.
- Click Publish when you're done.
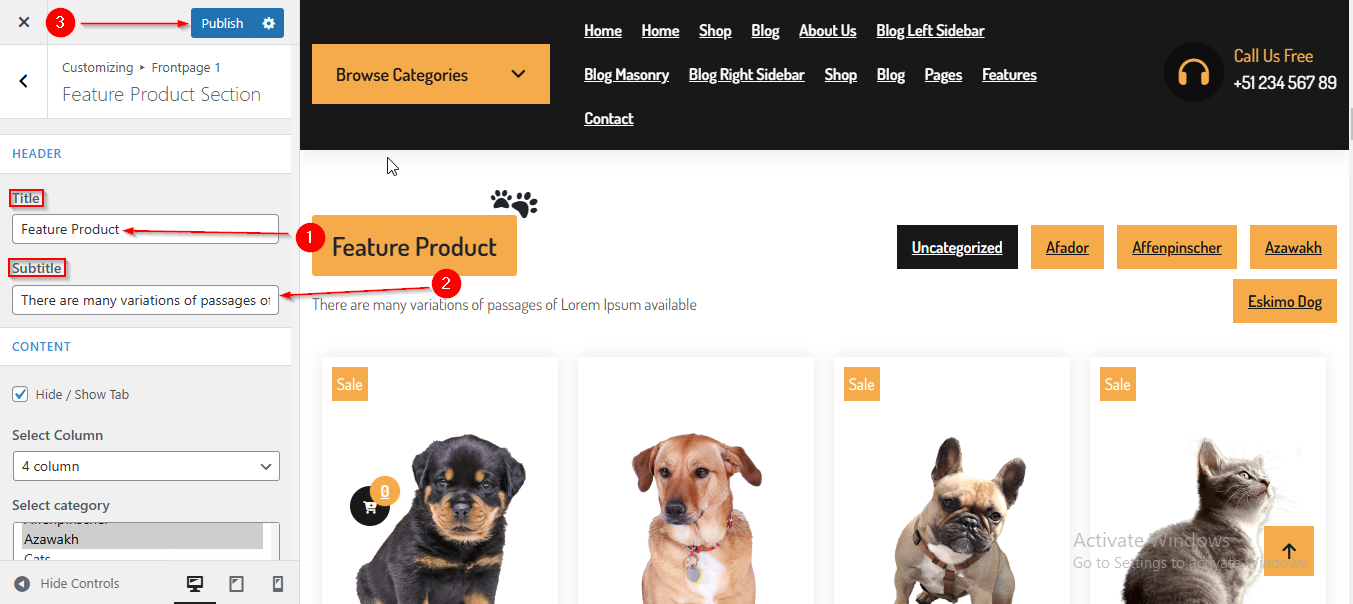
(6) How to manage the Section Title & Subtitle in Feature Product Section ?
Before proceeding, ensure you're logged into your WordPress Dashboard.
To manage the Section Title & Subtitle in Feature Product Section, follow these steps:
- From the WordPress Dashboard, navigate to Appearance > Customize.
- On the Customizer page, go to Frontpage 1 > Feature Product Section.
- Here you can manage the Section Title & Subtitle.
- Click Publish when you're done.
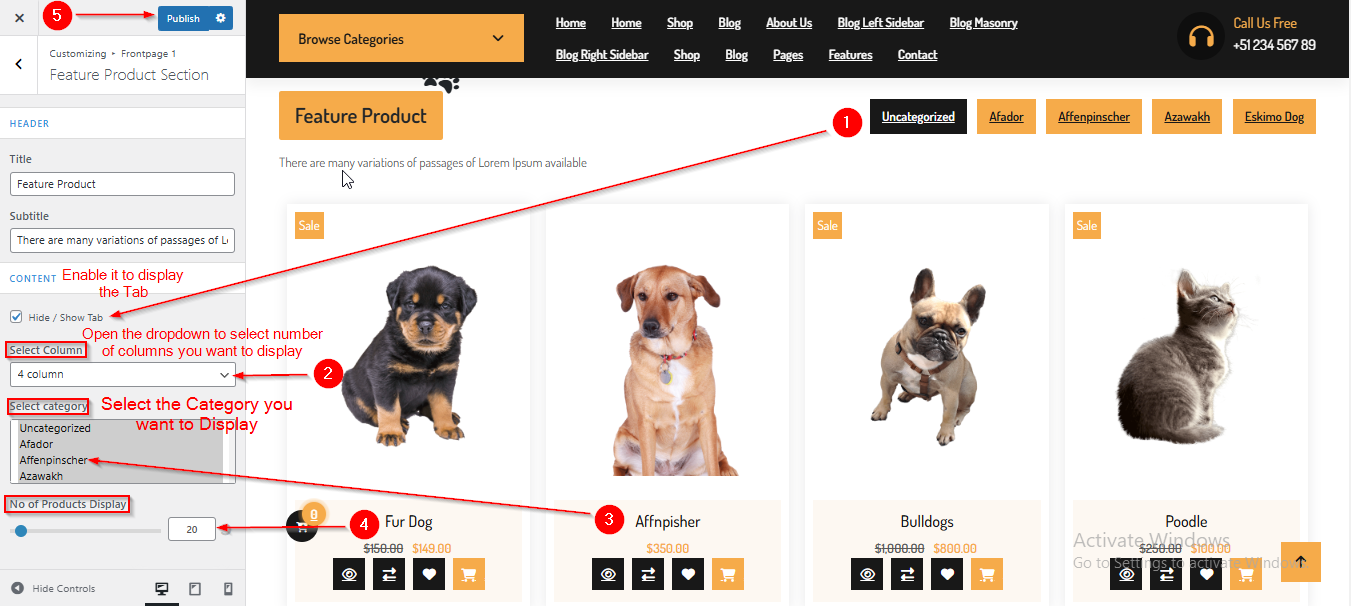
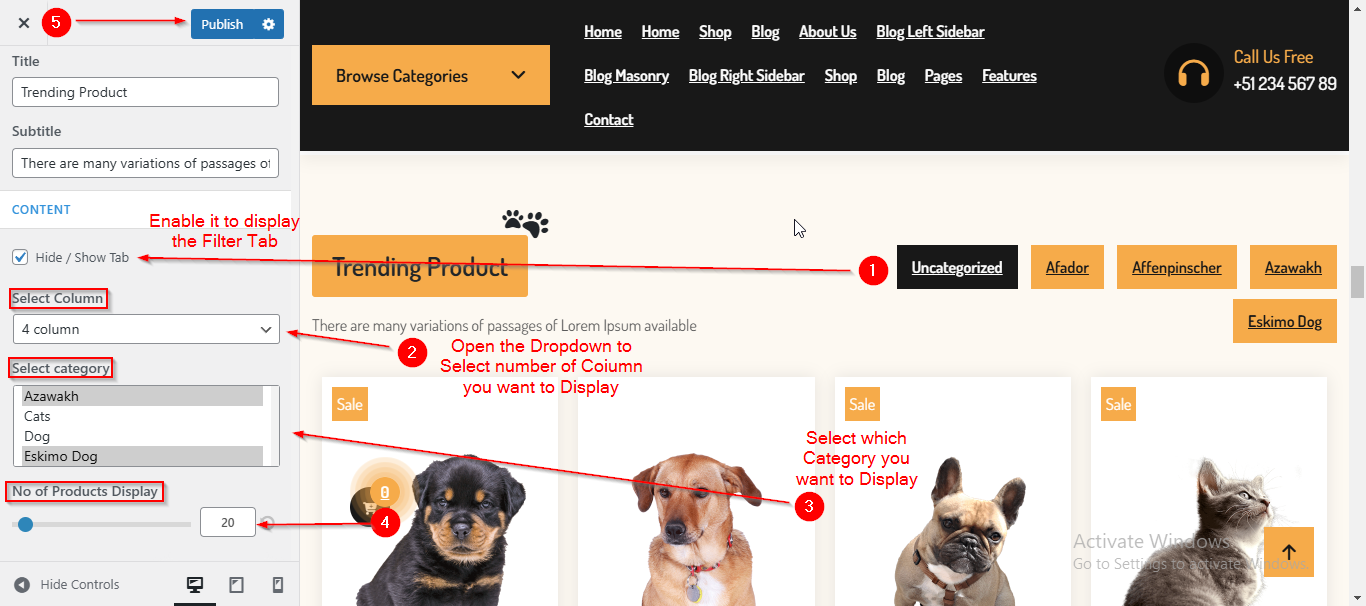
(7) How to manage the Select Column , Select category & No of Products Display in Feature Product Section ?
Before proceeding, ensure you're logged into your WordPress Dashboard.
To manage the Select Column , Select Category & No of Products Display in Feature Product Section, follow these steps:
- From the WordPress Dashboard, navigate to Appearance > Customize.
- On the Customizer page, go to Frontpage 1 > Feature Product Section.
- Once you have reached here you can manage the Select Column , Select Category & No. of Products Display.
- Click Publish when you're done.
Note : Ensure the checkbox labeled Hide/Show Tab is checked if you want to Enable the Filter Tab.
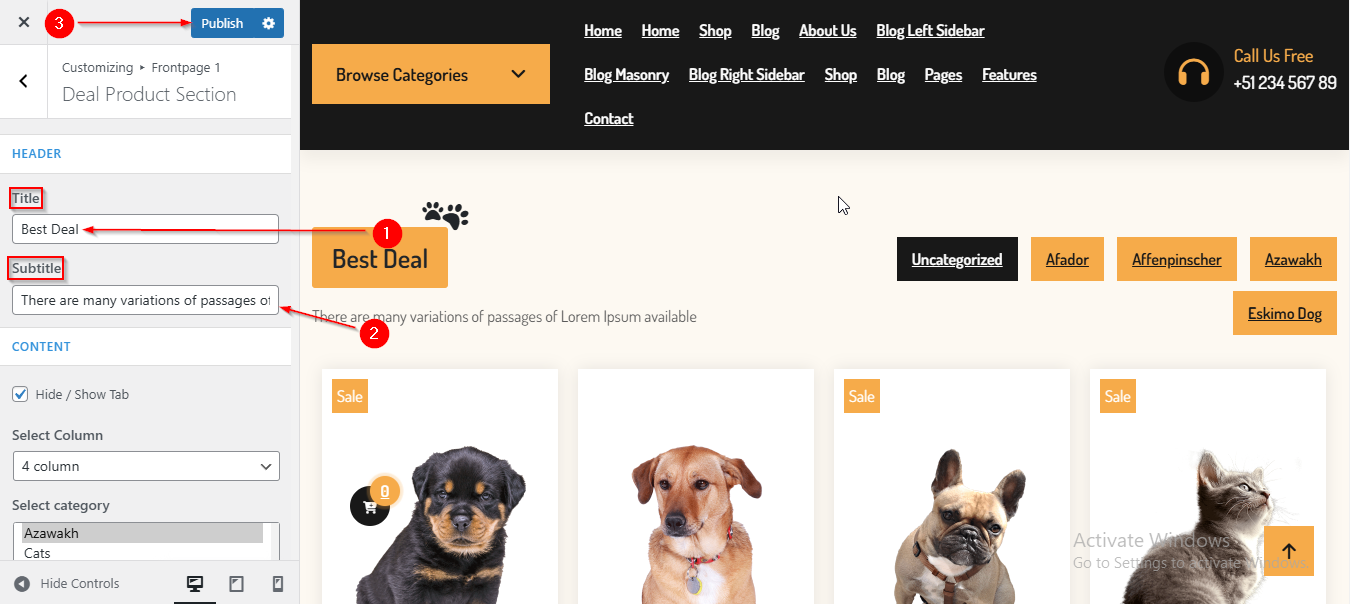
(8) How to manage the Section Title & Subtitle in Deal Product Section ?
Before proceeding, ensure you're logged into your WordPress Dashboard.
To manage the Section Title & Subtitle in Deals Product Section, follow these steps:
- From the WordPress Dashboard, navigate to Appearance > Customize.
- On the Customizer page, go to Frontpage 1 > Deal Product Section.
- After reaching here you can manage the Section Title & Subtitle in Deals Product Section.
- Click Publish when you're done.
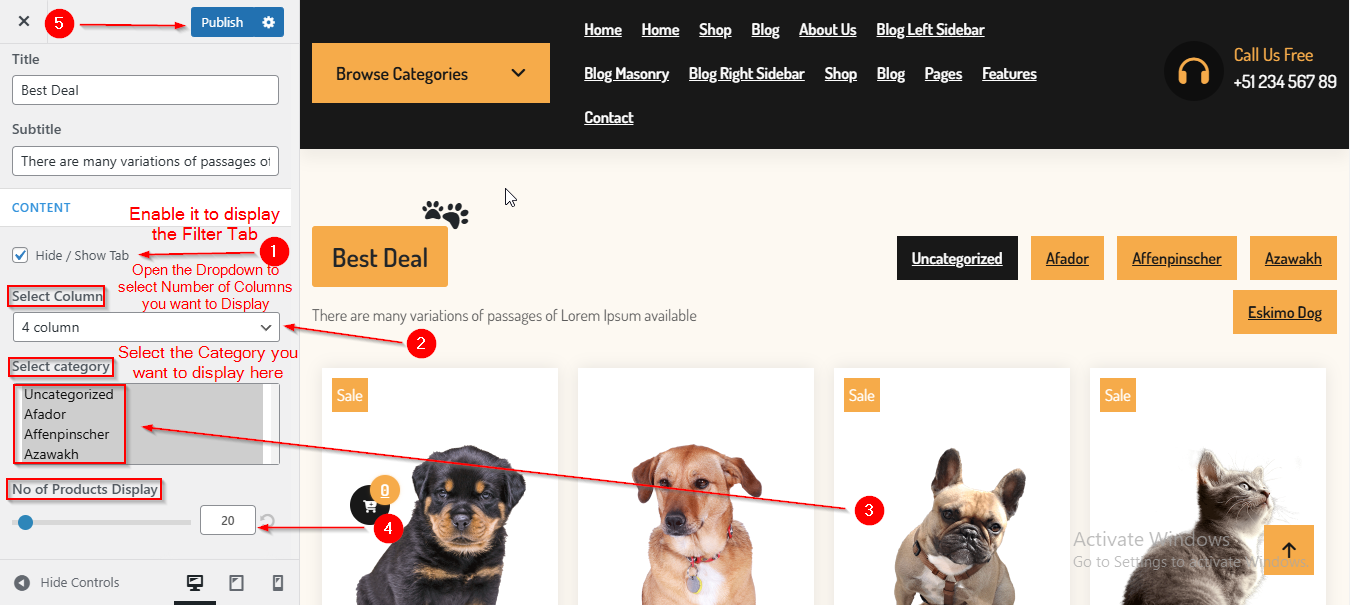
(9) How to manage the Select Column , Select category & No of Products Display in Deal Product Section ?
Before proceeding, ensure you're logged into your WordPress Dashboard.
To manage the Select Column , Select Category & No of Products Display in Deal Product Section, follow these steps:
- From the WordPress Dashboard, navigate to Appearance > Customize.
- On the Customizer page, go to Frontpage 1 > Deal Product Section.
- Once you have reached here you can manage the Select Column , Select Category & No. of Products Display.
- Click Publish when you're done.
Note : Ensure the checkbox labeled Hide/Show Tab is checked if you want to Enable the Filter Tab.
(10) How to manage the Banner Content in Banner Section ?
Before proceeding, ensure you're logged into your WordPress Dashboard.
To manage the Banner Content in Banner Section, follow these steps:
- From the WordPress Dashboard, navigate to Appearance > Customize.
- On the Customizer page, go to Frontpage 1 > Banner Section.
- Open the Banner toggle to manage the Banner content such as Title , Subtitle , Button Label & Image.
- Click Publish when you're done.
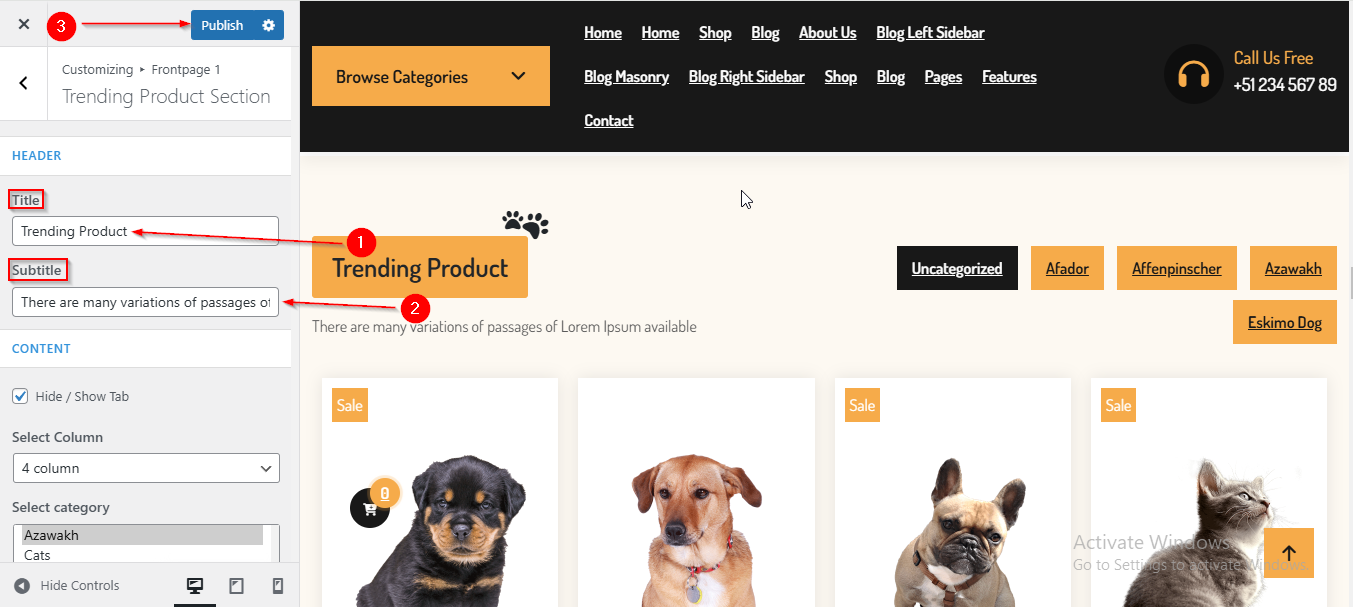
(11) How to manage the Section Title & Subtitle in Trending Product Section ?
Before proceeding, ensure you're logged into your WordPress Dashboard.
To manage the Section Title & Subtitle in Trending Product Section, follow these steps:
- From the WordPress Dashboard, navigate to Appearance > Customize.
- On the Customizer page, go to Frontpage 1 > Trending Product Section.
- After reaching here you can manage the Section Title & Subtitle.
- Click Publish when you're done.
(12) How to manage the Select Column , Select category & No of Products Display in Trending Product Section ?
Before proceeding, ensure you're logged into your WordPress Dashboard.
To manage the Select Column , Select Category & No of Products Display in Trending Product Section, follow these steps:
- From the WordPress Dashboard, navigate to Appearance > Customize.
- On the Customizer page, go to Frontpage 1 > Trending Product Section.
- Once you have reached here you can manage the Select Column , Select Category & No. of Products Display.
- Click Publish when you're done.
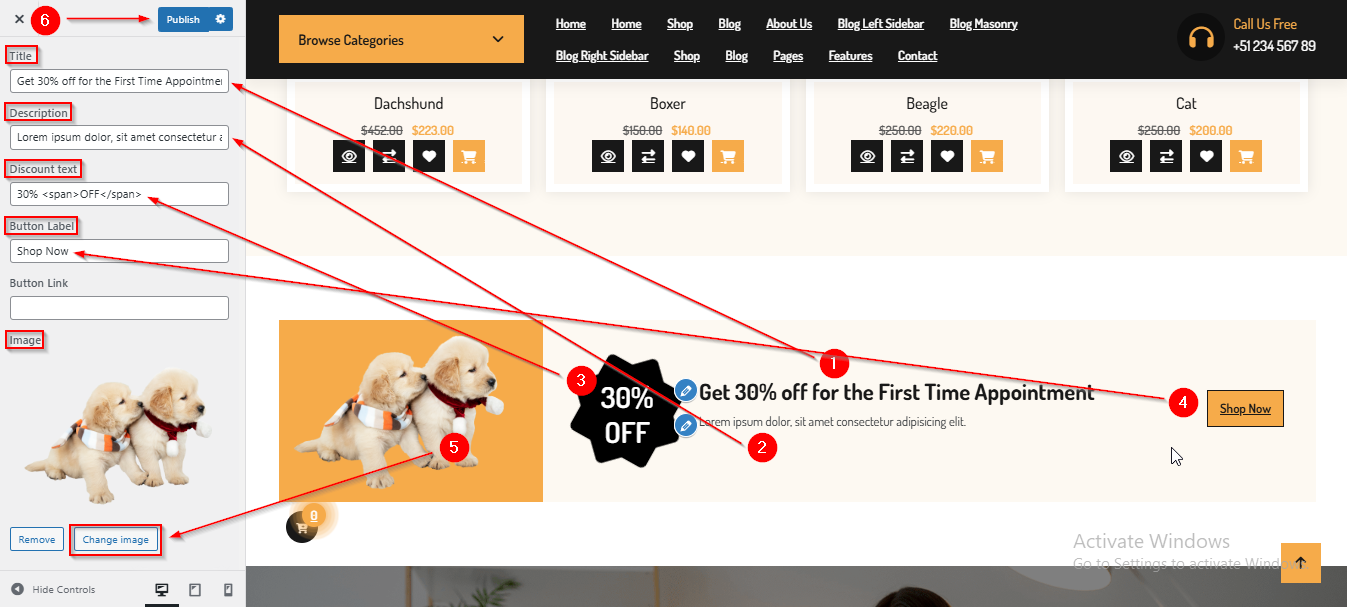
(13) How to manage the Call To Action content in Call To Action Section ?
Before proceeding, ensure you're logged into your WordPress Dashboard.
To manage the Call To Action content in Call To Action Section, follow these steps:
- From the WordPress Dashboard, navigate to Appearance > Customize.
- On the Customizer page, go to Frontpage 1 > Call To Action Section.
- Here you can manage the Call To Action content such as Title , Description , Discount text , Button Label & Image
- Click Publish when you're done.
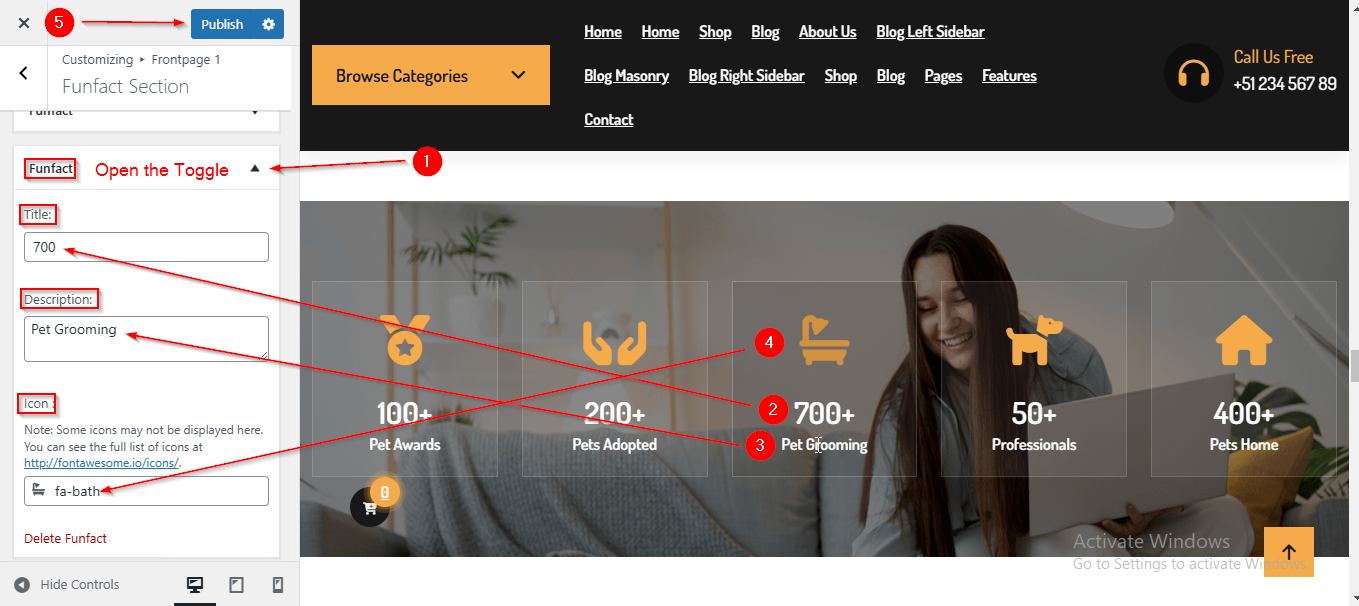
(14) How to manage the Funfact content in Funfact Section ?
Before proceeding, ensure you're logged into your WordPress Dashboard.
To manage the Funfact content in Funfact Section, follow these steps:
- From the WordPress Dashboard, navigate to Appearance > Customize.
- On the Customizer page, go to Frontpage 1 > Funfact Section.
- Open the Funfact toggle to manage the Funfact content such as Title , Description & Icon
- Click Publish when you're done.
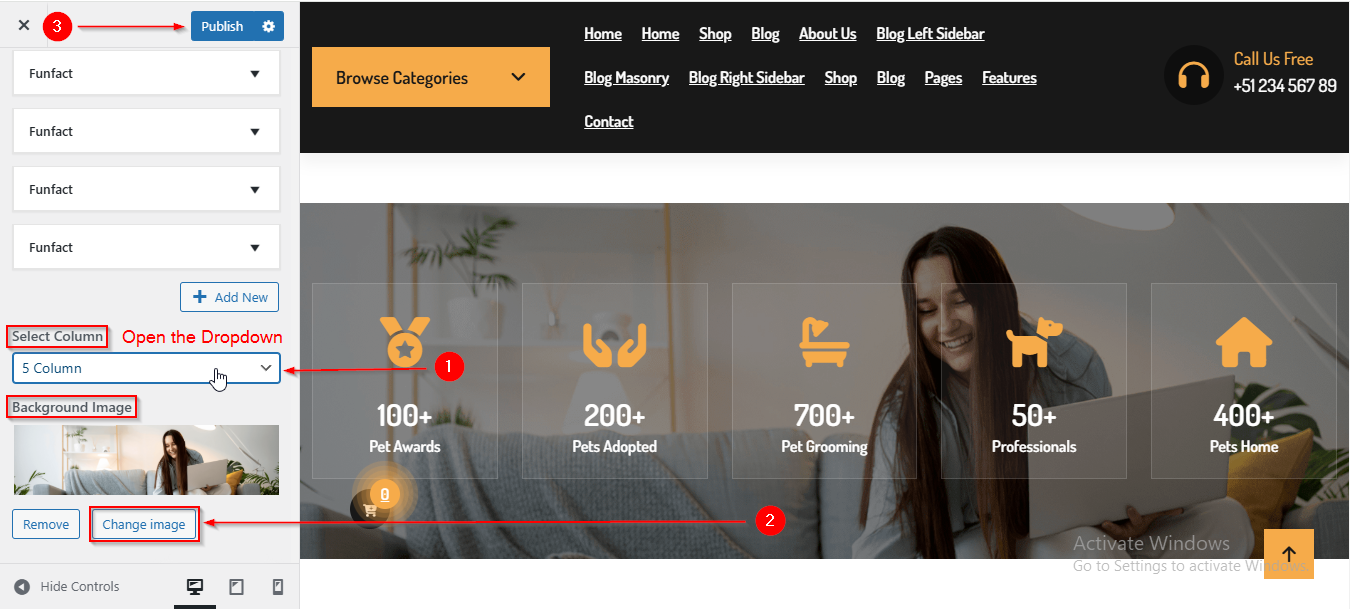
(15) How to manage the Column and Background Image in Funfact Section ?
Before proceeding, ensure you're logged into your WordPress Dashboard.
To manage the Column and Background Image in Funfact Section, follow these steps:
- From the WordPress Dashboard, navigate to Appearance > Customize.
- On the Customizer page, go to Frontpage 1 > Funfact Section.
- Scroll down until you see the Select Column & Background Image option.
- From here you can manage the Column and Background Image.
- Click Publish when you're done.
(16) How to manage the Background Image in Work Process Section ?
Before proceeding, ensure you're logged into your WordPress Dashboard.
To manage the Background Image in Work Process Section, follow these steps:
- From the WordPress Dashboard, navigate to Appearance > Customize.
- On the Customizer page, go to Frontpage 1 > Work Process Section.
- Here from the Background Image option you can manage the Background Image.
- Click Publish when you're done.

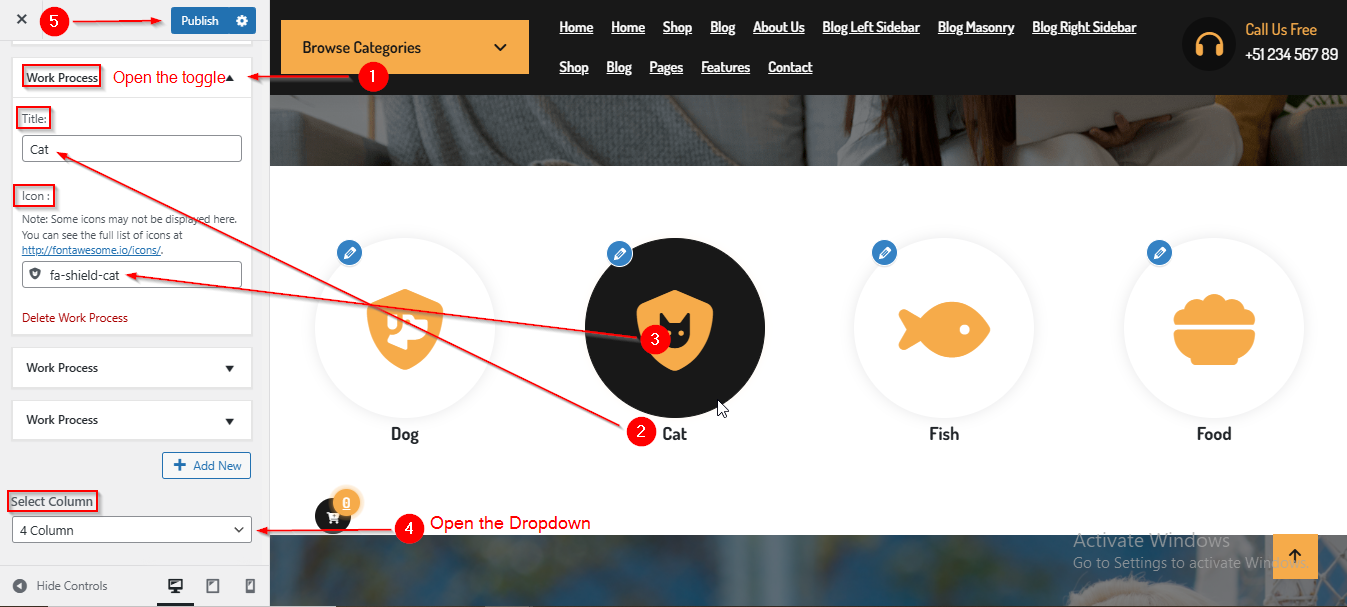
(17) How to manage the Work Process content and Columns in Work Process Section ?
Before proceeding, ensure you're logged into your WordPress Dashboard.
To manage the Work Process content and Columns in Work Process Section, follow these steps:
- From the WordPress Dashboard, navigate to Appearance > Customize.
- On the Customizer page, go to Frontpage 1 > Work Process Section.
- Open the Work Process toggle to manage the Work Process content such as Title & Icon.
- Below the Work Process toggles, you will find the Select Column dropdown to manage the number of columns.
- Click Publish when you're done.
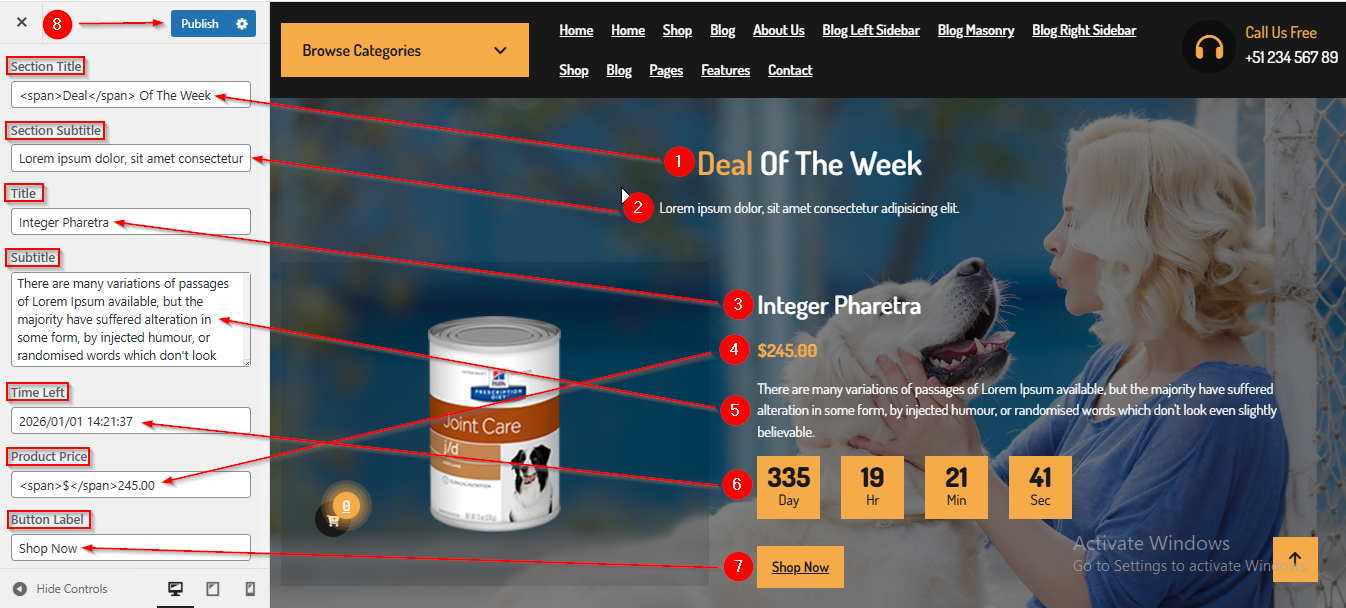
(18) How to manage the Week Deal Content in Week Deal Section ?
Before proceeding, ensure you're logged into your WordPress Dashboard.
To manage the Week Deal Content in Week Deal Section, follow these steps:
- From the WordPress Dashboard, navigate to Appearance > Customize.
- On the Customizer page, go to Frontpage 1 > Week Deal Section.
- From here you can manage the Week Deal Content such as Section Title , Section Subtitle , Title , Subtitle , Time Left , Product Price and Button Label.
- Click Publish when you're done.
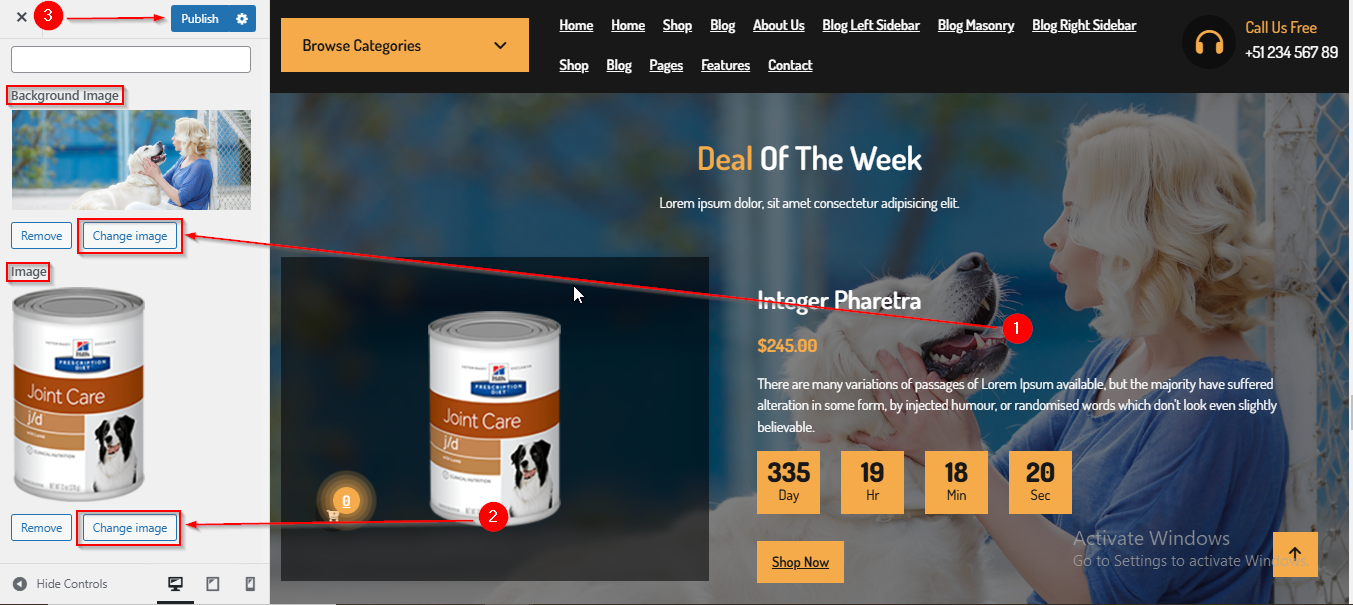
(19) How to manage the Background Image and Image in Week Deal Section ?
Before proceeding, ensure you're logged into your WordPress Dashboard.
To manage the Background Image and Image in Week Deal Section, follow these steps:
- From the WordPress Dashboard, navigate to Appearance > Customize.
- On the Customizer page, go to Frontpage 1 > Week Deal Section.
- Scroll down until you see the Background Image and Image option.
- From here you can manage the Background Image and Image.
- Click Publish when you're done.
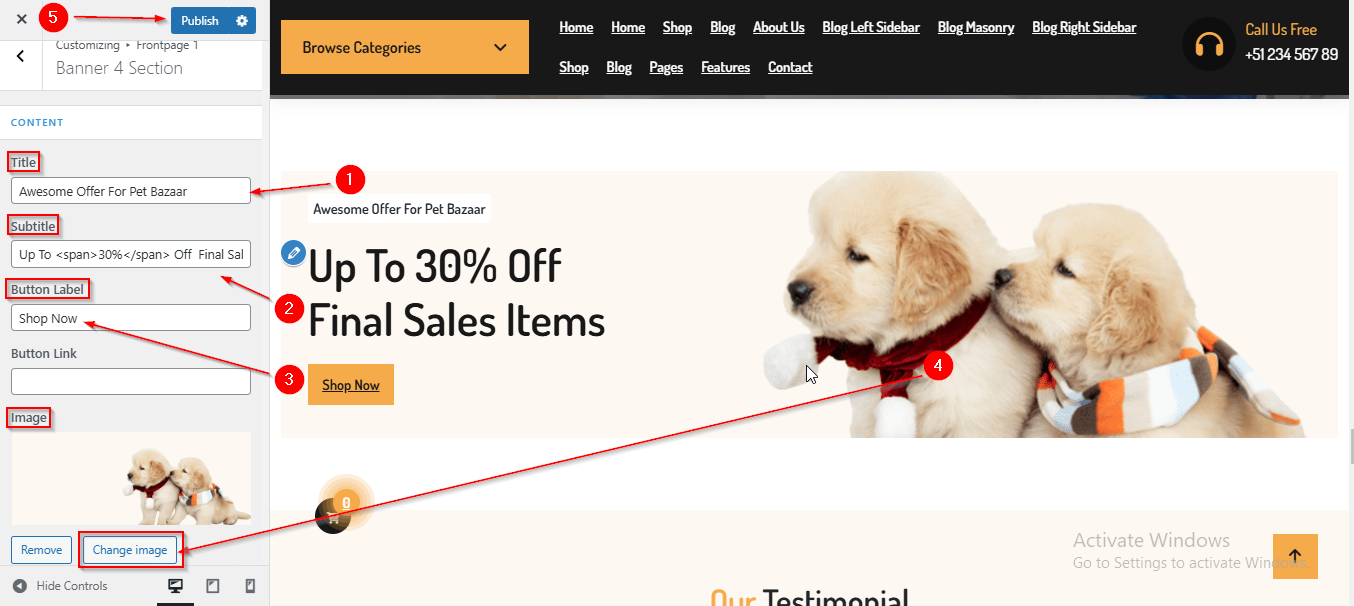
(20) How to manage the Banner 4 content in Banner 4 Section ?
Before proceeding, ensure you're logged into your WordPress Dashboard.
To manage the Banner 4 content in Banner 4 Section, follow these steps:
- From the WordPress Dashboard, navigate to Appearance > Customize.
- On the Customizer page, go to Frontpage 1 > Banner 4 Section.
- From here you can manage the Banner 4 content such as Title , Subtitle , Button Label and Image.
- Click Publish when you're done.
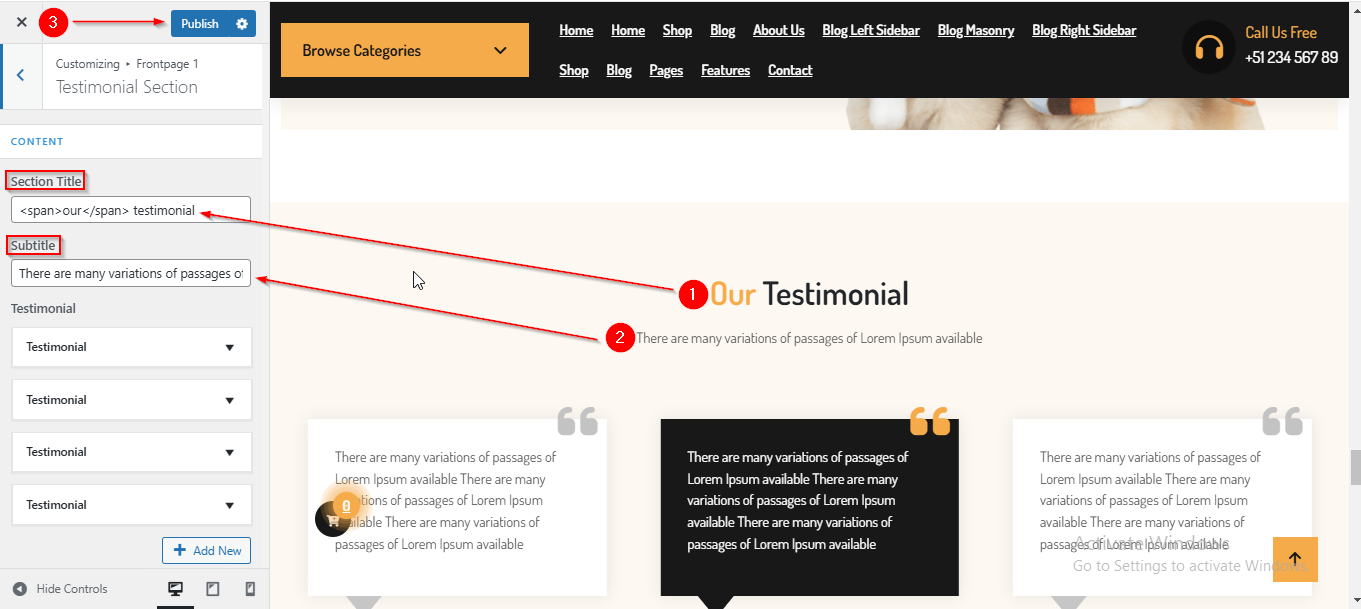
(21) How to manage Section title and Subtitle in Testimonial Section ?
Before proceeding, ensure you're logged into your WordPress Dashboard.
To manage the Section title and Subtitle in Testimonial Section, follow these steps:
- From the WordPress Dashboard, navigate to Appearance > Customize.
- On the Customizer page, go to Frontpage 1 > Testimonial Section.
- After reaching here you can manage the Section title and Subtitle.
- Click Publish when you're done.
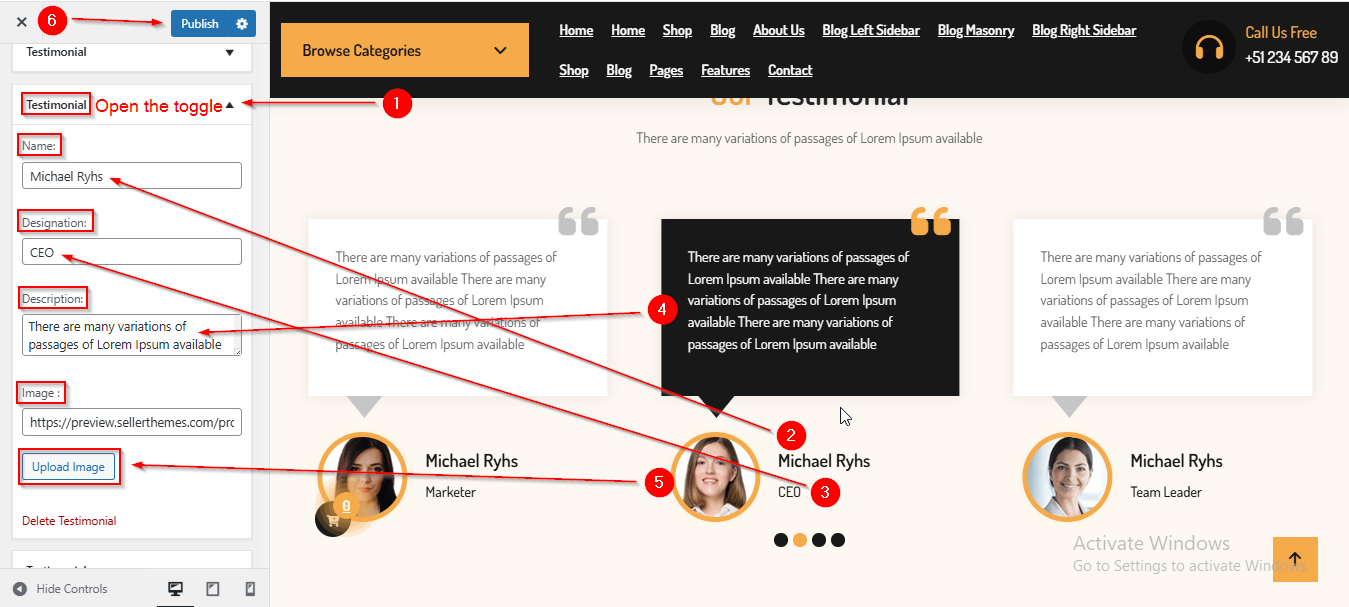
(22) How to manage the Testimonial content in Testimonial Section ?
Before proceeding, ensure you're logged into your WordPress Dashboard.
To manage the Testimonial content in Testimonial Section, follow these steps:
- From the WordPress Dashboard, navigate to Appearance > Customize.
- On the Customizer page, go to Frontpage 1 > Testimonial Section.
- Open the Testimonial toggle to manage the Testimonial content such as Name , Designation , Description & Image.
- Click Publish when you're done.
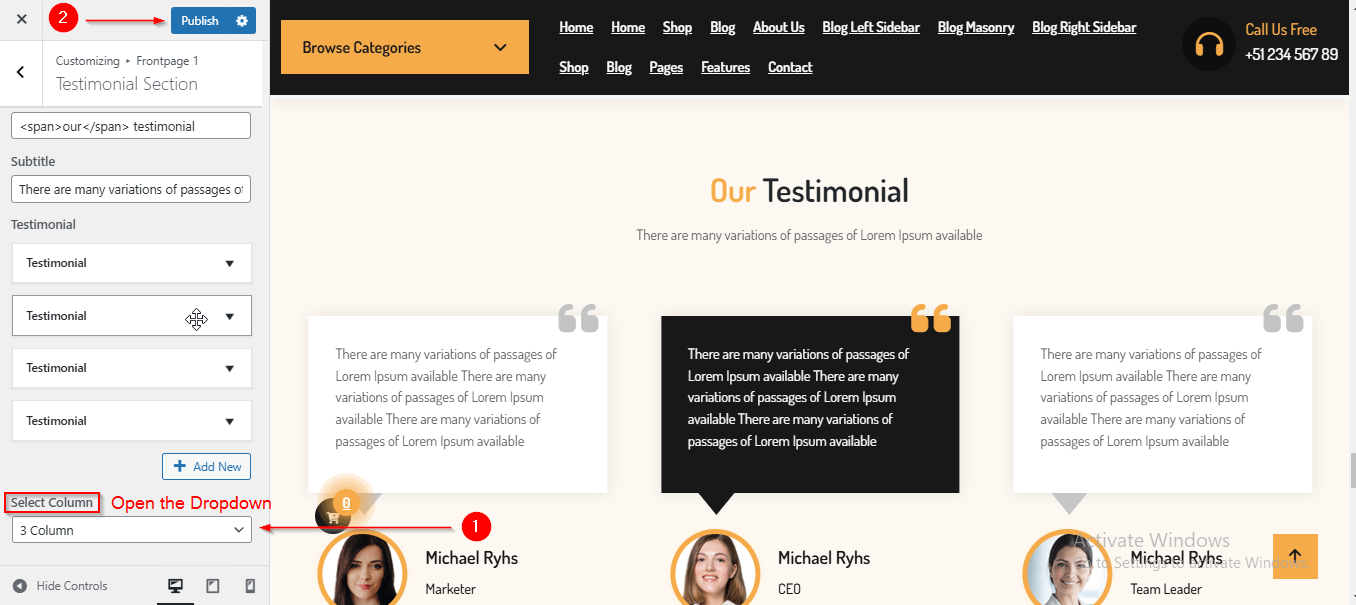
(23) How to manage the Column in Testimonial Section ?
Before proceeding, ensure you're logged into your WordPress Dashboard.
To manage the Column in Testimonial Section, follow these steps:
- From the WordPress Dashboard, navigate to Appearance > Customize.
- On the Customizer page, go to Frontpage 1 > Testimonial Section.
- Scroll down until you see the Select Column dropdown to manage the Columns .
- Click Publish when you're done.
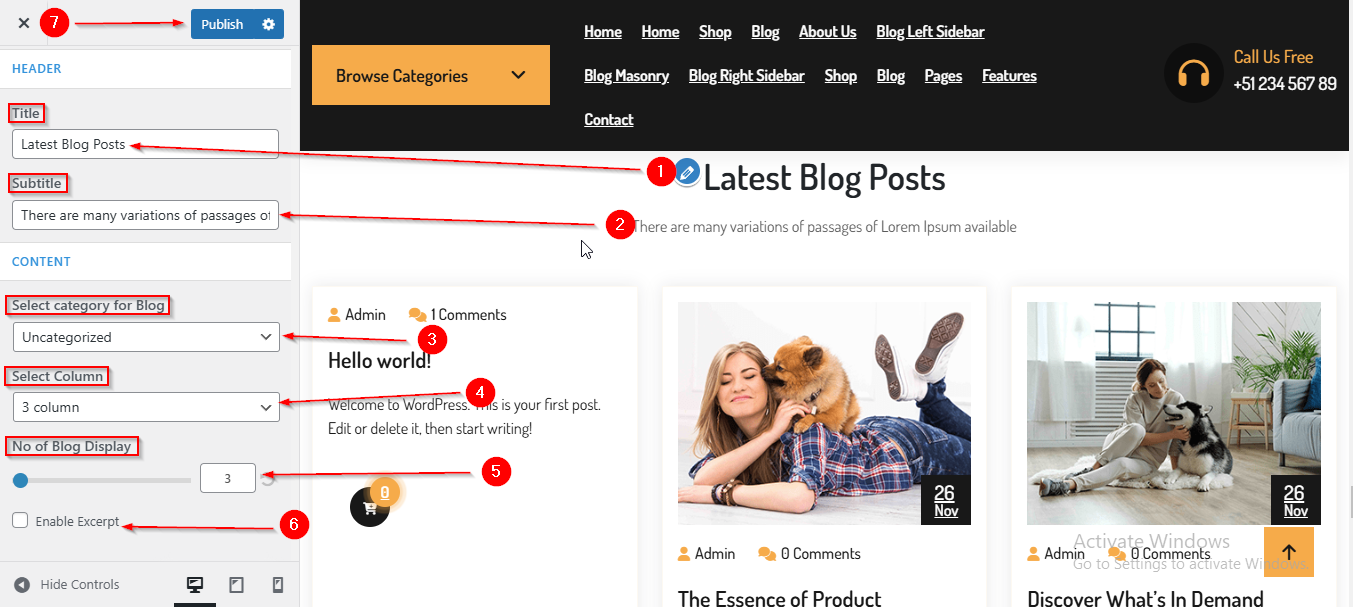
(24) How to manage the Blog Content in Blog Section ?
Before proceeding, ensure you're logged into your WordPress Dashboard.
To manage the Blog Content in Blog Section, follow these steps:
- From the WordPress Dashboard, navigate to Appearance > Customize.
- On the Customizer page, go to Frontpage 1 > Blog Section.
- After reaching here you can manage the Blog Content such as Section Title , Subtitle ,Select Category for Blog , Select Column , No of Blog Display & Enable Excerpt.
- Click Publish when you're done.
Important: Before you can manage the blog section, you need to have blog posts created. If you haven’t created any blog posts yet, please follow this guide : https://sellerthemes.ticksy.com/article/20412/
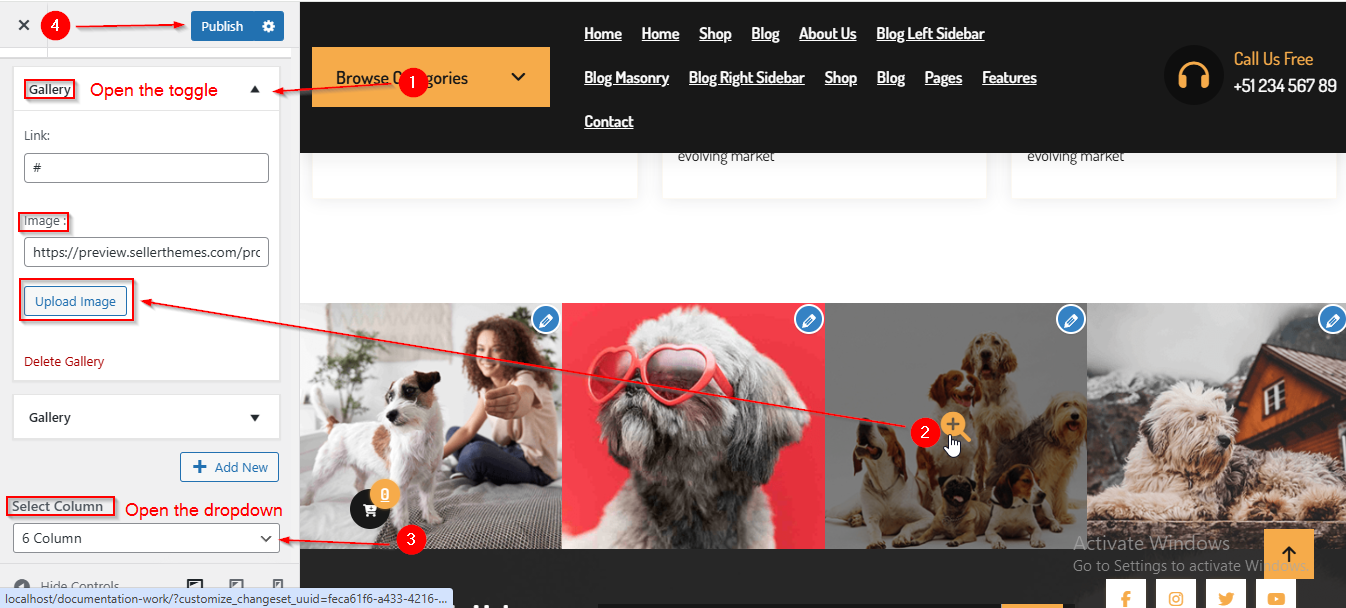
(25) How to manage the Gallery Image and Column in Gallery Section ?
Before proceeding, ensure you're logged into your WordPress Dashboard.
To manage the Gallery Image and Column in Gallery Section, follow these steps:
- From the WordPress Dashboard, navigate to Appearance > Customize.
- On the Customizer page, go to Frontpage 1 > Gallery Section.
- Open the Gallery toggle to manage the Gallery Image.
- Below the Gallery toggles, you will find the Select Column dropdown to manage the number of columns.
- Click Publish when you're done.