
Pet Bazaar Pro Header Setup
In this article, you’ll learn how to set up and customize the Header Section of the Pet Bazaar Pro theme, This guide will help you configure these settings to align with your site’s branding and functionality needs.
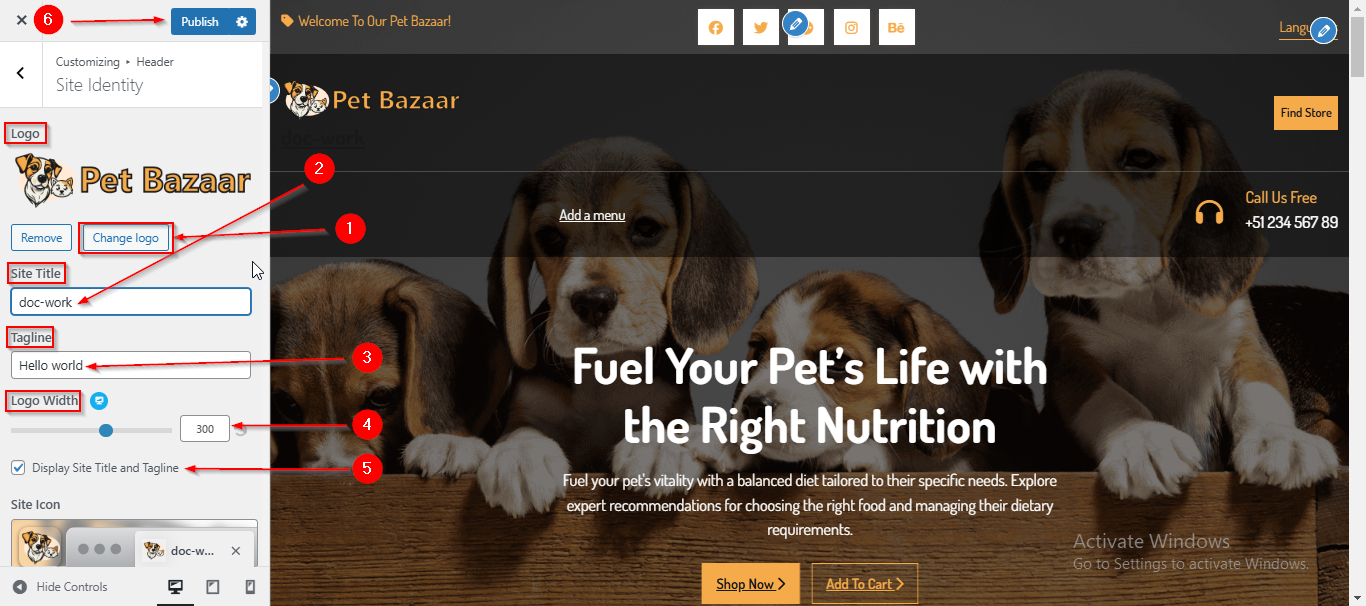
(1) How to manage the Logo, Site Title , Tagline and Logo width in the Header Section ?
Before proceeding, ensure you're logged into your WordPress Dashboard.
To manage the Logo, Site Title, Tagline and Logo Width in the Header Section, follow these steps:
- From the WordPress Dashboard, navigate to Appearance > Customize.
- On the Customizer page, go to Header > Site Identity.
- Here, you can manage the Logo, Site Title , Tagline and Logo Width.
- Click Publish when you’re done.
Note : Ensure the checkbox labeled Display Site Title and Tagline is checked if you want to display the Site Title and Tagline.
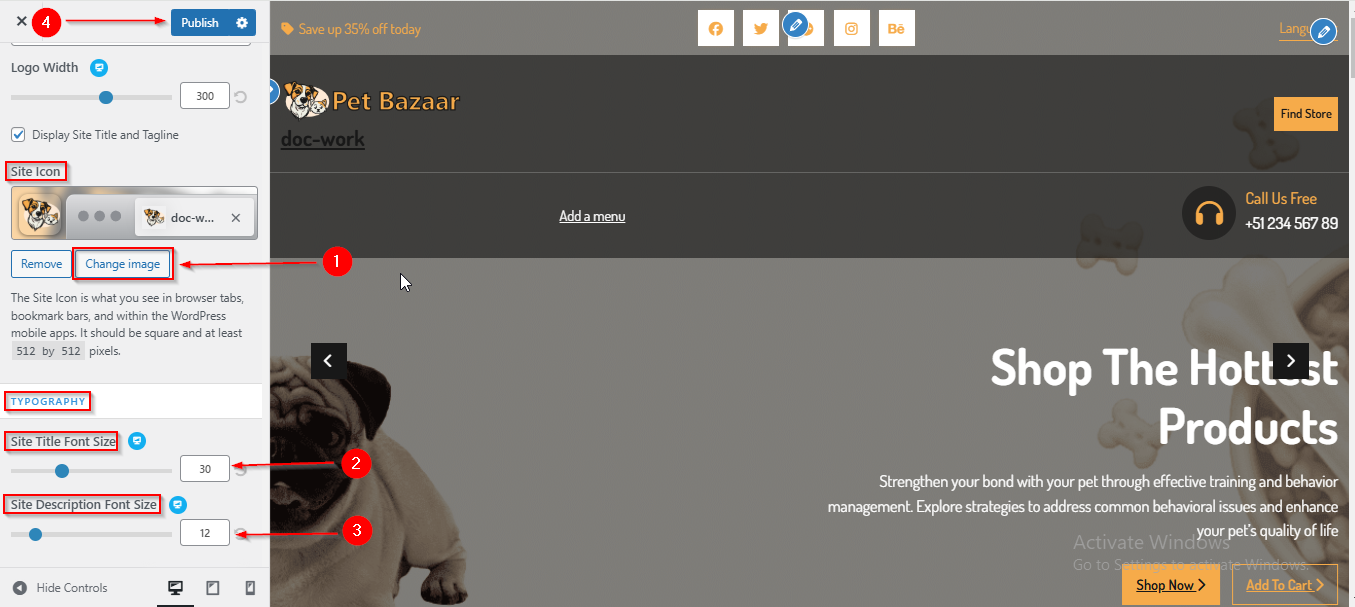
(2) How to manage the Site Icon, Site Title, and Site Description Font Size in the Header Section ?
Before proceeding, ensure you're logged into your WordPress Dashboard.
To manage the Site Icon, Site Title, and Site Description Font size in the Header Section, follow these steps:
- From the WordPress Dashboard, navigate to Appearance > Customize.
- On the Customizer page, go to Header > Site Identity.
- Scroll down to the Site Icon section to manage the Site Icon.
- For the Site Title and Description, scroll to the TYPOGRAPHY section below the Site Icon, where you can adjust the Font Size.
- Click Publish when you're done.
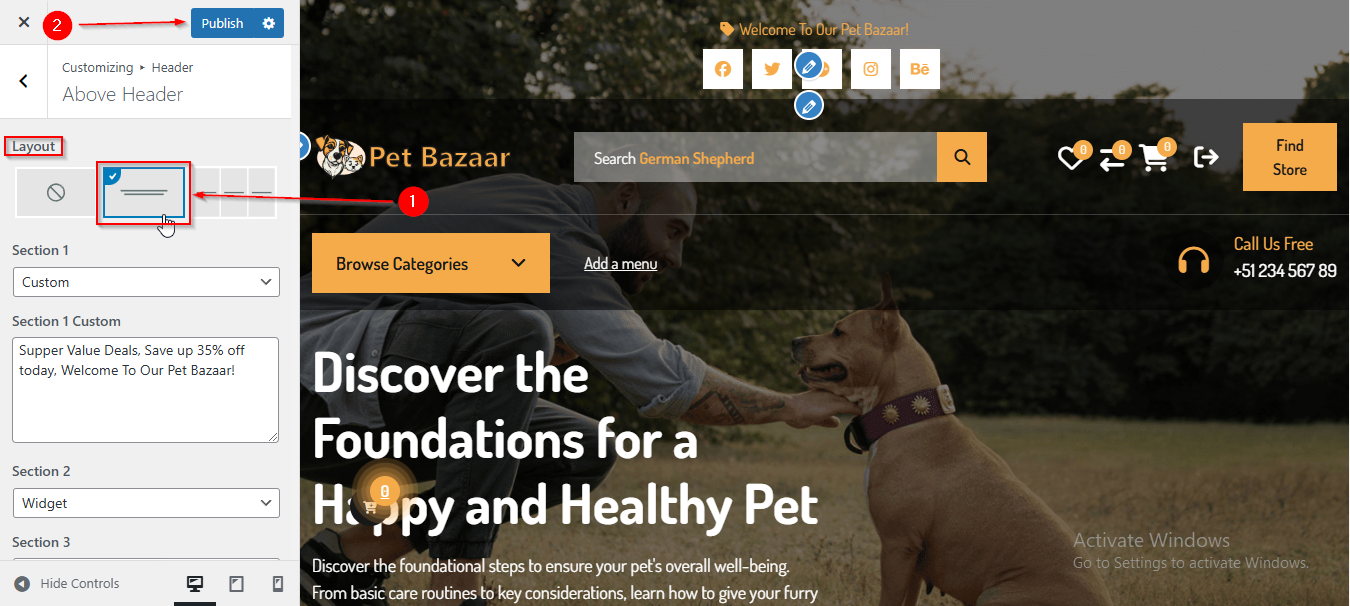
(3) How to manage the Above Header Layout in Header Section ?
Before proceeding, ensure you're logged into your WordPress Dashboard.
To manage the Above Header Layout in the Header Section, follow these steps:
- From the WordPress Dashboard, navigate to Appearance > Customize.
- On the Customizer page, go to Header > Above Header.
- From here, you can choose the layout for your Above Header.
- Click Publish when you're done.
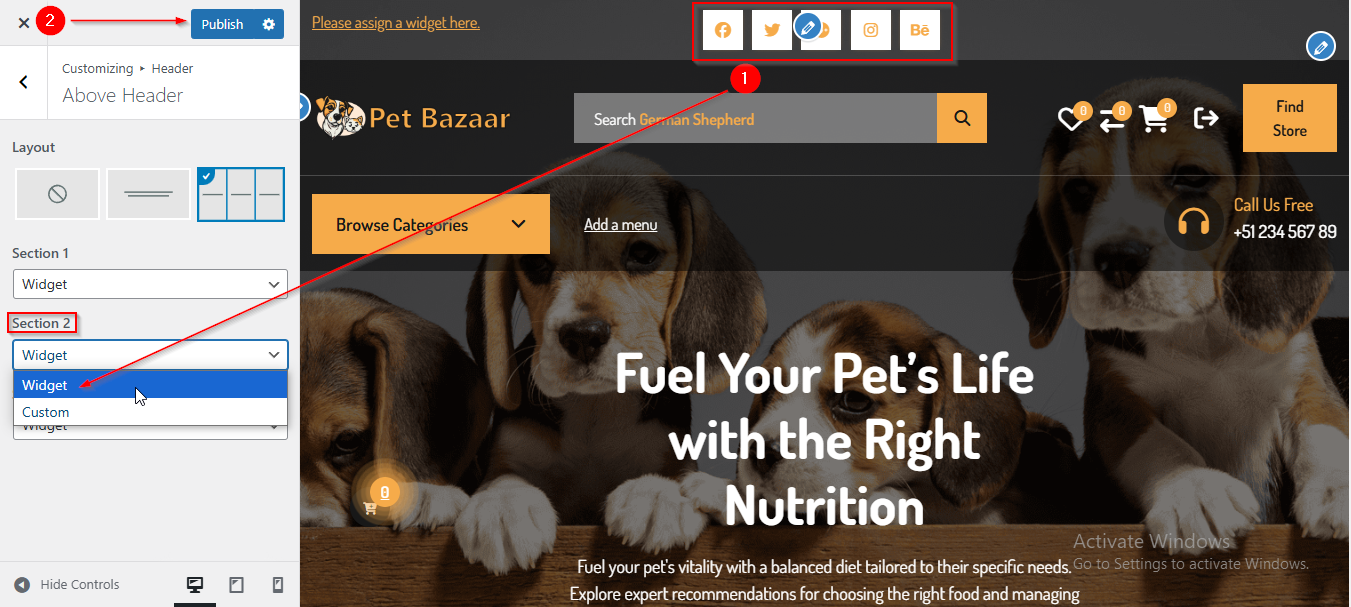
(4) How to manage the Above Header Sections in Header Section ?
The Above Header Sections offer two options for customization. You can either choose Widget, allowing you to add a widget to these sections, or select Custom, which enables you to insert your own custom content. Below, we’ll guide you through both methods step by step.
(a) Managing Above Header Sections by Selecting Widget
Before proceeding, ensure you're logged into your WordPress Dashboard.
To manage the Above Header Sections by selecting Widgets in the Header Section, follow these steps:
- From the WordPress Dashboard, navigate to Appearance > Customize.
- On the Customizer page, go to Header > Above Header.
- You will see all three Above Header Sections available for management, labeled as Section 1, Section 2, and Section 3.
- Open the dropdown menu under each section and select Widget.
- The widget you’ve added to the Header Widget Area will now appear in the Above Header Section.
- Click Publish when you're done.
Note : If you haven’t already added Widgets to the Header Widget Areas, they won’t appear in the Above Header Sections. Ensure you’ve added the widgets first. If you need guidance on how to manage widgets, please refer to our article on :
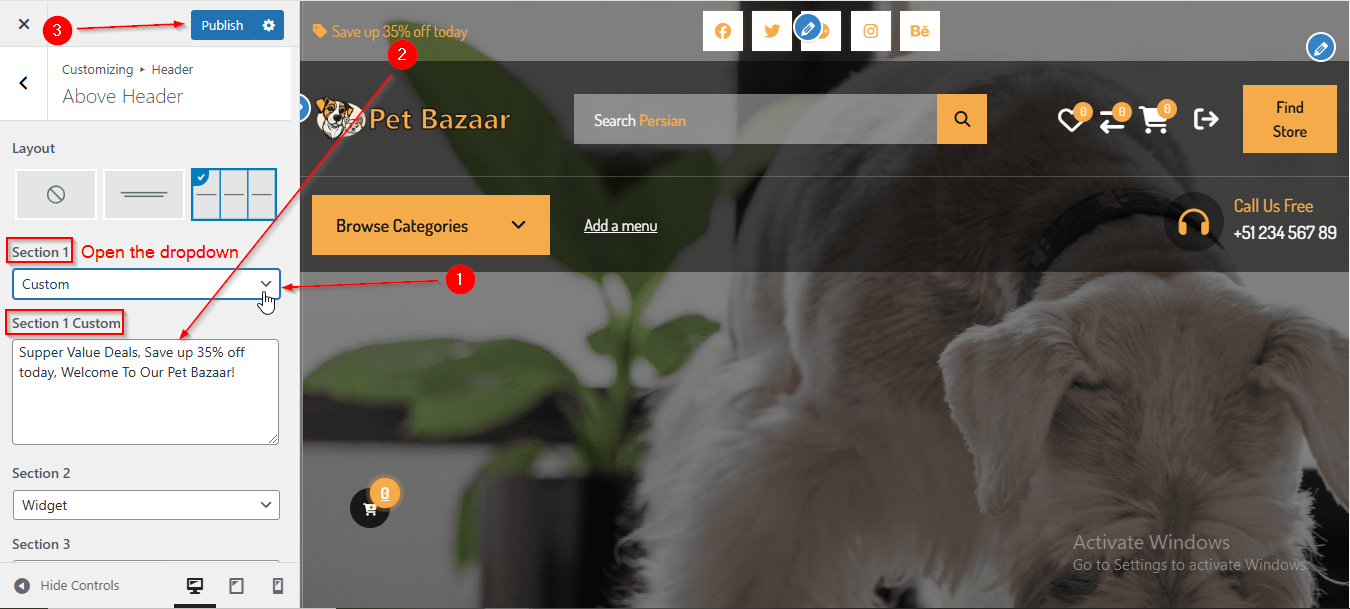
(b) Managing Above Header Sections by Selecting Custom
Before proceeding, ensure you're logged into your WordPress Dashboard.
To manage the Above Header Sections by selecting Custom in the Header Section, follow these steps:
- From the WordPress Dashboard, navigate to Appearance > Customize.
- On the Customizer page, go to Header > Above Header.
- You will see all three Above Header Sections available for management, labeled as Section 1, Section 2, and Section 3.
- Open the dropdown menu under each section and select Widget.
- A text box named Section 1 Custom will appear, where you can add your own custom content.
- Click Publish when you're done.
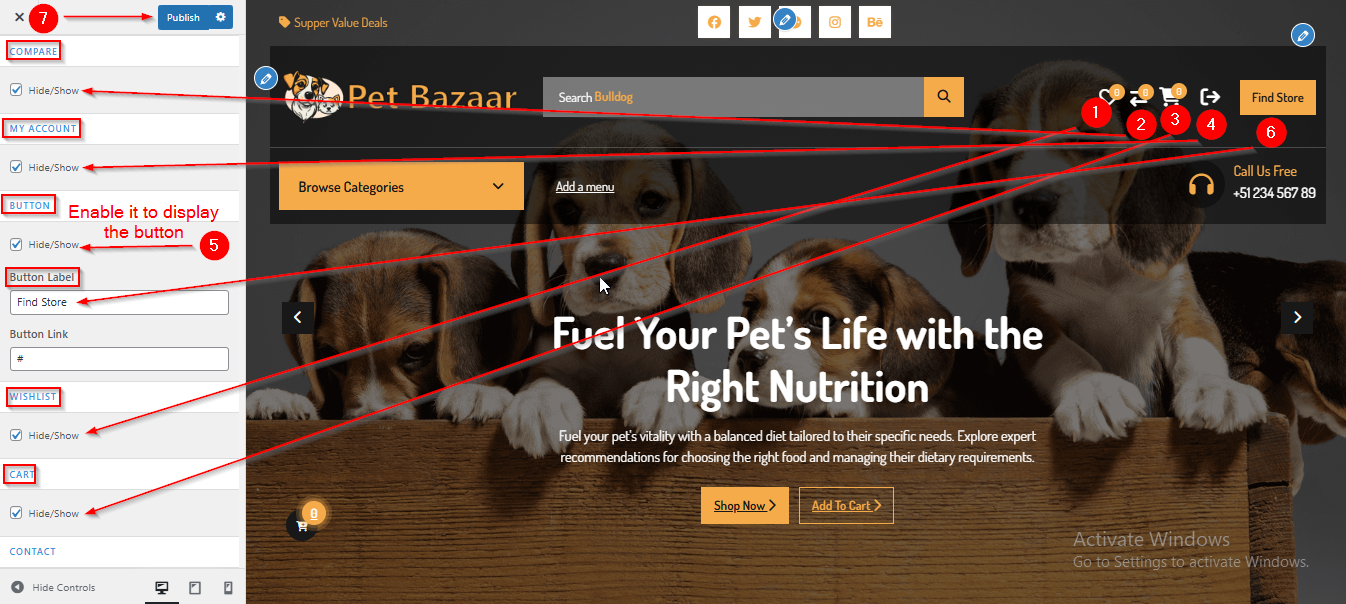
(5) How to manage the Header Navigation Icons & Button in Header Section ?
Before proceeding, ensure you're logged into your WordPress Dashboard.
To manage the Header Navigation Icons & Button in the Header Section, follow these steps:
- From the WordPress Dashboard, navigate to Appearance > Customize.
- On the Customizer page, go to Header > Header Navigation.
- Here, you can manage the Header Navigation Icons such as COMPARE , MY ACCOUNT , BUTTON , WISHLIST , CART & CONTACT by enabling or disabling them using the Hide/Show checkbox.
- To manage the Header Navigation Button, first enable the Hide/Show option, then enter your preferred button name in the Button Label field.
- Click Publish when you're done.
(6) How to manage the Contact Area contents in Header Navigation in Header Section ?
Before proceeding, ensure you're logged into your WordPress Dashboard.
To manage the Contact Area contents in Header Navigation in Header Section, follow these steps:
- From the WordPress Dashboard, navigate to Appearance > Customize.
- On the Customizer page, go to Header > Header Navigation.
- Scroll down until you see the CONTACT Section.
- From here you can manage the Contact Area contents such as Icon , Title & Text.
- Click Publish when you're done.

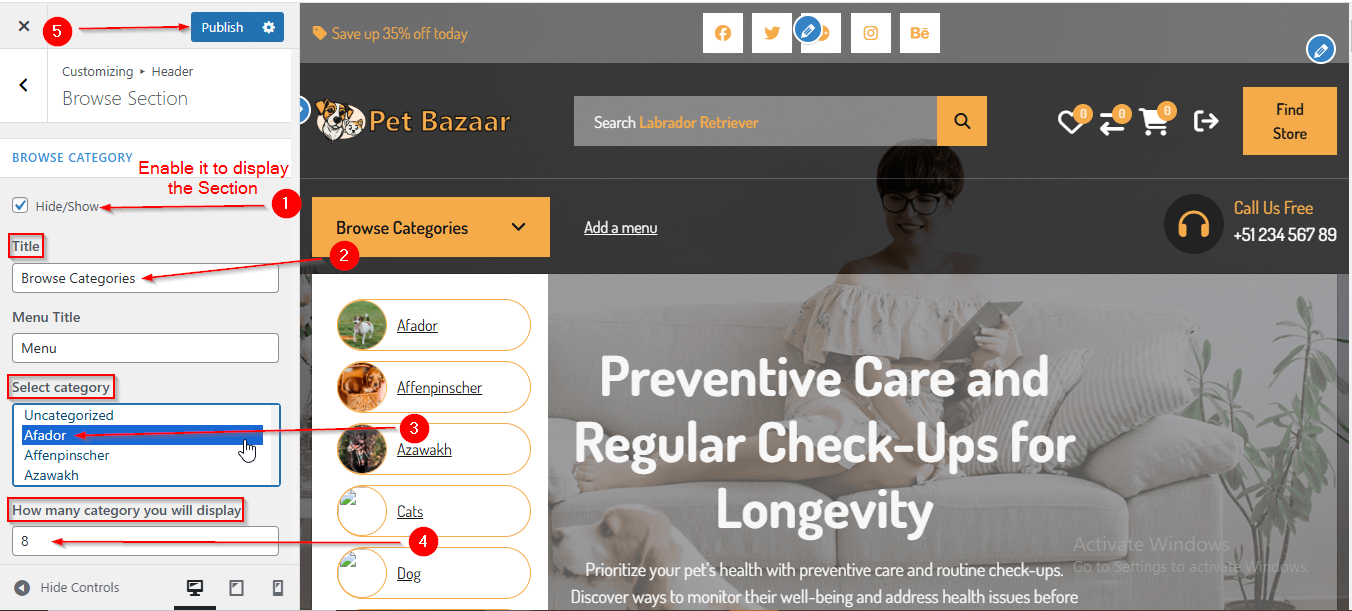
(7) How to manage the Browse Section Contents in Header Section ?
Before proceeding, ensure you're logged into your WordPress Dashboard.
To manage the Browse Section Contents in Header Navigation in Header Section, follow these steps:
- From the WordPress Dashboard, navigate to Appearance > Customize.
- On the Customizer page, go to Header > Browse Section.
- Here, you can manage the Browse Section Contents, such as the Title, Select Category, and the number of categories to display.
- Click Publish when you're done.
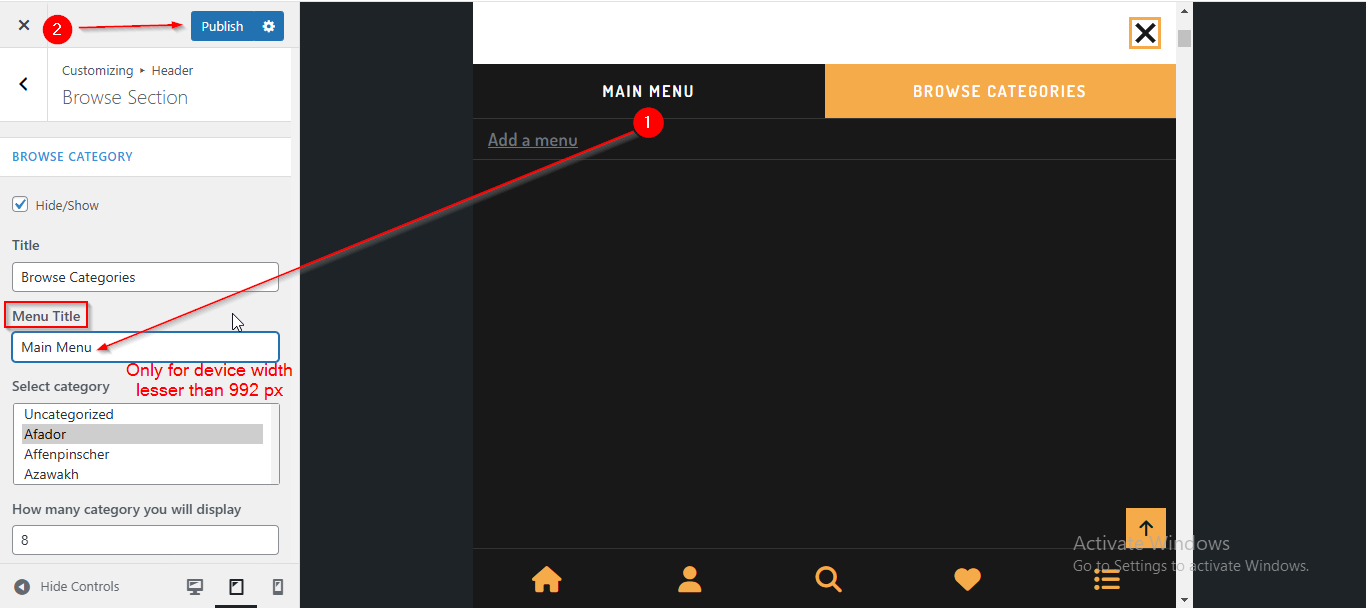
(8) How to manage the Menu Title in Header Section ?
Before proceeding, ensure you're logged into your WordPress Dashboard.
To manage the Menu Title in Header Section, follow these steps:
- From the WordPress Dashboard, navigate to Appearance > Customize.
- On the Customizer page, go to Header > Browse Section.
- Under Menu Title, you can manage the title as needed.
- Click Publish when you're done.
Note: This Menu Title setting will only apply to devices with a screen width smaller than 992px. On devices with a width of 992px or greater, the menu title will not be displayed.
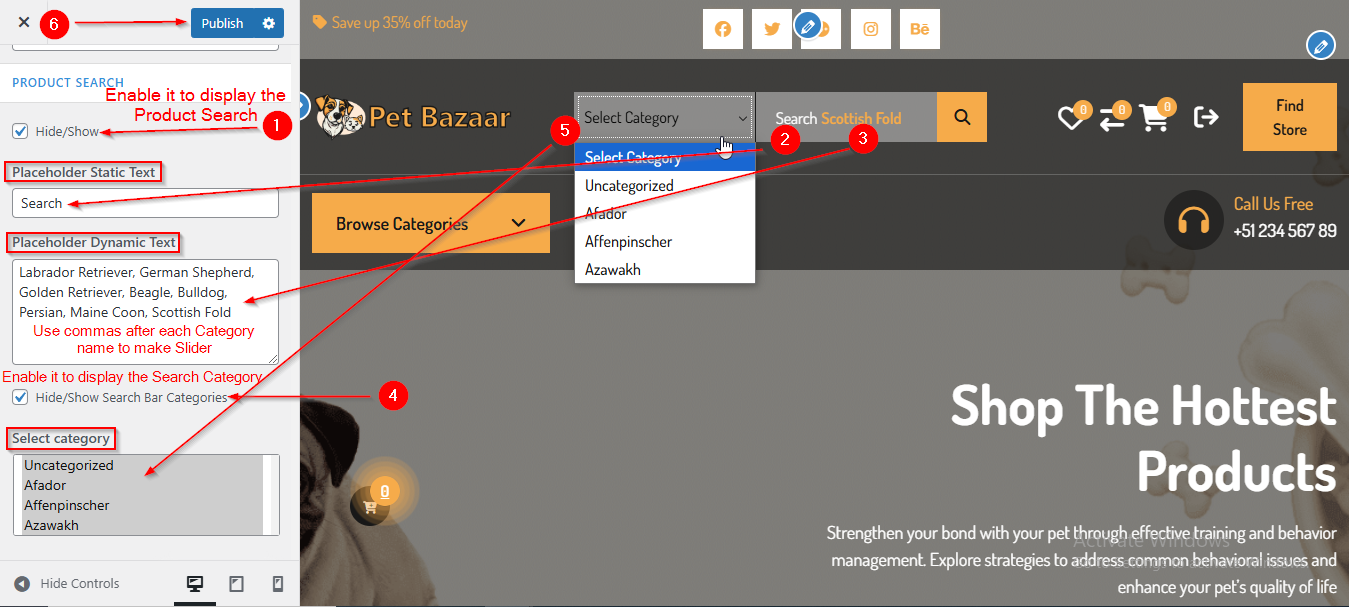
(9) How to manage the Product Search in Header Section ?
Before proceeding, ensure you're logged into your WordPress Dashboard.
To manage the Product Search in Header Section, follow these steps:
- From the WordPress Dashboard, navigate to Appearance > Customize.
- On the Customizer page, go to Header > Browse Section.
- Scroll down until you see the PRODUCT SEARCH heading.
- From here you can manage the Product Search content such as Placeholder Static Text,Placeholder Dynamic Text ,Slider and Select Category
- Use commas after each Category name to make a Slider in Product Search.
- Click Publish when you're done.
Note : Ensure the checkbox labeled Hide/Show is checked if you want to display the Search Bar and the Search Bar Category.
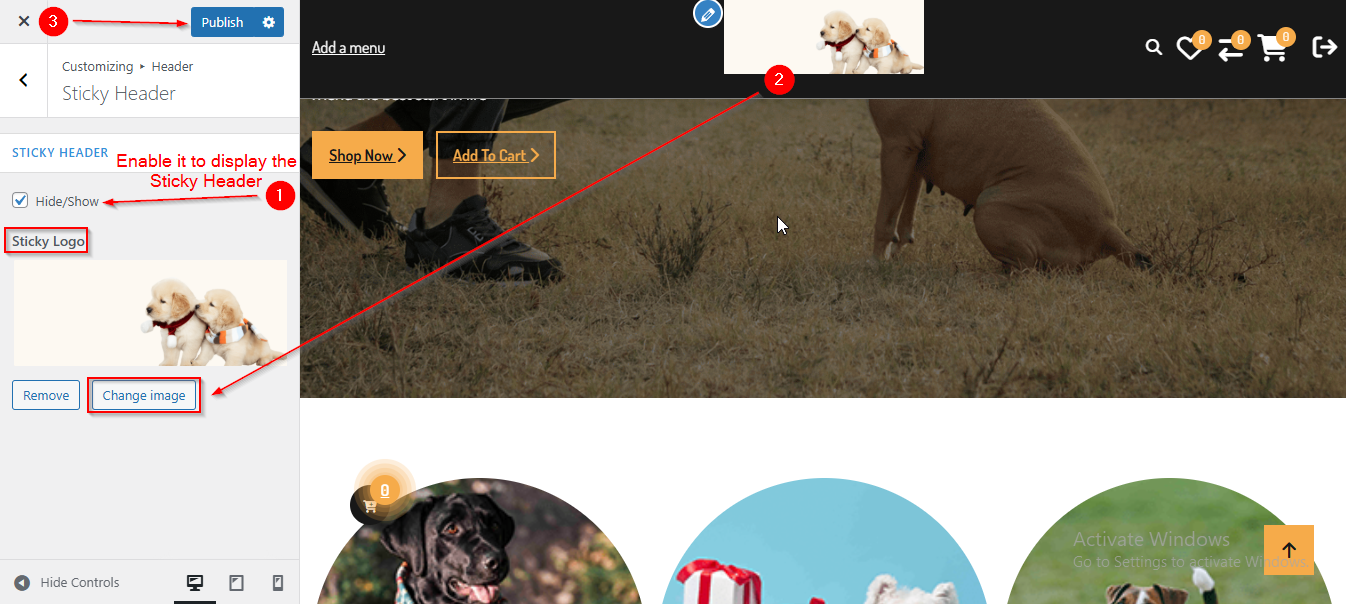
(10) How to manage the Sticky Header in Header Section ?
Before proceeding, ensure you're logged into your WordPress Dashboard.
To manage the Sticky Header in Header Section, follow these steps:
- From the WordPress Dashboard, navigate to Appearance > Customize.
- On the Customizer page, go to Header > Sticky Header.
- From here you can manage the Sticky Header by Enabling or Disabling the Chekckbox
- You can also add a Sticky Header Logo here; however, please note that the Sticky Header Logo is only available for Homepage 3, Homepage 4, and Homepage 5.
- Click Publish when you're done.